Admin and Flow Experience
Table of Contents
| Topic | Lab Type | Difficulty Level | Estimated length |
|---|---|---|---|
| Part 1: Introduction to the new Admin Experience | Exploration | EASY | 10 min |
| 1.1: Control Hub User Management Tasks | Activity | EASY | 10 min |
| 1.2: Contact Center User Configuration | Activity | EASY | 10 min |
| 1.3: Bulk Operations | Activity | EASY | 5 min |
| 1.4: Access to the Agent Desktop | Activity | EASY | 10 min |
| Part 2: Introduction to Flow Designer | Exploration | EASY | 10 min |
| 2.1: Configuring tenant for Call Delivery | Activity | EASY | 10 min |
| 2.2: Adding Callback functionality to the flows | Activity | EASY | 8 min |
| 2.3: Business Hours Configuration | Exploration | EASY | 8 min |
| Part 3: Introduction to Flow Debugger | Activity | EASY | 15 min |
| Part 4: Workflow in Outdial Entry Point | Activity | EASY | 15 min |
| Bonus: Experience Management | Exploration | EASY | 15 min |
| Bonus: Other Flow Enhancements | Exploration | EASY | 5 min |
Part 1: Introduction to the new Admin Experience
In this Lab, we will go through Admin UI by completing the tasks that are required for the general pre-configuration of a tenant. These tasks are to be undertaken by a customer administrator. By following each of the steps, you would have prepared your tenant to begin configuring different services offered by the platform. At the end of the lab, you should be able to log in to an agent interface with the configured user extension. You can do the tasks from the lab guide either on the Lab Tenant (you need to request access from the lab support team).
Objective
- This lab is designed to help you do the initial setup and configuration of the tenant.
- The lab contains multiple exercises on Control Hub (Admin Portal) to make you comfortable with the Webex Contact Center application.
Pre-requisites
(0) Lab Credentials and Attendee ID - Provided to you over email.
Please
submit the form below with your Attendee ID. All configuration items in the lab guide will be renamed with that prefix.
Create Chrome Profiles
-
For the lab, create new Chrome profiles so that you can login the Administrators, Agents and Supervisors using the same Browser.
- Select
Profileson Chrome - Select
Add Profile - Select
continue without an account - Give it a name .i.e
Admin - Click
done - Create 2 more profiles for
SupervisorandAgent
- Select
(2) Administrator access to Control Hub
Your Administrator ID is in the format
wxcclabs+admin_ID
(3) PSTN number (dialed number) registered on the Control Hub
This is sent over email as the DN (Dialed Number)
(4) The items listed below have been pre-configured for you:
- Agent and Supervisor user accounts are configured and ready for logins.
- You can access the Agent Desktop via the URL: https://desktop.wxcc-us1.cisco.com.
- As an agent, you’re associated with two teams—designated by your Attendee ID—as “Team1” and “Team2”.
Example:
If your attendee ID is 100:
100_Team1
100_Team2
(5) Agents will use browsers for voice calls using WebRTC (Web Real-time Communication) endpoints. Additionally, Webex Calling extensions have been assigned to users (both agents and supervisors) to facilitate alternate device experiences. Webex Contact Center agents and supervisors can opt for any mix of these devices, encompassing PSTN endpoints and mobile phones.
(6) A preset inbound Voice flow is available for test calls.
Quick Links
Control Hub: https://admin.webex.com
Agent Desktop: https://desktop.wxcc-us1.cisco.com\
Lab Section
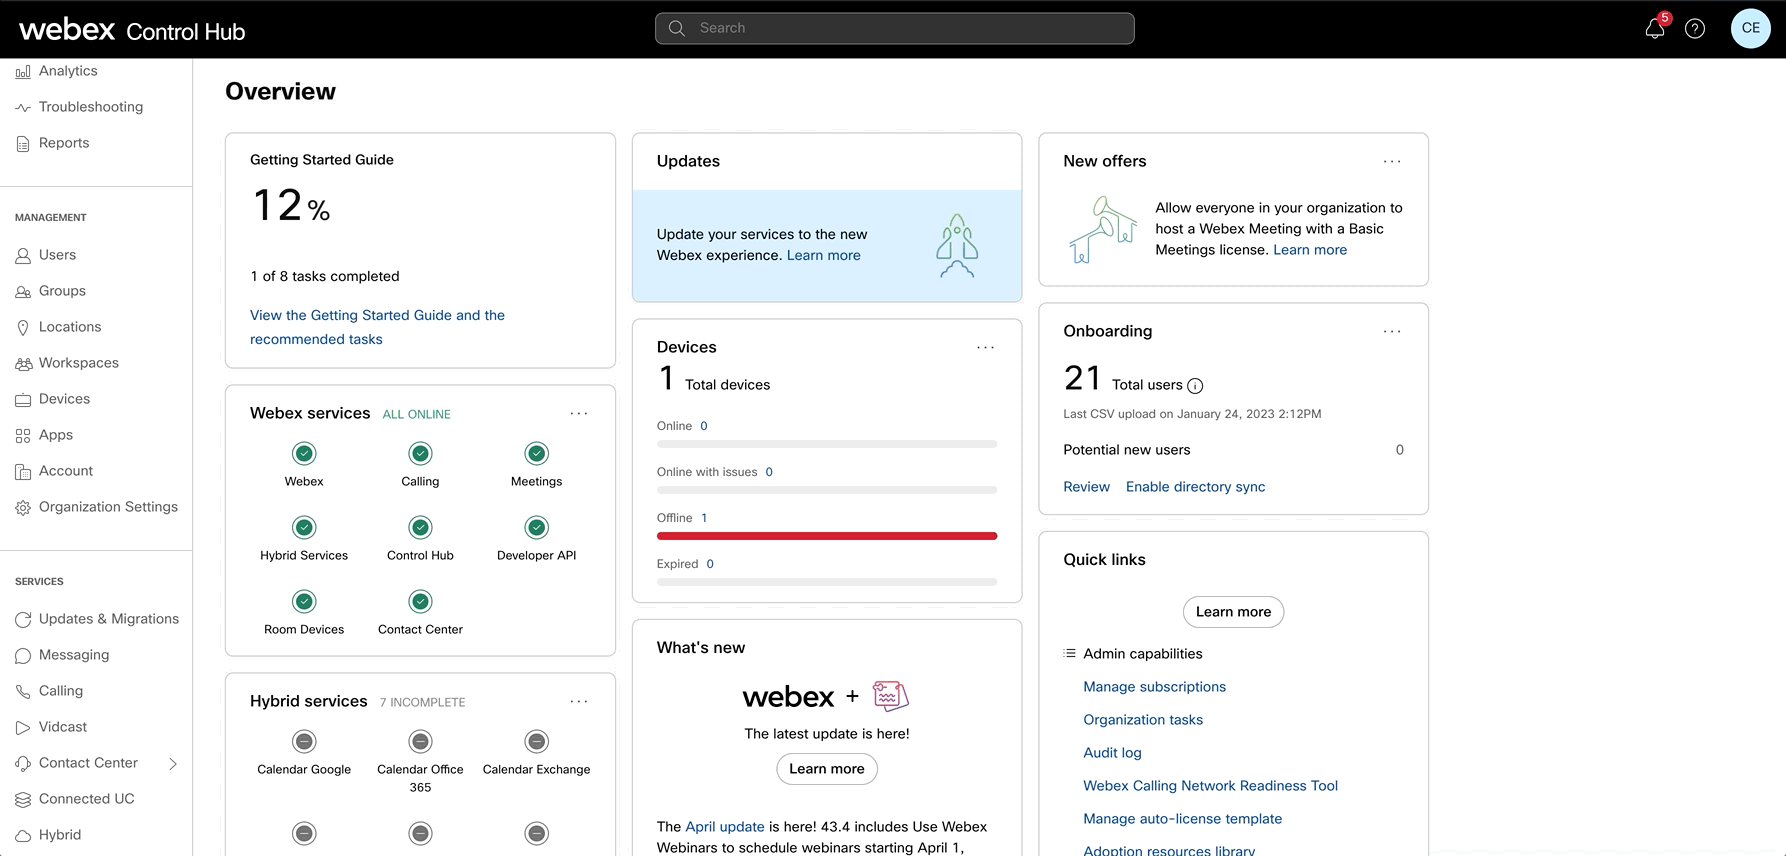
The overall aim of admin consolidation is to provide a single pane of glass (SPOG) experience for administrators so that admins need not have frequent context switch by having to traverse different applications.
The following steps outlines the new features of a new admin experience.
This introduces the new left navigation panel for Webex Contact Center in Control Hub as well as other configuration settings which were migrated from the Management Portal.
1.1: Control Hub User Management Tasks
The following section describes the process of managing different types of users. You will use the steps to add new users and verify the Calling extensions for Supervisors. While adding the user, we will see how to select user roles.
Note: Agents will use WebRTC endpoints (Desktop Telephony) > Supervisors will use Webex Calling App (as Telephony Device)
1. Verify the configuration parameters
The following Administration entities have been configured for you via Webex Control Hub.
Please note, that to proceed to the next section, you will need to use the accounts shown below.
| Entity | Name |
|---|---|
| Administrator | wxcclabs+admin_ID |
| Agent 1 | wxcclabs+agent_ID |
| Supervisor 1 | wxcclabs+supvr_ID |
| Desktop Profile | WebexOne Desktop Profile |
| Inbound EP | |
| Queue | |
| Team 1 | |
| Team 2 | |
| Site | |
| Multimedia Profile | |
| Outdial EP | WebexOne_Outdial_EP |
| Outdial ANI | WebexOneOutdial ANI |
| Address Book | WebexOne Address Book |
| Inbound Flow | QtoA_WebexOne_InboundFlow |
| Outbound Flow | WebexOne_OutdialFlow |
2. Verify agents, supervisors and telephony settings
-
Login to the Control Hub with the admin account.
-
In the left navigation pane go to Contact Center Users under Management and verify the below users:
| Entity | Name |
|---|---|
| Administrator | wxcclabs+admin_ID |
| Agent 1 | wxcclabs+agent_ID |
| Supervisor 1 | wxcclabs+supvr_ID |
- Verify the assigned licenses to these users
1.2: Contact Center User Configuration
The following section outlines how to verify the Site, Team, and Multimedia Profile that will be assigned to the Contact Center users. We will also learn how to navigate to the Webex Contact Center admin section and how to associate newly created Sites, Teams, and Multimedia Profiles with new users.
| Entity | Name |
|---|---|
| Multimedia Profiles | |
| Site | |
| Team1 |
NOTE: Here, the configuration is created with your Attendee ID and should be used as the prefix for all your configurations.
1. Verify the Multimedia Profile
-
Login with admin credentials to Control Hub by accessing https://admin.webex.com.
-
In the left pane navigate to Contact Center card.
-
Scroll down in the left navigation panel to the DESKTOP EXPERIENCE section and click on Multimedia Profiles.
-
Search for your MMP
attendeeId _MMP -
In the Media Details section, verify the Blended mode is selected and input
1for Voice,3for Chat,3for Email,3for Social
2. Verify the Site
-
Navigate to USER MANAGEMENT in the left navigation panel and select Sites.
-
Search for your
attendeeId _Site and veriy your MMP profile is selected
3. Verify the Teams
-
Navigate to Teams under the USER MANAGEMENT.
-
Search for your
attendeeId _Team1. -
Verify the Parent Site is selected as your assigned site
-
Verify the team type
Agent Based. -
Verify your Multimedia profile.
-
Verify the default value Global Layout is the Desktop layout
1.3: Bulk Operations
In this section you will learn how to use the Bulk Configuration in Control Hub by creating a third team. As an administrator, you can use Bulk Operations to create, modify, import, or export configuration objects in Webex Contact Center. This feature provides greater speed and efficiency to deploy and configure Webex Contact Center systems.
Bulk Operations are available for the following configuration object types:
| Entry Point | Auxiliary Code |
| Queue | Agent Profile |
| Outdial Entry Point | Address Book |
| Outdial Queue | Outdial ANI |
| Site | Skill Definition |
| Team | Skill Profile |
| Users | Entry Point Mappings |
| User Profiles | Audio Files |
| Work Types | Global Variable |
Create the third Team
-
Go to the Control Hub by accessing https://admin.webex.com.
-
In the left pane navigate to Contact Center card.
-
Select Bulk Operations in the Webex CC navigation pane from the left.
-
Click Create Bulk Operations button in the right upper corner.
-
In Step 1 select the configuration object Team in the drop-down list.
-
In the Export section enter the MyTeam as the file name and click Next button.
-
Once the task is Completed click on Download export file button under the Action and open the csv file in the notepad.
-
The first line is the headers, it is mandatory to have it during the import process. Remove all lines from the CSV file except the first line with headers and the second line with the team.
NAME,SITE,TYPE,MULTIMEDIA PROFILE,SKILL PROFILE,DN,CAPACITY,DESKTOP LAYOUT
###Proctor_Team,###_Site,AGENT,###_MMP,,,,Default Desktop Layout
- Rename the Proctor_Team to
attendeeId _Team3 and save the file. You should have only 2 rows in the file. Example:
NAME,SITE,TYPE,MULTIMEDIA PROFILE,SKILL PROFILE,DN,CAPACITY,DESKTOP LAYOUT
###_Team3,###_Site,AGENT,###_MMP,,,,Default Desktop Layout
-
Go back to the Bulk Operations menu and click Create Bulk Operations button again.
-
In step 1, select the Team configuration object from the drop-down list and import the CSV file by dragging it into the Import section.
-
Click Next button and wait the results. The status should be shown as Completed.
-
On Webex Control Hub, navigate to Teams under the USER MANAGEMENT tab and verify that the
attendeeId _Team3 is created.
1.4: Access to the Agent Desktop
We will now log in to the Agent Desktop with your credentials and use Desktop (WebRTC) as the telephony device.
Note: Please use Google Chrome as the browser to take advantage of the all new WebRTC Voice Option.
1. Download and Login in the Webex app for PC or Mac
For the supervisor user, Lab Tenant you would need Webex app for placing calls to Entry Point and sign in as supervisor.
- Download the Webex app from https://www.webex.com/downloads.html.
-
Install the application on your PC/Mac.
-
Open Webex app and сlick Sign In. Specify the supervisor credentials.
2. Agent Desktop Login
Note: To log in to the agent desktop, we will use Chrome profiles so that we can use the same browser for Admins, Agents and Supervisors without clearing the cache.
-
Here is how you create a Chrome profile so you can login the Agent on the same browser
- Select
Profileson Chrome - Select
Add Profile - Select
continue without an account - Give it a name .i.e
supervisor - Click
done
- Select
-
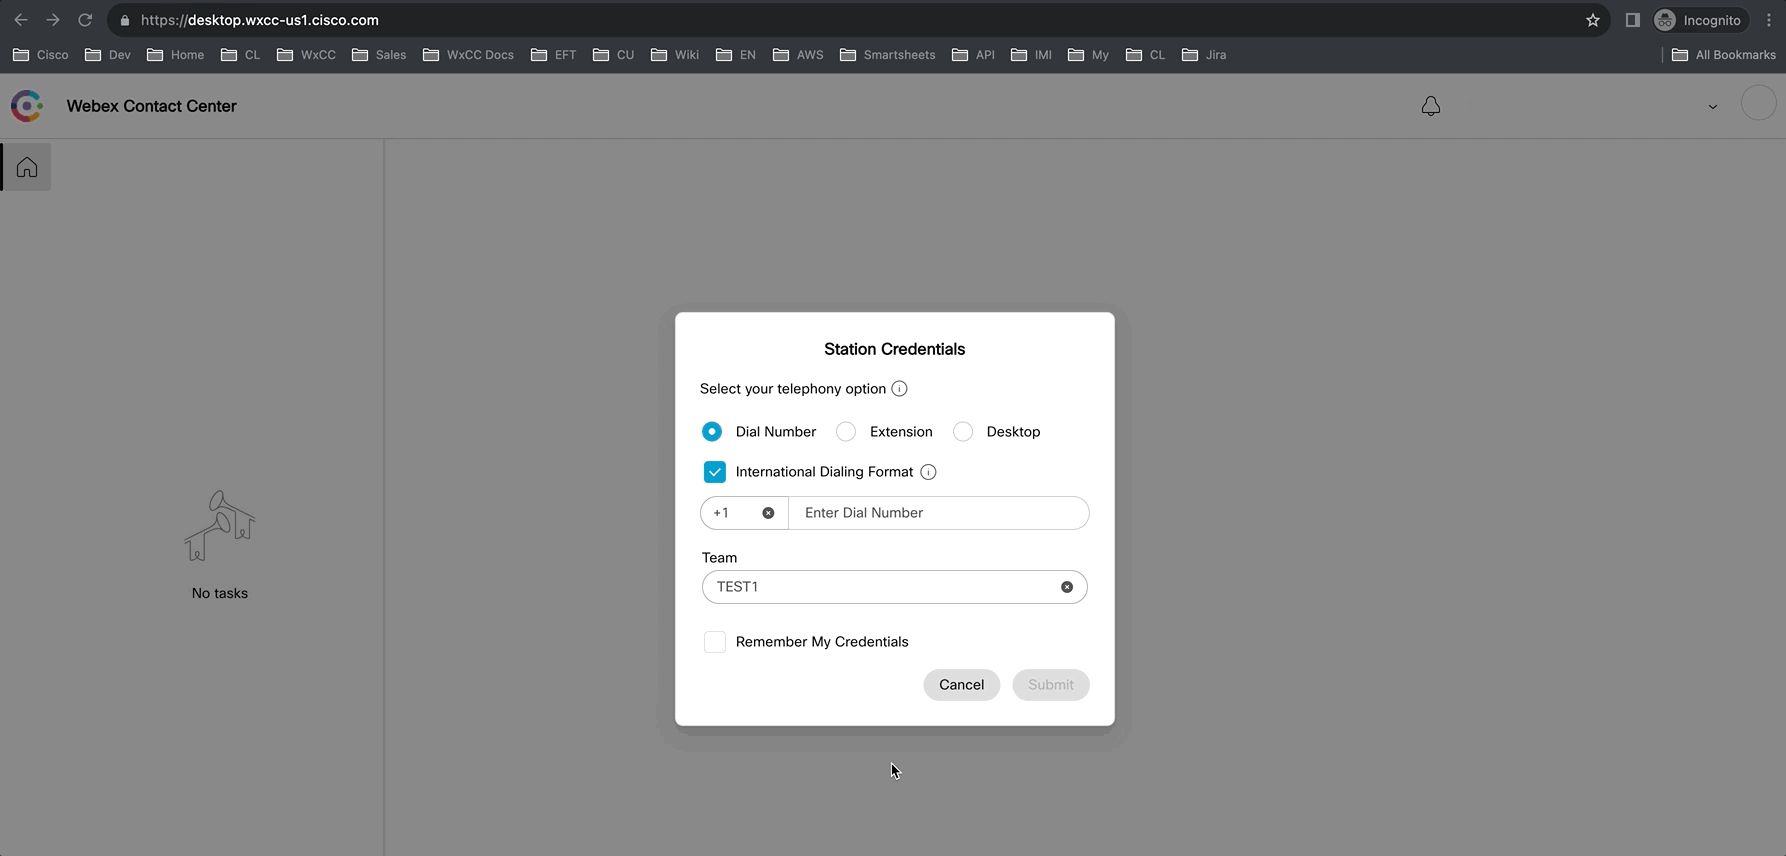
After you create a new Chrome Profile, navigate to https://desktop.wxcc-us1.cisco.com/ in the chrome browser with the incognito mode.
-
Enter the agent’s email ID which you created in the previous task.
-
Enter the Password for the appropriate username.
-
In the Station Credentials pane, select “Desktop”.
-
Select the team
attendeeId _Team1. -
Click Submit button. The browser may ask you to confirm use the microphone from the browser.
-
Make sure that you are successfully logged in to the Agent Desktop.
Part 2: Introduction to Flow Designer
Flow designer is a simple drag-and-drop user interface (UI) to define the flows. The following steps explain the Flow Designer layout, activity library, and terminology used in the Flow Designer.
In this lab, we will configure all of the required elements to deliver a call into a queue. We will then create a new flow and iterate on it adding functionality and exploring opportunities for improvement.
Objective
- Looking at the configuration of Entry Points (Channels), Entry Point Mapping, Routing Strategy, and Queue
- Verifying the basic flow
- Verify functionality to the flow by looking at various use cases.
Note: If you have prior experience with creating flows, please navigate to step 2.6: Bringing It Together: Advanced Flow configuration
2.1: Configuring tenant for Call Delivery
Verify your flow
On Webex Control Hub, navigate to Flows under the CUSTOMER EXPERIENCE tab, search for the below flow
- QtoA_WebexOne_InboundFlow
Select to open the flow and review the flow configuration
Note: There are no changes that need to be made to the flow and you can proceed with the next step
Verify Text-To-Speech configuration on the flow
- Select the node attendee node on the flow
- Verify Text-to-speech toggle is enabled
- The Connector linked to the flow
- Verify Output voice is set as en-US-Standard-A
- Verify the
Text-to-Speech Message
Tip: Please refer the article Google Text-To-Speech Configuration for complete configuration steps
Verify your Entry Point
- On Webex Control Hub, navigate to Channels under the CUSTOMER MANAGEMENT tab and verify that the
attendeeId _EP is created.
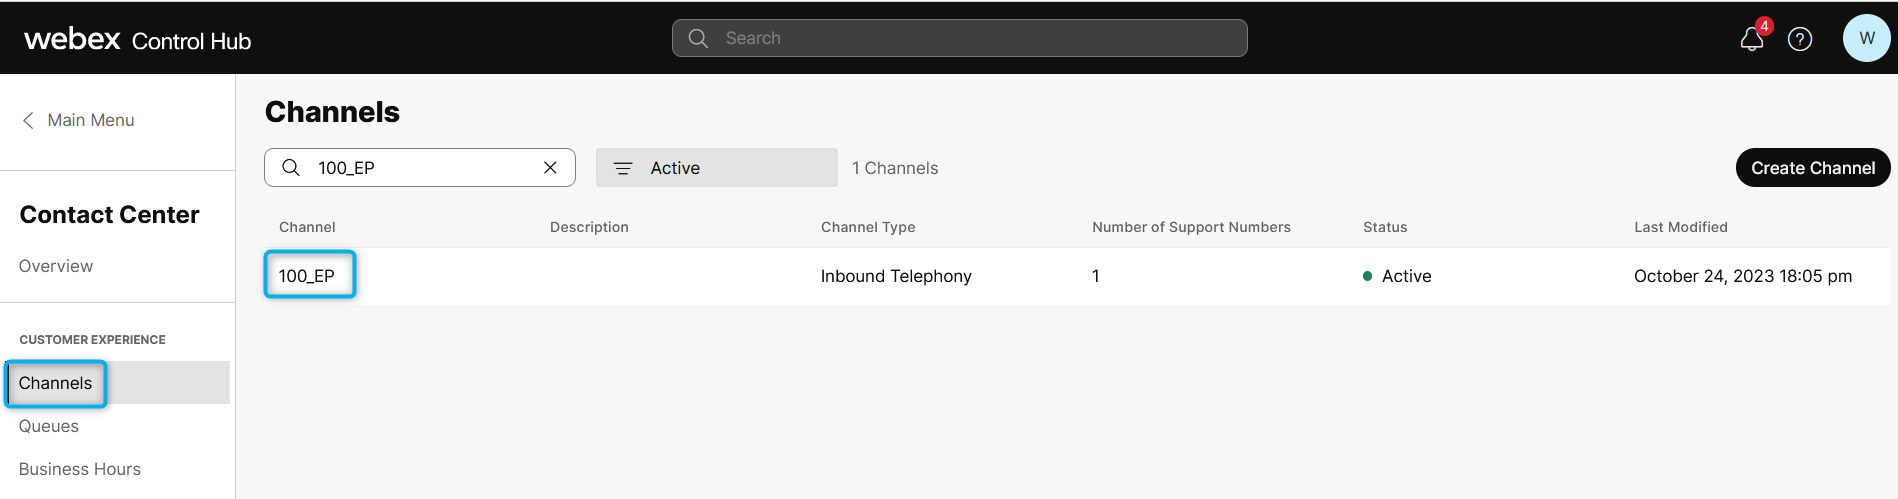
- Verify the Entry Point configuration
Name your Entry Point EP_
AttendeeID Description: optional
Channel Type: telephony
Service Level Threshold: 60
Flow: Flow_template
Version Label: Live
Music on Hold: defaultmusic_on_hold.wav
Click Save
Verify your Entry Point mapping
On Webex Control Hub, navigate to Channels under the CUSTOMER EXPERIENCE tab:

Go to Support Number and verify the below:
Webex calling locationis set asUS
Support Numberis set to the the EP-DN assigned to you
PSTN RegionasDefaultClick
Save
Test your configuration
-
Call your assigned EP-DN:
You should hear the greeting message asking for your attendee ID.
Enter your 3 digit attendee ID. Example: 051
Go available on the agent desktop
The call should be delivered to your agent extension
End the call, Wrap-up, and Go unavailable
2.2: Adding Callback functionality to the flows
On Webex Control Hub, navigate to Flows under the CUSTOMER EXPERIENCE tab, search for the below flow
- QtoA_WebexOne_InboundFlow
- Verify the below flow variable is created:
Name: CallerANI
Type: String
No default value ***
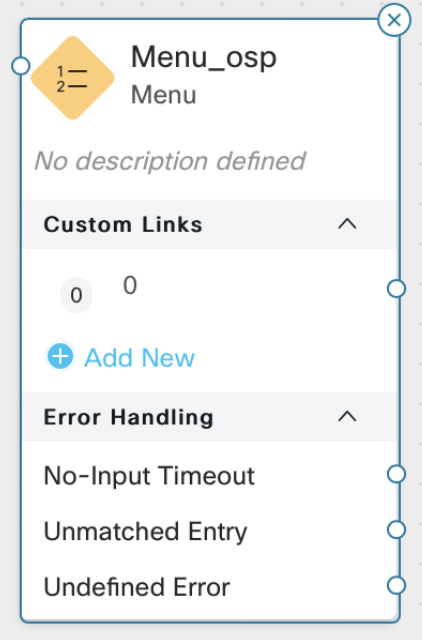
- Verify a new Menu node
Activity Label: Menu_Callback
Prompt: Text-to-Speech is enabled
Make Prompt Interruptible: True
Digit Number: 1 Link Description: confirm number
Digit Number: 2 Link Description: change number
Connect No-Input Timeout to the front of the Menu node
Connect Unmatched Entry to the front of the Menu node
- Verify the Set Variable node
Activity Label: callbackANI_set
Select Variable: CallerANI
Set to Value: {{NewPhoneContact.ANI | slice (NewPhoneContact.ANI.length -10,NewPhoneContact.ANI.length)}}
- Verify the Collect Digits node
Activity Label: newNumber
Prompt: Text-to-Speech is enabled
Make Prompt Interruptible: True
Minimum Digits: 10
Maximum Digits: 10
Connect No-Input Timeout to the front of the newNumber node
Connect Unmatched Entry to the front of the newNumber node
- Verify the Set Variable Node
Activity Label: newCB
Variable: CallerANI
Set Value: {{newNumber.DigitsEntered}}
- Verify connection between newNumber node and newCB node
- Verify the Callback node
Activity Label: Callback_node
Callback Dial Number: CallerANI
Static ANI: Select the default outdial ANI as +14402308010
- Verify the PlayMusic node Callback_confirm
Activity Label: Callback_confirm
Static Audio File
Music file: callback_confirm_English.wav
- Verify the PlayMusic is connected to the Disconnect Contact node
Activity Label: Disconnect_contact
2.3: Business Hours Configuration
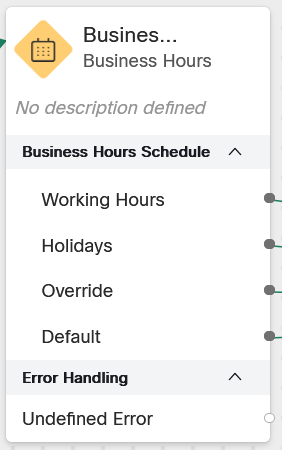
Business hours(BH) is a feature that lets you define the operational hours of contact center. In addition to that, we can also add holidays, or event driven interventions like extended working hours during festival seasons. This feature is an upgrade over routing strategy.
Business hours aims to remove all such pain points. There are 3 sub entities which comes under business hours:
- Working hours - Define normal operational hours. Add one or more shifts to have per-day or per-hour timing control
- Holidays - Define 24 hours break in operations like Christmas Day
- Overrides - Define an event based intervention in which operational hours are disrupted. Like black Friday sale when CC is operating at additional capacity. Or like emergency downtime, in which we close all operations immediately
The subsequent flow execution from BH activity takes the following priority:
- Priority-1 Override: checks if any of the override schedules apply at a given moment during execution
- Priority-2 Holidays: checks if any of the holiday hours schedules apply at a given moment during execution
- Priority-3 Working hours: checks if any of the working hours shift schedules apply at a given moment during execution
- Priority-4 Default: If no schedule applies, then route following the “Default” port will be selected
1. Create a Business Hours Schedule
-
Login with admin credentials to Control Hub by accessing https://admin.webex.com.
-
In the left pane navigate to Contact Center card.
-
Scroll down in the left navigation panel to the CUSTOMER EXPERIENCE section and click on Business Hours.

- Click on
Working Hoursbutton and select WebexOne_Business_Hours

- Verify the
Name,TimezoneandShiftof the schedule

-
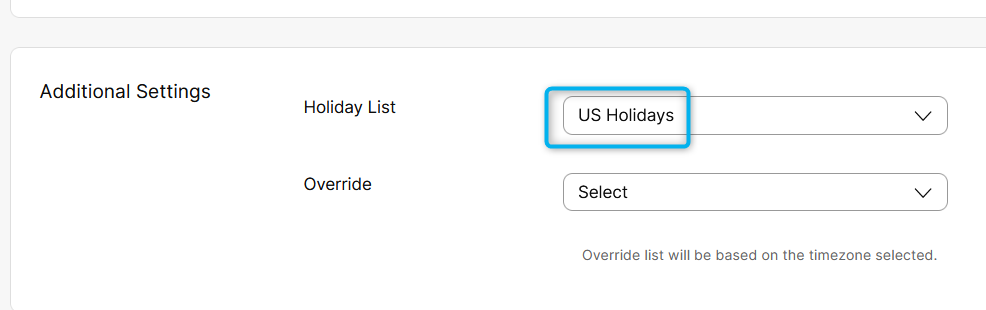
Verify the holiday schedule, click on Business Hours and select
Holiday Lists -
Select US Holidays
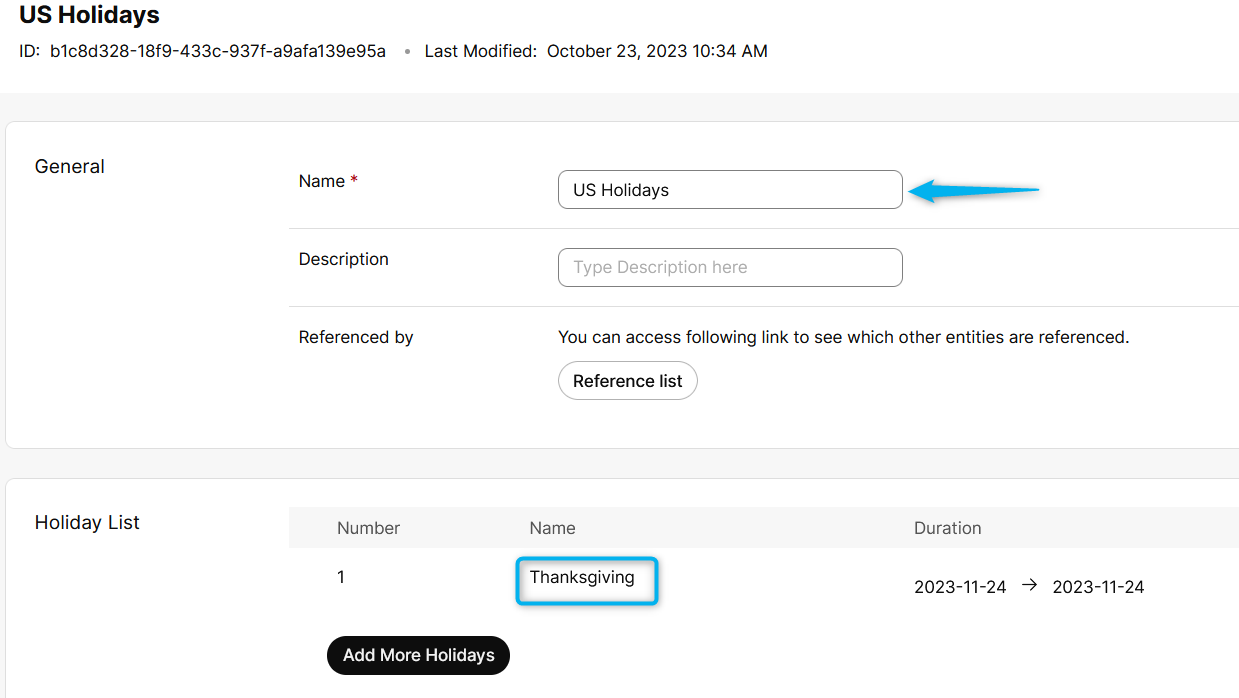
- Now you can Go back to
Working Hoursbutton and select WebexOne_Business_Hours and verify the US Holidays is selected underHoliday Lists
- Similar steps can be followed to create
Overrideschedule
2. Verify the Configuration
Verify the Business Hours configuration by using this on the flow
Tip: Use the
Reference Listsection withinWorking Hoursto check the Entity Name the schedule is referenced by

Part 3: Introduction to Flow Debugger
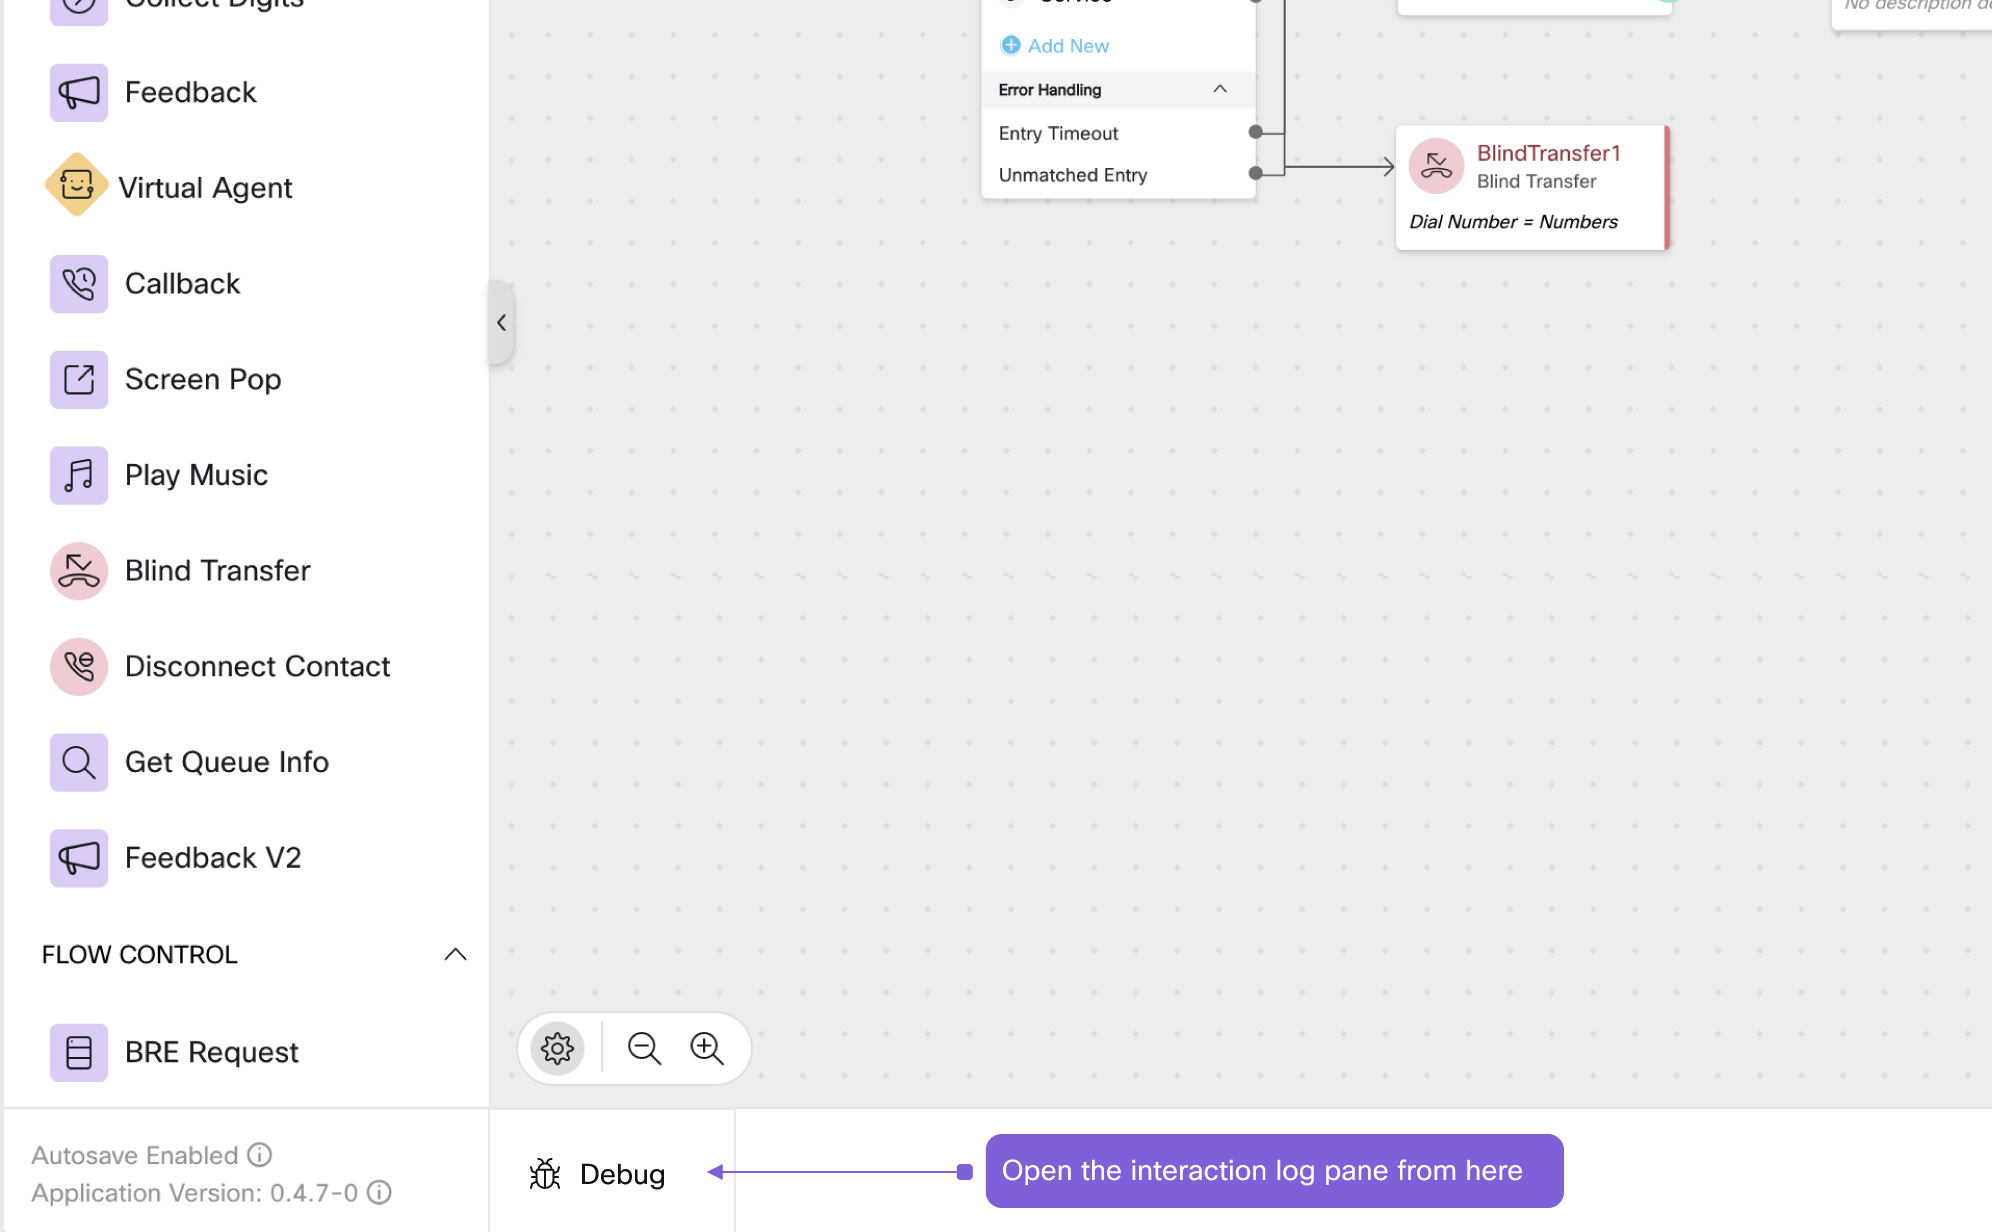
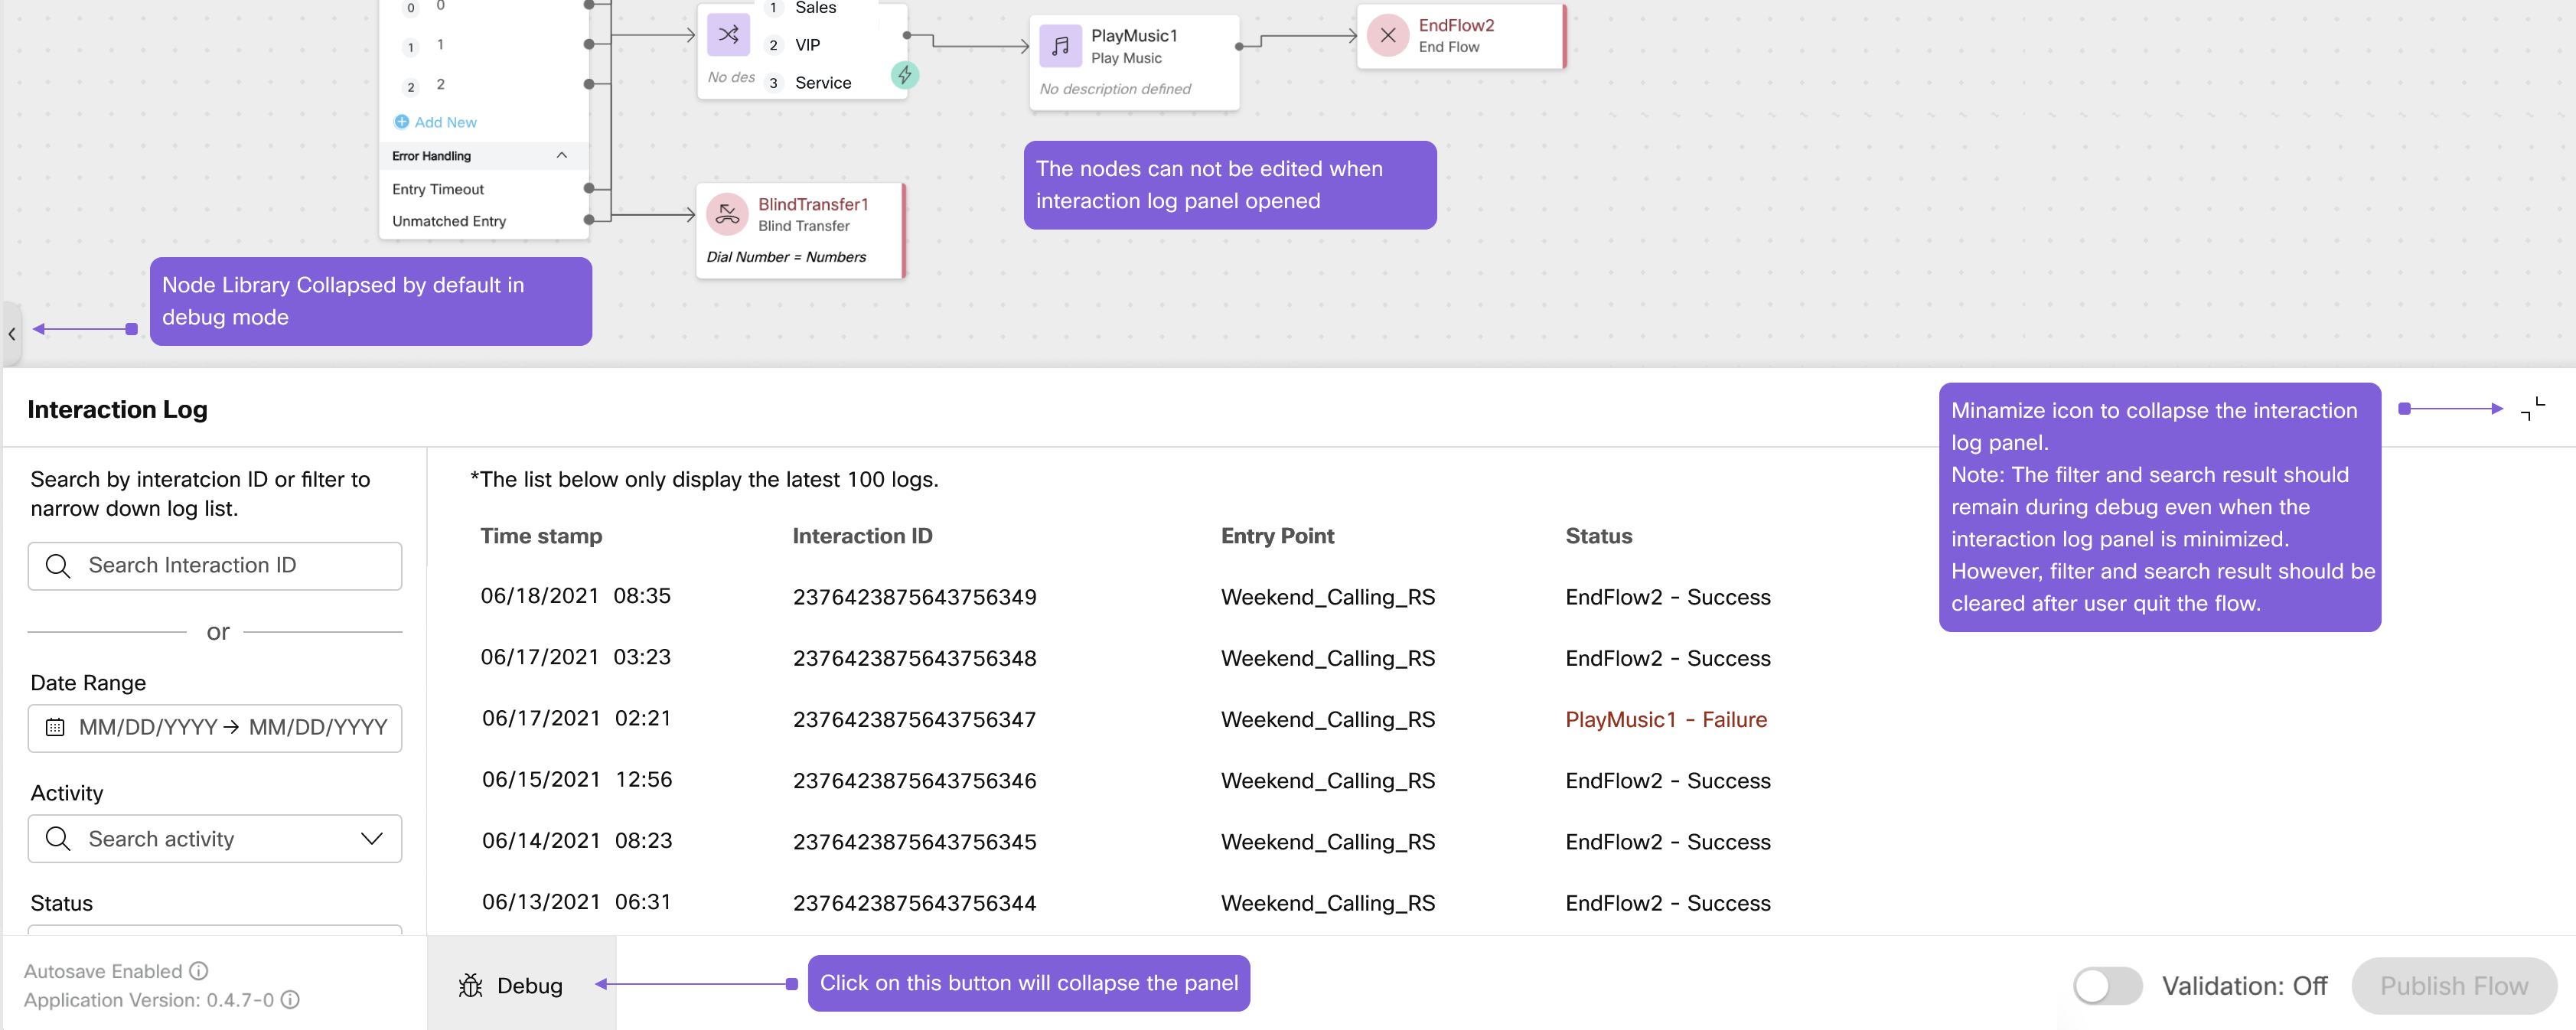
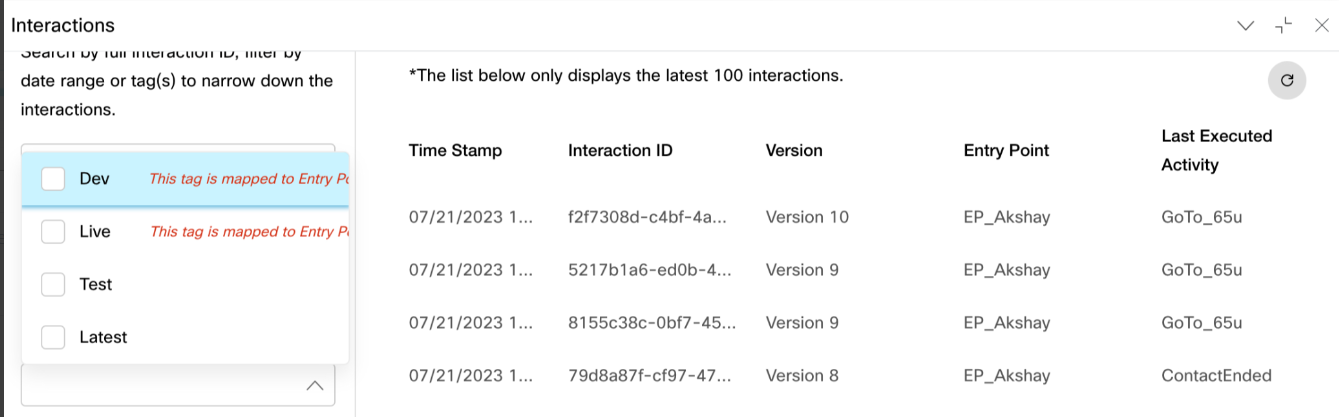
From a UI standpoint, the flow builder UI contains a “Debug” button on the bottom pane. Clicking the button brings up the pane displaying a list of previous interactions of the flow in production. By default, there are only 100 latest interactions displayed, but the user can either input in a specific interaction ID or a date range to filter the interactions displayed.
Once the user selects an interaction, the Interaction Detail pane displays the list of all the activities involved in the interaction along with their inputs/outputs, start times and end times of execution.
3.2: Verify the Flow Debugger functionality
Place a call to the flow and trace the call through the Flow Debugger.
Tip: Selct
Edit: Offto open the flow inRead-Onlymode when using using the debug functionality
Part 3: Workflow in Outdial Entry Point
The intend of this feature is to get workflow support for Outbound
With this feature, we will get the the option to give the flow, Music on Hold and outbound queue in outdail entry point page on portal. if we don’t provide the flow,moh and outdail queue details to the entry point then by default the configurations present will be taken for the call execution which is without flow
3.1: Verify the Outbound flow
- On Webex Control Hub, navigate to Flows under the CUSTOMER EXPERIENCE tab, search for the below flow:
- WebexOne_OutdialFlow
-
Follow the similar steps provided in
Section 2.1to import and publish the flow -
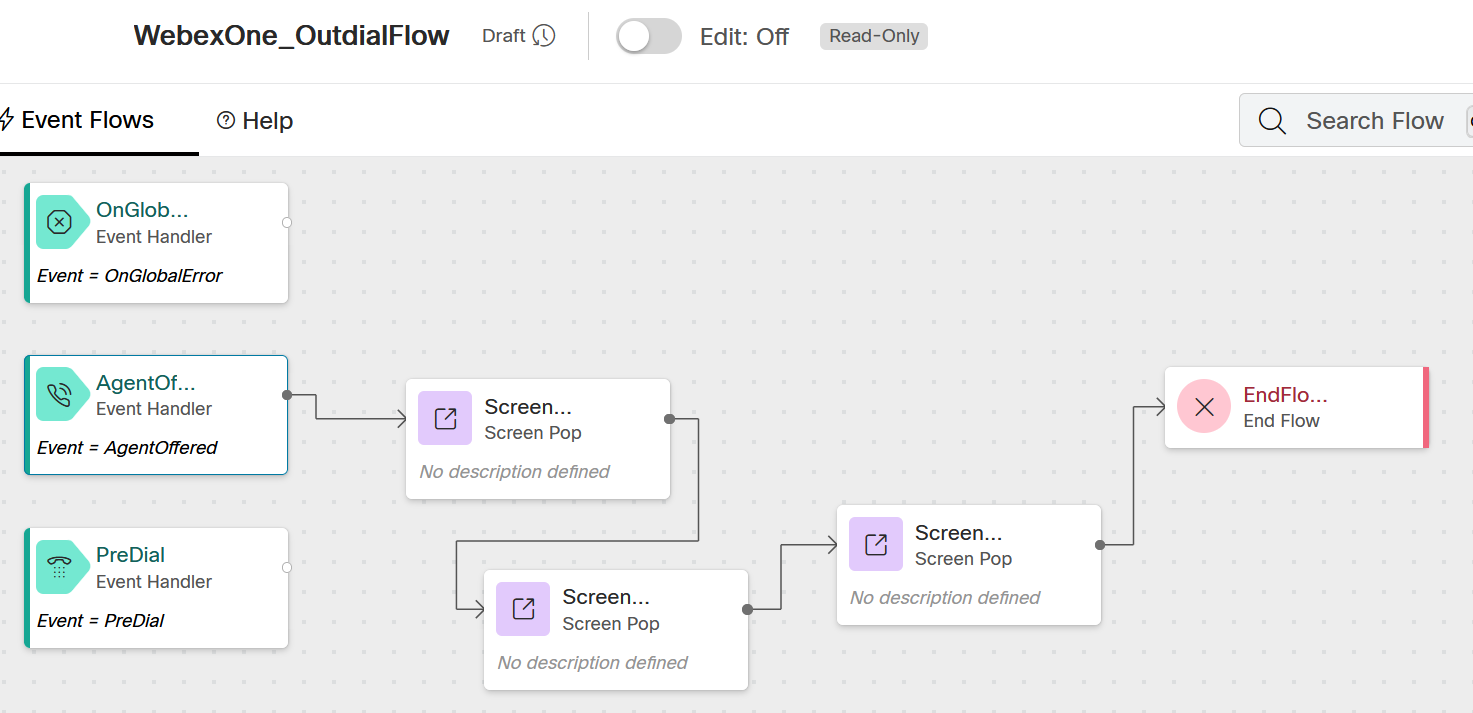
Within the flow, navigate to Event Flows notice that the Screen pops configured for the AgentOffered event
3.2: Verify your Outdial Entry Point
-
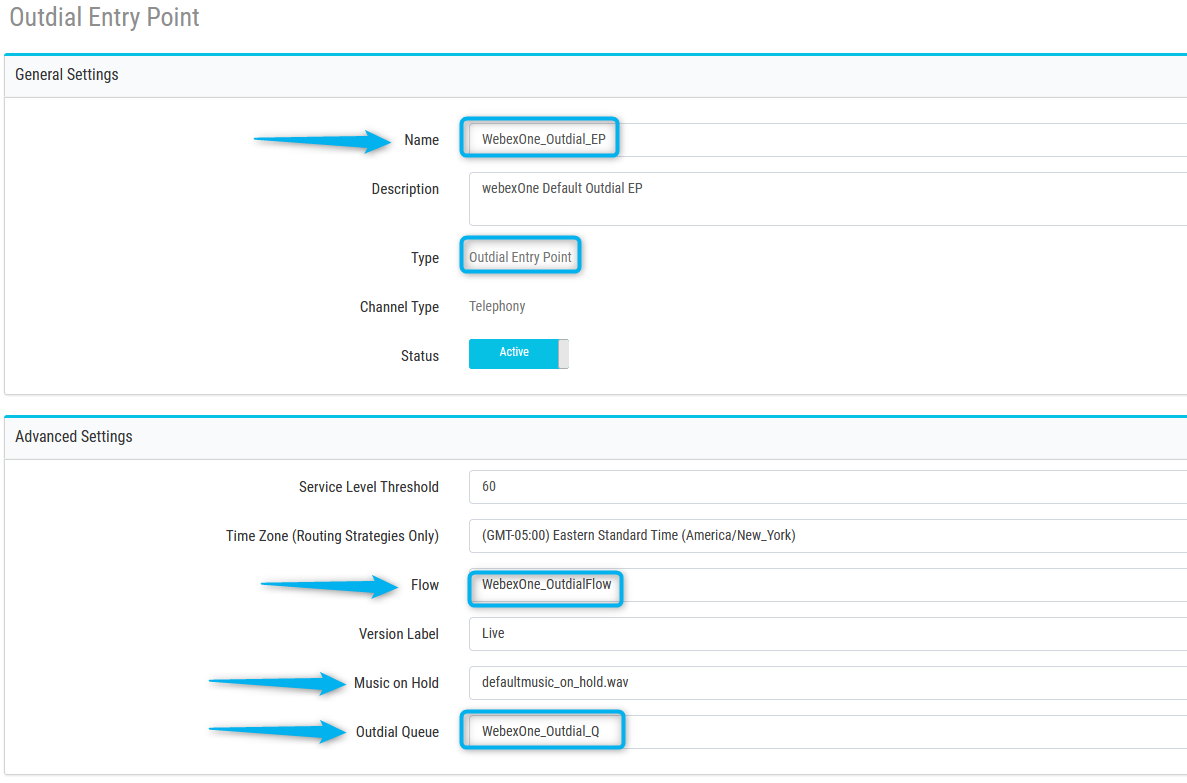
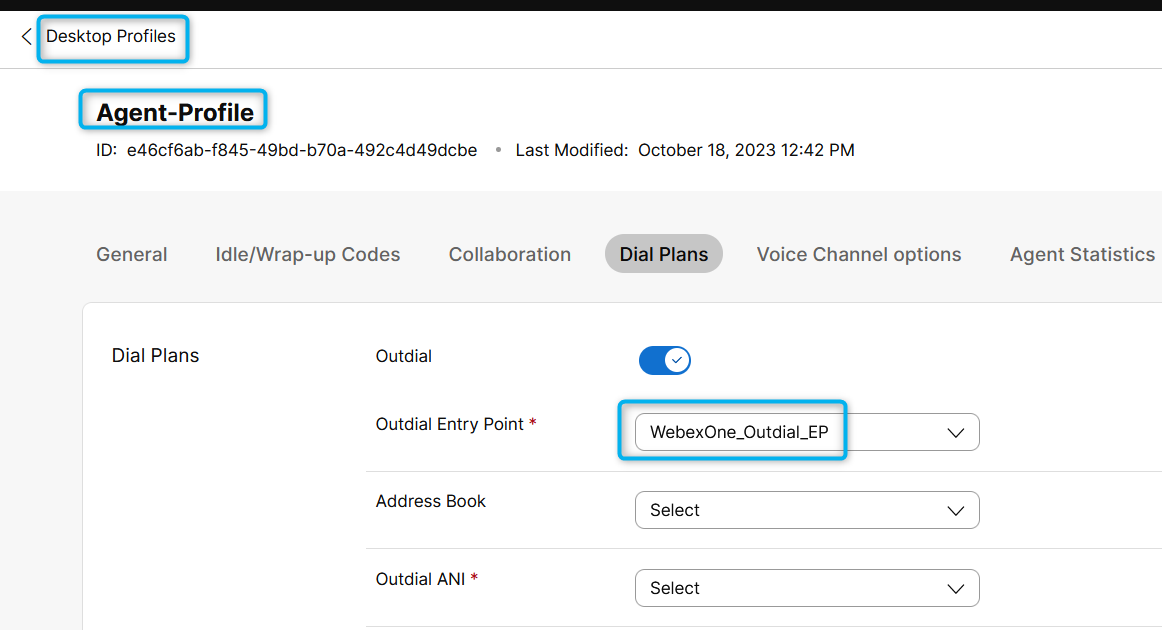
On Webex Control Hub, navigate to Channels under the CUSTOMER EXPERIENCE tab and verify that the WebexOne_Outdial_EP is created.
-
Verify the
Name,Flow,Music On Hold,Outdial QueueandVersion Label
Update the Desktop profile
-
Navigate to Contact Center Users under the DESKTOP MANAGEMENT.
-
Select the Agent profile assigned to the user under Desktop Profile
-
Select Dial plans and under Outdial Entry Point, enter the outdial entry point created in the above step
3.3: Verify the configuration
Place an outbound call as an agent from Agent Desktop
Note: The
Outdial queueselected as part of the outdail entry point is currently purely for reporing purposes.
3.4: Caveats
Unsupported Flow Activities
Below activities are not supported for the outdail voice contacts. If we configure these in flow, these activities will fail:
- Queue Contact Activity
- QueueToAgent Activity
- Callback Activity
- Get Queue Info Activity
- Advanced Queue Info Activity
- Blind Transfer Activity
Supported Flow Activities
Below activities can we used in flow for outdial voice contacts.
- HTTP Request
- Condition
- Parse
- Set Variable
- Business Hours
- EndFlow
- Screen PopUp
Bonus: Experience Management
| Topic | Lab Type | Difficulty Level | Estimated length |
|---|---|---|---|
| Introduction to Experience Management | Watch & Understand | EASY | 7 min |
| Configure Post Call IVR Survey | Practical Lab | EASY | 10 min |
| Configure Post Interaction Digital Survey | Practical Lab | EASY | 10 min |
Overview of the lab
In this lab, we will configure all the required elements to collect and view end-customer feedback using the new Experience Management.
Lab Objective
- Create a basic survey
- Upload audio files to the survey
- Configure the survey in flow designer
- Simulate a customer interaction with survey feedback
- Download and verify survey feedback
Pre-requisites
- You have completed Lab 1 - Admin Experience:
- You are familiar with Control Hub and navigation within Control Hub
- You have completed Lab 2 - IVR Contact Routing:
- You are familiar with creating and modifying flows
- You have completed Lab 3 - Agent Desktop:
- You are familiar with logging in as an Agent and accepting inbound interactions
-
You have Webex Calling installed in your mobile phone and supervisor created in Lab 1 from which you can make calls to the contact center
Quick Links
Control Hub: https://admin.webex.com
Portal: https://portal.wxcc-us1.cisco.com/
Agent Desktop: https://desktop.wxcc-us1.cisco.com\
1. Introduction to Experience Management Post Interaction and Post Call Surveys
Experience Management is a next-gen tool that facilitates post interaction surveys and outcomes. It allows you to track and measure customer satisfaction using anchor metrics like Net Promoter Score (NPS), Customer Effort Score (CES), and Customer Satisfaction (CSAT). Webex Contact Center brings in an integration of Experience Management for its post call survey interactive voice response (PCS IVR) and digital channels.
Lab Section
2. Configure Post Call IVR Survey
Create a survey
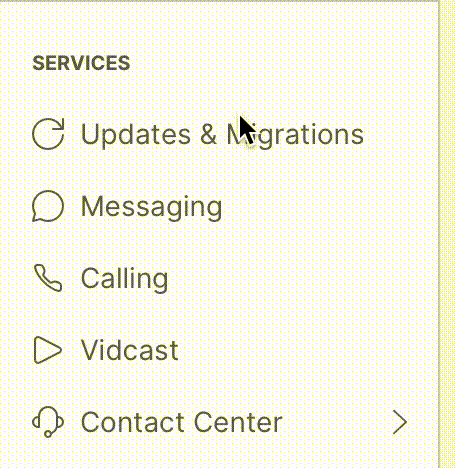
- Click on Contact Center under Services from Control Hub
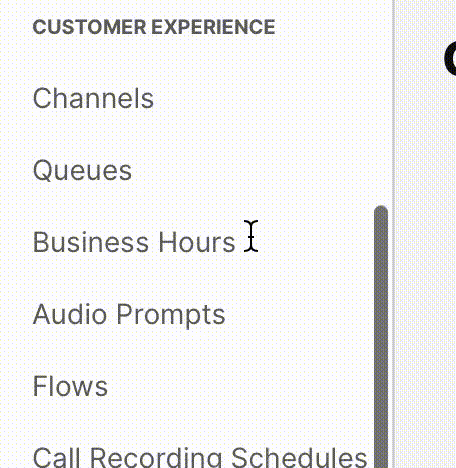
- Under Contact Center, under “Customer Experience” section > click on “Surveys”
- Click the “Create new survey” button on the top-right corner of the Survey page
Use the name “Post_Call_Survey” ensure there are no spaces.
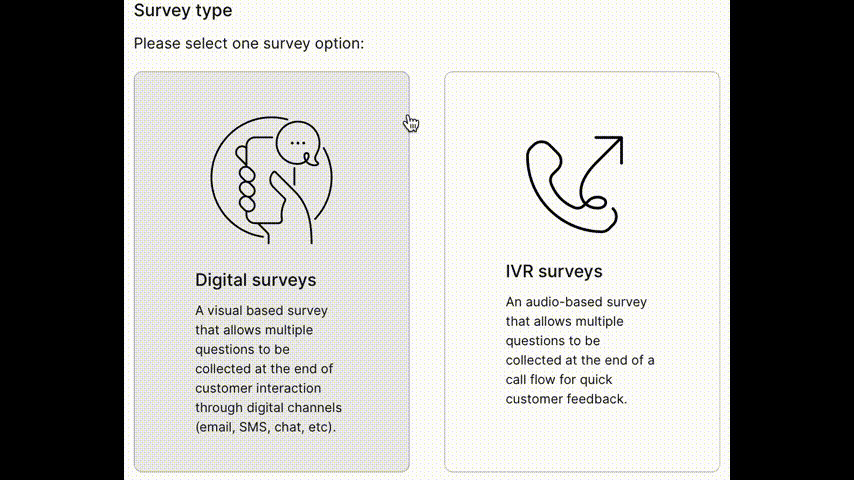
Select Survey type as IVR
Provide a name for your survey appended with your Attendee ID
Choose the additional languages for the survey from the drop-down (optional)
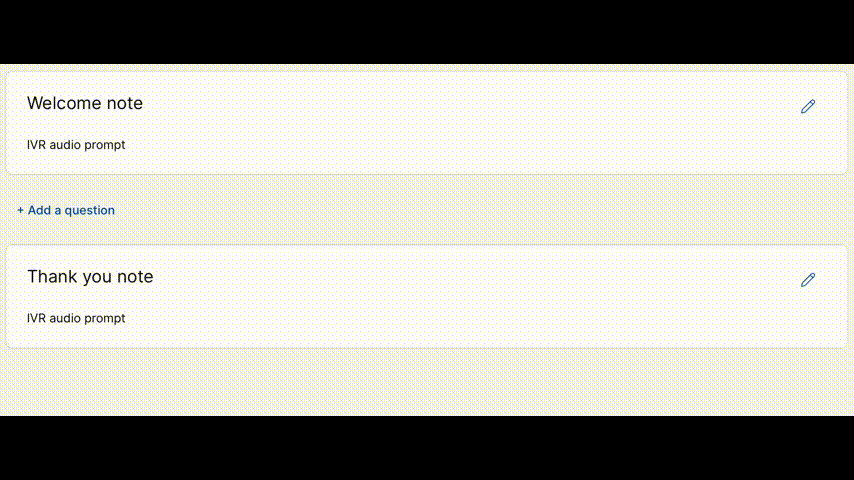
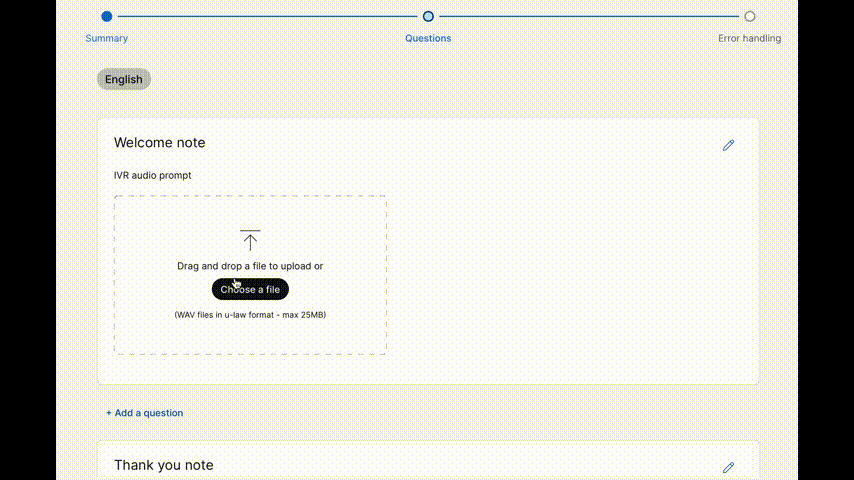
Click on Next 4. Add audio files to the Welcome and Thank you notes (Audio Files) Click on the pencil icon to the right
Select Choose a file when the note expands, pick the audio file (Welcome.wav) and upload
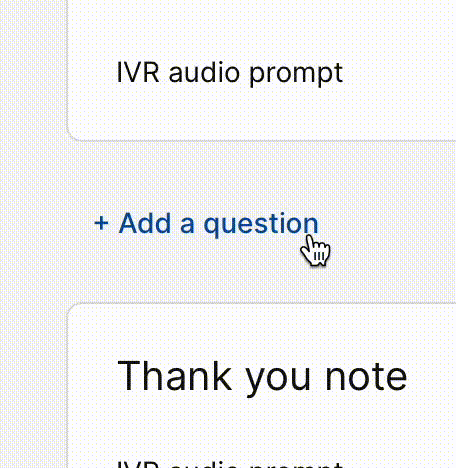
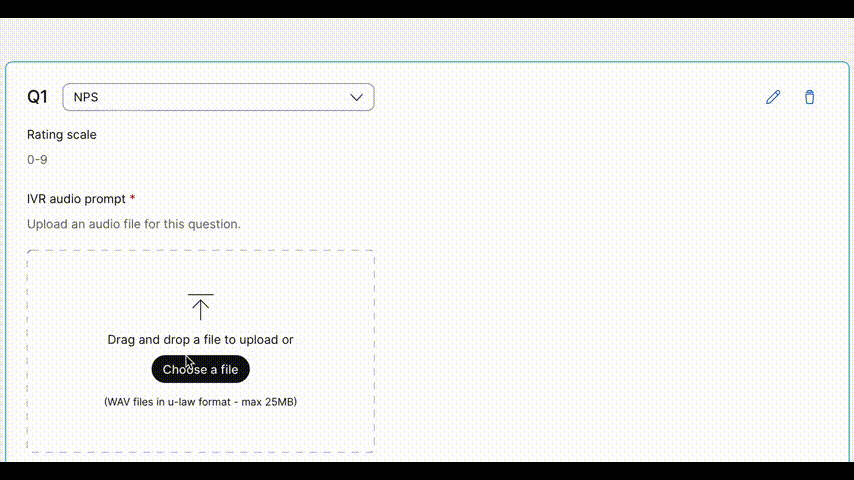
Repeat steps for Thank you note (Thankyou.wav) 5. Add a question to your survey Select the NPS question from the drop-down by clicking + Add a question
Choose the corresponding audio file, nps.wav for the NPS question and upload (Audio Files)
Under Question to show on reporting type the column name as “NPS Score”
6. Update Error handling settings (optional) Upload audio files for Invalid Input and Timeout by clicking on Choose a file under each section
Set the maximum number of invalid inputs and timeouts allowed from the drop-down
Choose an audio file for exceeding maximum tries 7. Save the survey from the bottom right corner


Add the feedback activity to your flow
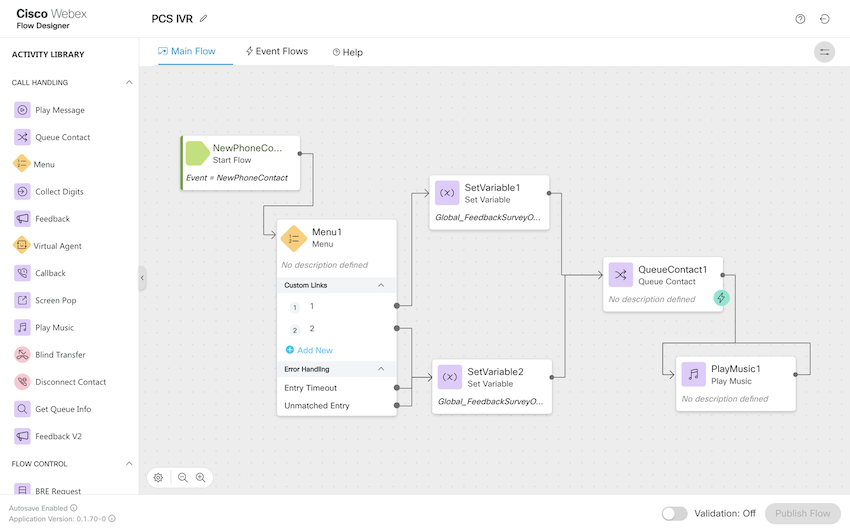
NOTE: Refer to the Lab 2 - IVR Contact Routing if you are unfamiliar with working on flow designer
- Open your flow created from Lab 2 - IVR Contact Routing
- Introduce a Menu into your main flow to prompt the caller to opt-in for the survey in between the NewPhoneContact event and the Queue Contact node
Activity Label: surveyOptin
Prompt: OptinMenu.wav (Audio Files)
Make Prompt Interruptible: True
Digit Number - 1
Link Description: Opt-In
Digit Number - 2
Link Description: Opt-Out
- Assign true and false values for the Global_FeedbackSurveyOptin variable
Drag and drop two Set Variable nodes into your main flow after the Menu
Click on the first Set Variable node
Activity Label: OptIn
Variable: Global_FeedbackSurveyOptin
Set Value: TRUE
Click on the second Set Variable node
Activity Label: OptOut
Variable: Global_FeedbackSurveyOptin
Set Value: False
- Connect the nodes together
Connect Custom Menu Links for digit 1 to the Set Variable node with Global_FeedbackSurveyOptin set as true
Connect Digit 2 and error handling links to the Set Variable node with Global_FeedbackSurveyOptin set as false
Connect the Set Variable blocks back to your flow before Queue Contact
Example Flow
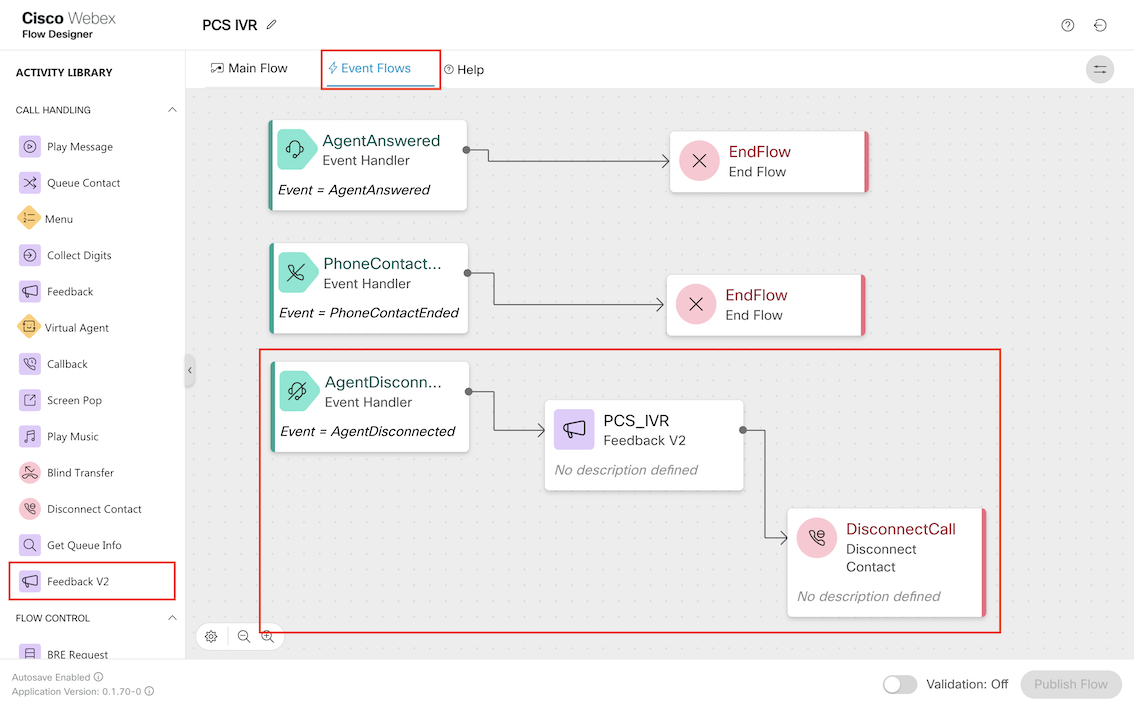
- Navigate to the Event Flows tab
- Add the Feedback V2 node
Connect the Feedback V2 node to the AgentDisconnected Activity
Click on the Feedback V2 node
Activity Label: PCS_IVR
Survey Method: Voice Based
Select survey created earlier from drop-down
Timeout: 10
- Complete the flow by adding a Disconnect Contact node after the Feedback V2 node
Example Flow
- Validate and Publish the flow
3. Provide a survey response
NOTE: Refer to the section Basic Features in Lab 3 - Agent Desktop if you are unfamiliar with testing an incoming call
- Login to your Agent Desktop and make your state Available
- Dial your designated DN and accept the incoming voice interaction
- Provide the DTMF input 1 to opt-in to the survey
- End the interaction from the Agent Desktop
- Provide a rating on the scale 0-9
4. Download and validate the survey response
- Navigate to the Surveys page on Control Hub
- Click on the download button on the far right of your survey
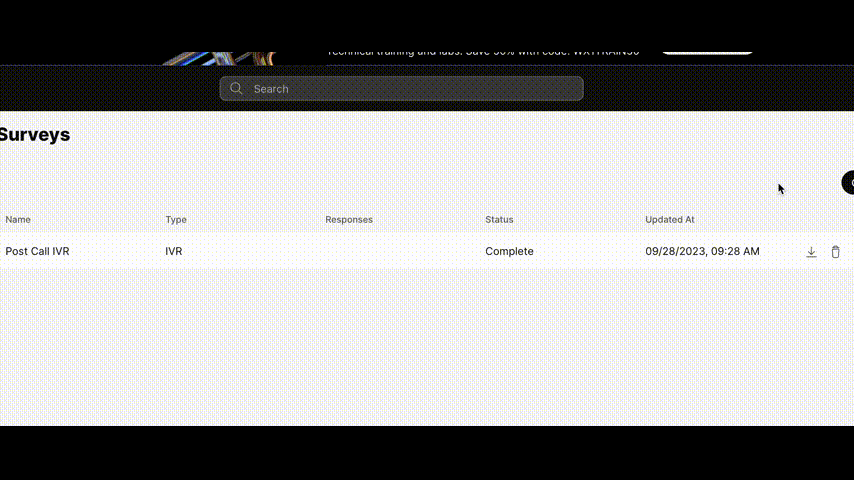
- Select the date range for the survey response period as Last 7 days and click Download
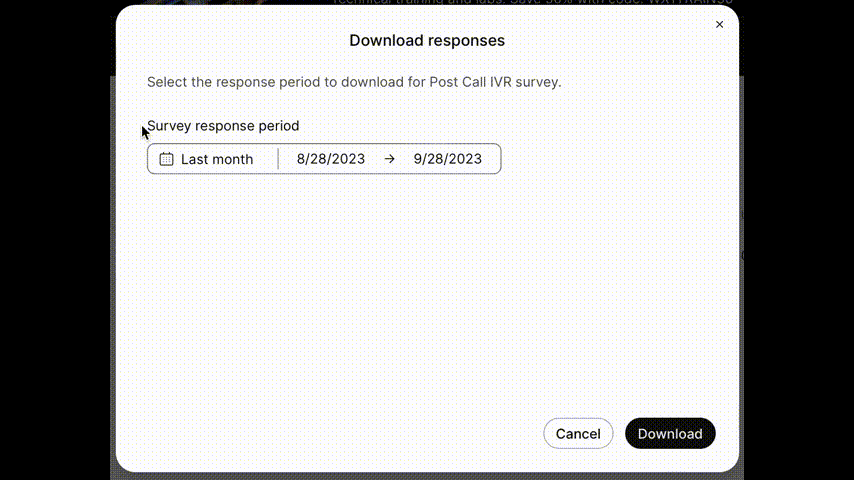
- Verify your response in the excel sheet to the one you provided on the call

Bonus: Other Flow Enhancments
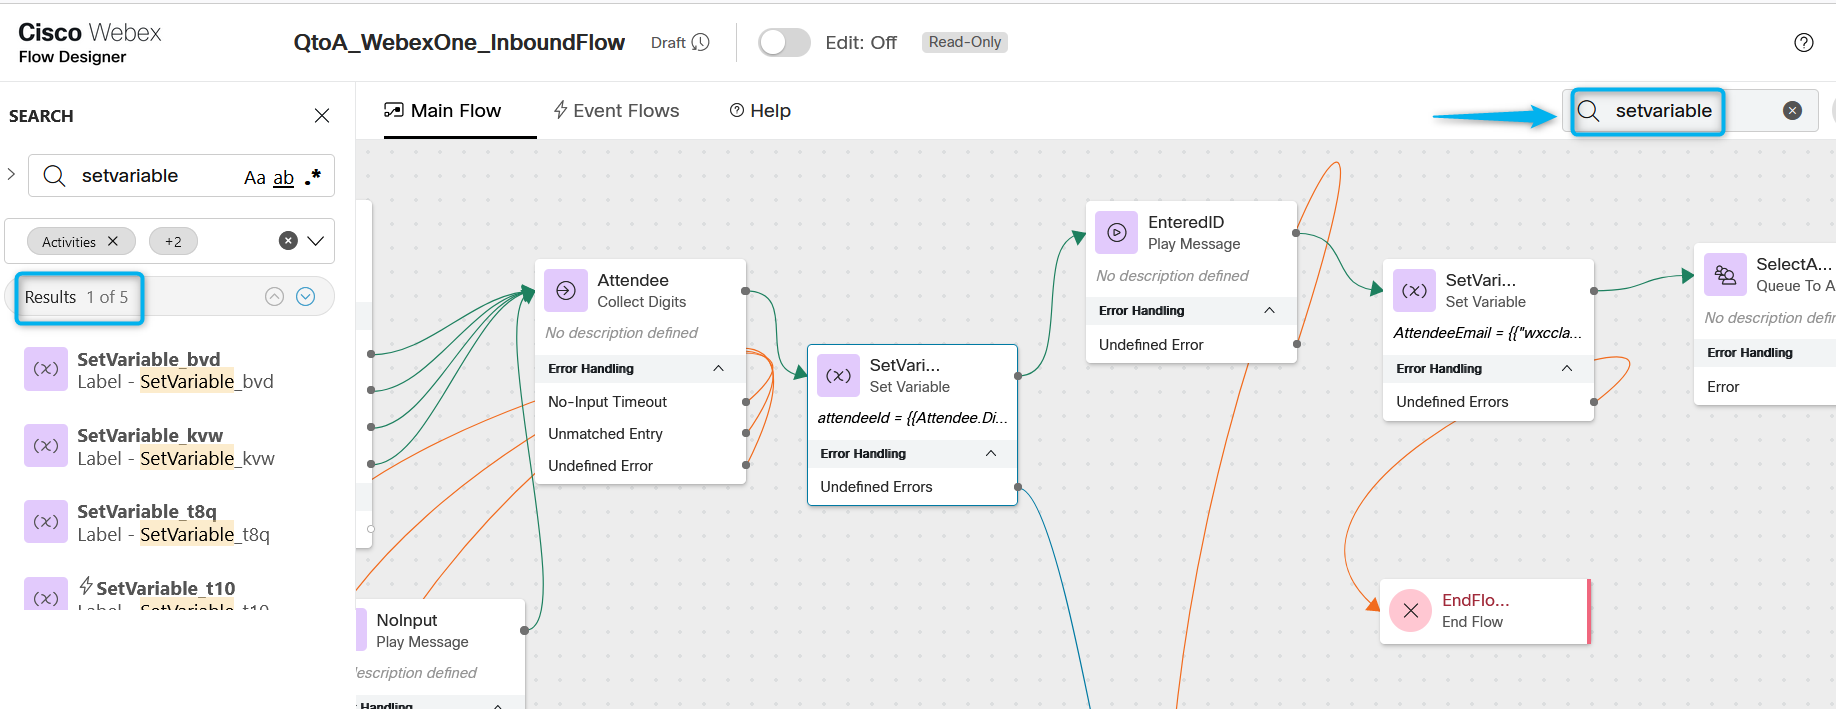
1. Flow Search
The entry point for the Search feature is the newly added located towards top right of flow designer. This list will update to include up to five matching results.
For shortcut to search please select: Ctrl K
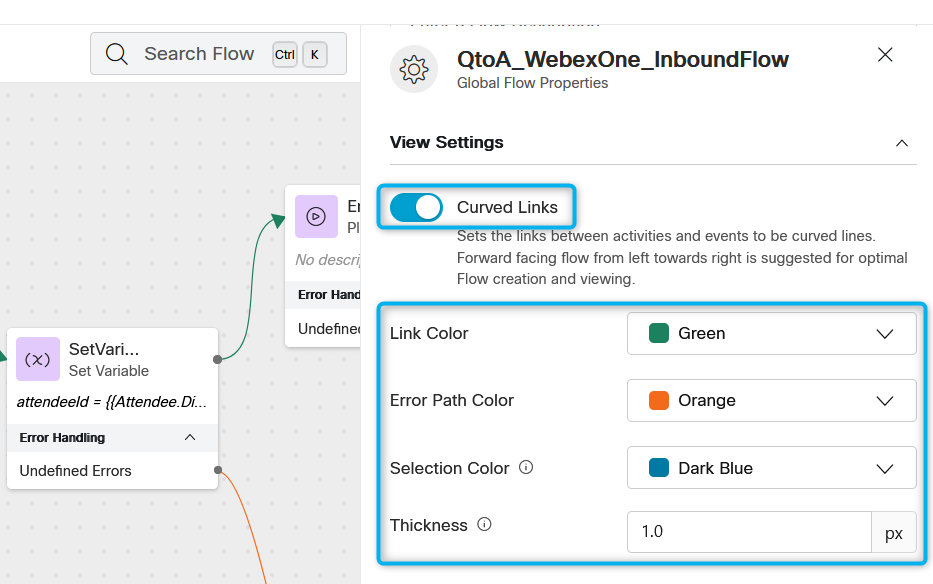
2. Flow Aesthetic Improvements
This feature provides support to Curved Links, Configure link color, Activity border color, Link selection color, activity border color, Link thickness and Activity border thickness.
Congratulations, you have completed this lab! You can continue with the next one.

3: Introduction to Flow Versioning
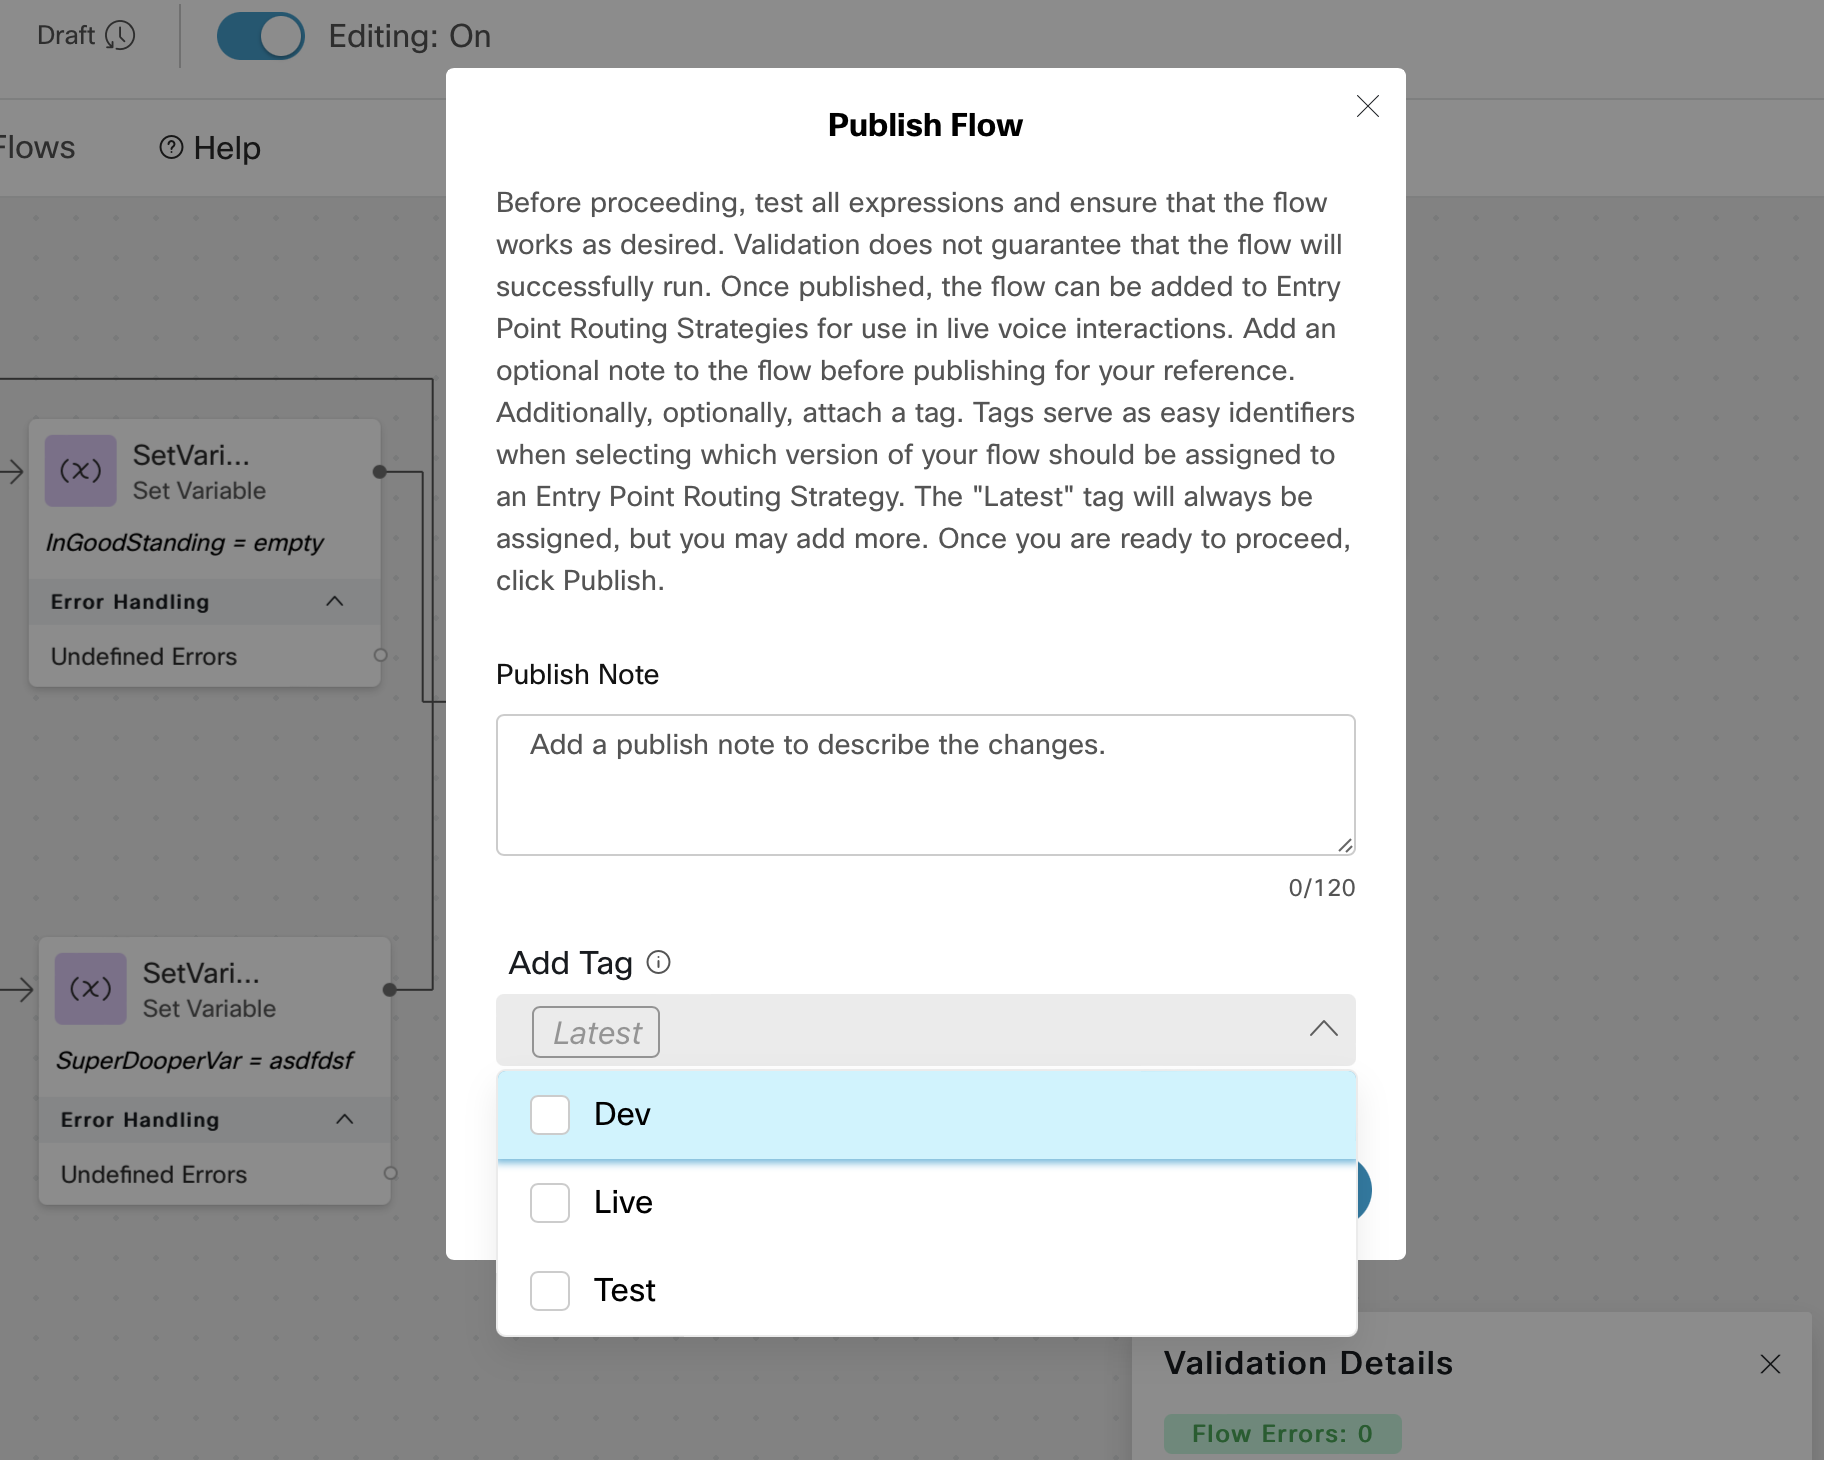
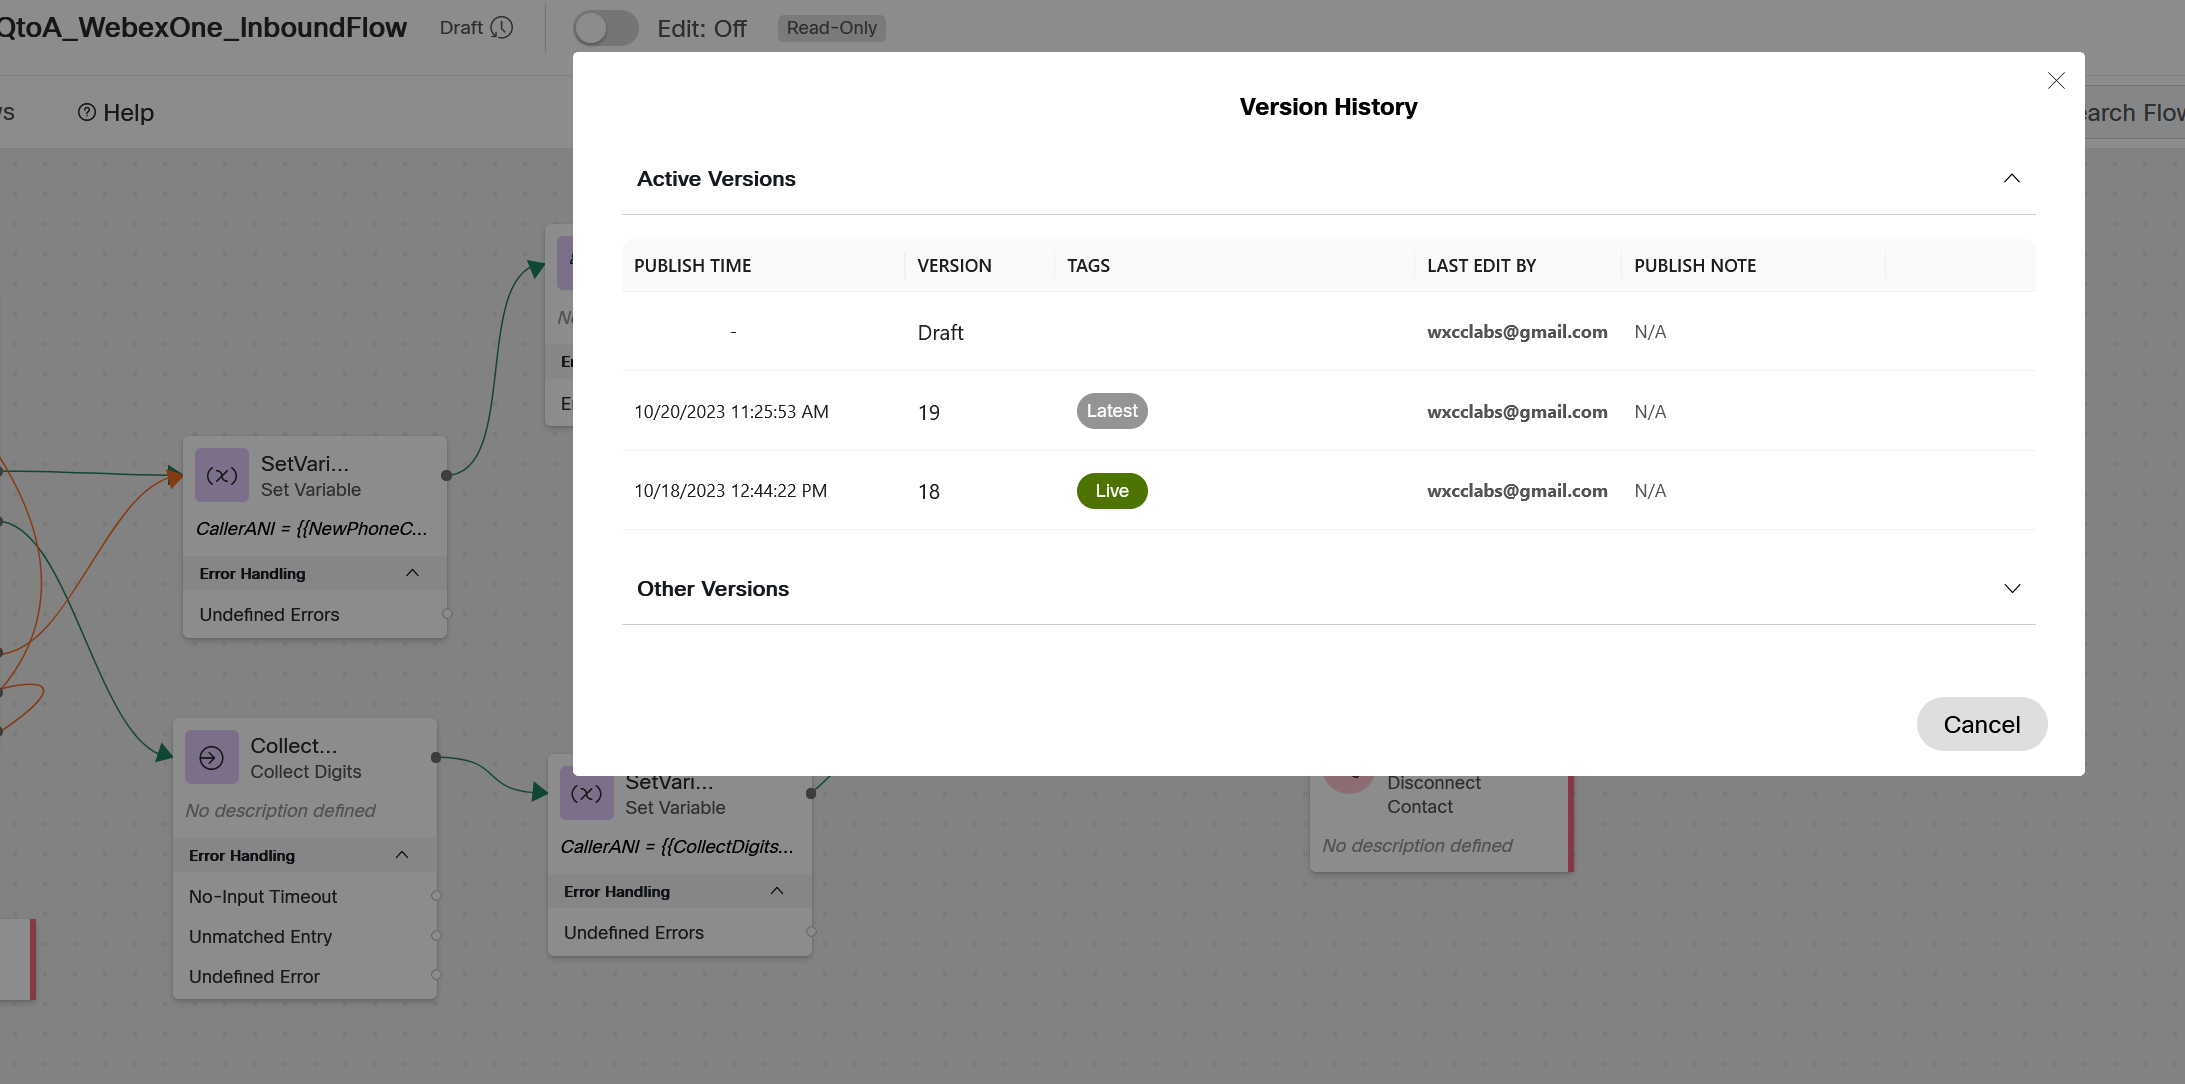
Tagging a version of the flow should come up while publishing. There are 3 predefined tags - Live, Dev, Test, and one default Tag - Latest. The tag selection dropdown is visible after publish button is hit. Multiple tags are allowed to be selected. Once selected and published and those tags are associated to that specific version.
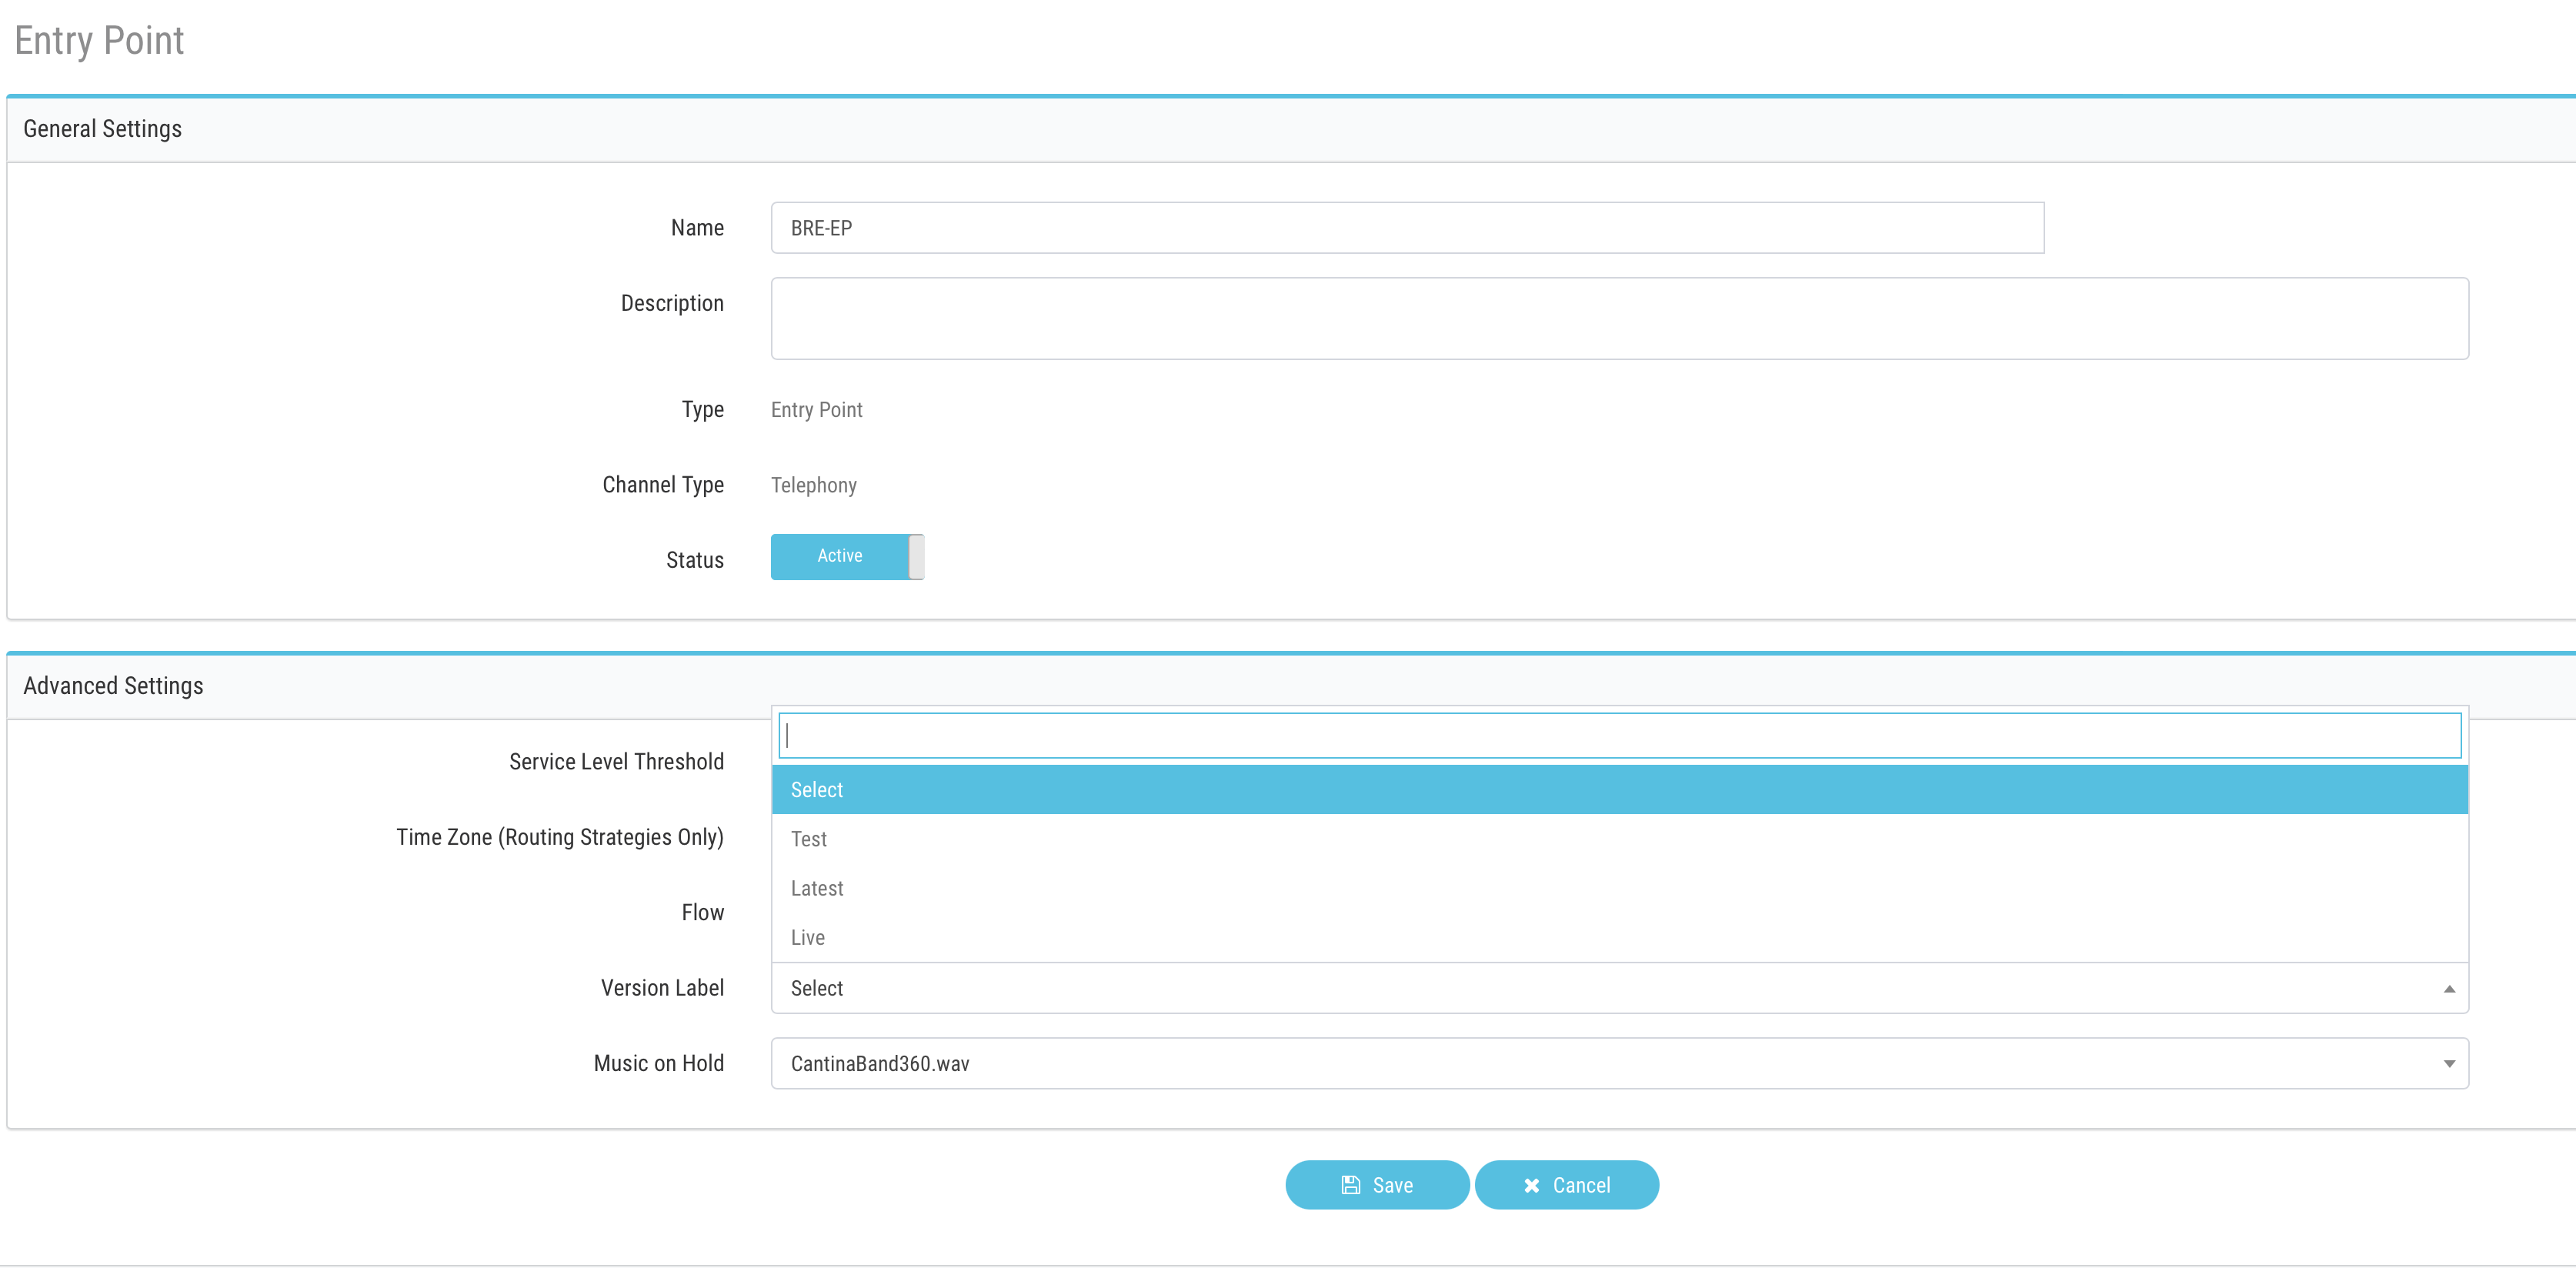
During entry point edit, the tags can be selected as well, here only the tags which are currently in use are shown.
During debugging, the tags filter allows to filter any of the previous or current interactions that had those tags during execution between the time range selected.
While looking at the previous versions history, by clicking on the clock icon located at the top panel the previous versions comes up with their tags. The versions which used to have tags and have been moved to later versions, show the tags with lighter color tone.
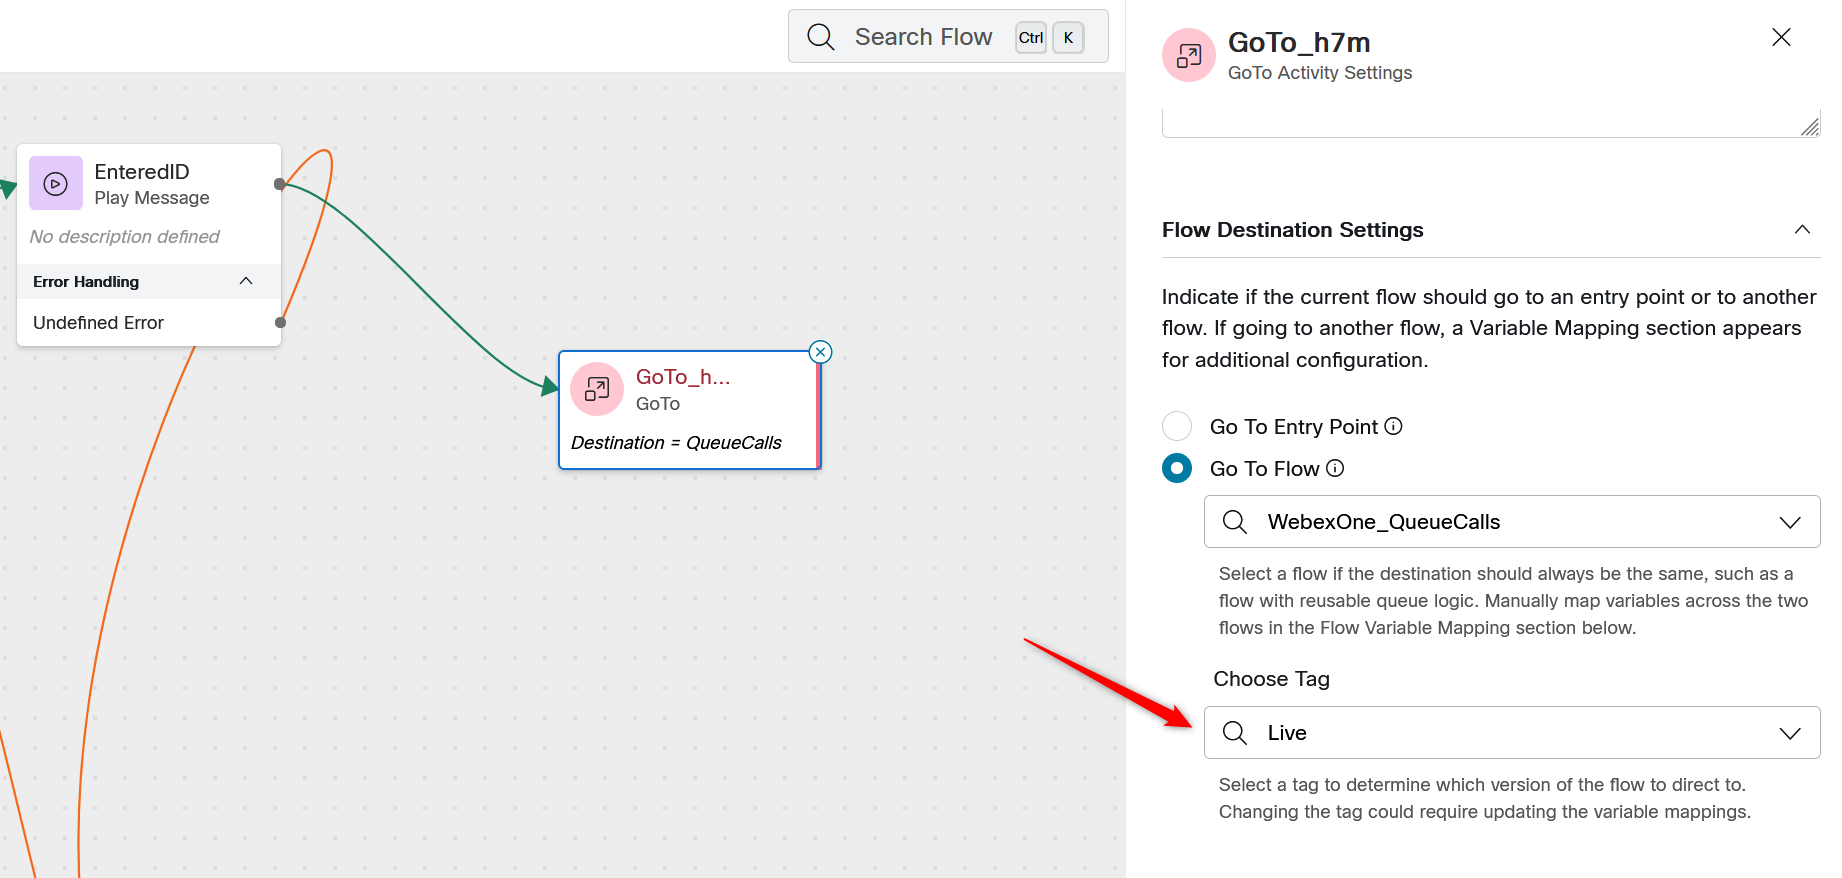
While using goto activity(which points to another flow), the tag selection drop down appears in the properties pane. This allows flow developer to choose a specific tagged version to goto and their corresponding variables are used for mapping.
4. Flow Error Handling
The error handling feature tries to deal all kinds of errors during the flow execution. Due to the nature of errors, it could be divided into two levels: the activity error and the global error[Global Error Handler].
- On the activity level, error paths are designed to handle specific problematic situations and it gives the flow designer more freedom on how to properly handle these scenarios
- For errors that are not captured by the activity error nodes, the global error handler would come into play and process the errors.
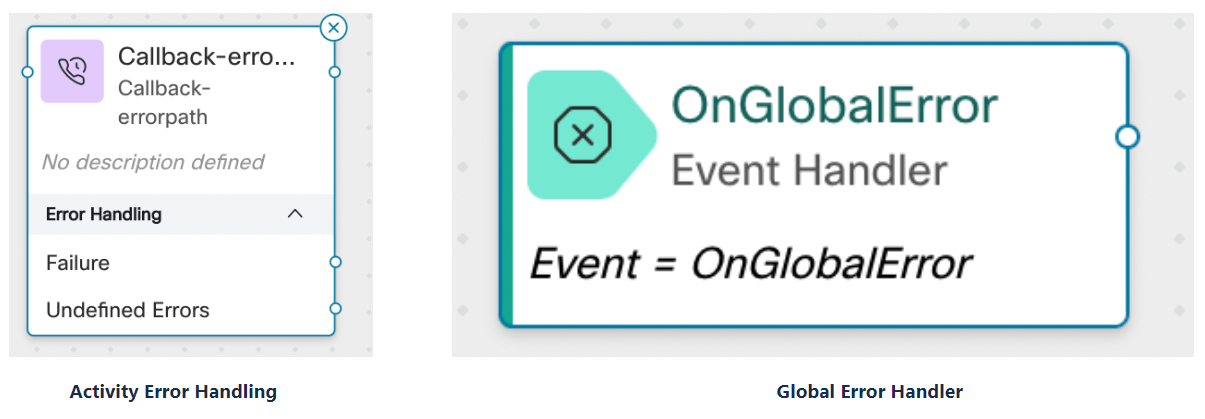
Activity Level Error Handling
Defined Errors: These are the errors which are already known to flow designers or the activity owner while creating a flow. They are managed by themselves by adding the error node to the activity.
Undefined Error: Undefined errors are a way to handle unexpected system conditions.