Agent & Supervisor Experience
Welcome to the Webex Contact Center Agent and Supervisor Experience!
In Part 1, we will explore the Webex Contact Center Agent Experience and the associated administrative toggles for configuring agents in the Webex Contact Center.
In Part 2, we will examine the Webex Contact Center Supervisor Experience and the associated administrative toggles for configuring supervisors in the Webex Contact Center.
Feel free to review the table of contents below.
Jump to any section using the live navigation on the right!
Table of Contents
Part 1: Agent Experience
Objectives
- Explore the Agent Experience on the Webex Contact Center by logging into the Agent Desktop application and navigating its out-of-the-box capabilities.
- Familiarize yourself with the complete Agent Desktop interface and its functions, covering Inbound, Outbound, and Omnichannel contact workflows.
- Dive into extensions of the Agent Desktop Experience, understanding the available widgets—both out-of-the-box and custom—and recognizing the potential of Desktop Widgets and customized workflows.
- The Bonus section (OPTIONAL) delves into advanced Desktop extensions, focusing on Desktop layout design and programmatic extensions.
Pre-Requisites
Note: The initial section of the lab is a walkthrough, the Desktop has been configured for you. This ensures you can experience a fully configured Agent desktop. For more insights on Desktop Administration and Configuration toggles available, please refer to the
Verify Desktop Administrationsection in the lab.
We’ll delve into each Administrative element in the following Verify Desktop Administration section that covers
Configuration and Administrative tasks.
You Will Need
(0) Lab Credentials and Attendee ID - Provided to you over email.
Please
submit the form below with your Attendee ID. All configuration items in the lab guide will be renamed with that prefix.
Create Chrome Profiles
-
For the lab, create new Chrome profiles so that you can login the Administrators, Agents and Supervisors using the same Browser.
- Select
Profileson Chrome - Select
Add Profile - Select
continue without an account - Give it a name .i.e
Admin - Click
done - Create 2 more profiles for
SupervisorandAgent
- Select
(1) One additional device (like your personal phone) to test inbound calls to the Webex Contact Center. You can use your cell phone for this purpose.
- Administrator credentials for the Control Hub: admin.webex.com.
- Agent Login Credentials for the Agent Desktop: desktop.wxcc-us1.cisco.com.
(2) Webex App Installed and Logged in. Provided your Supervisor Login ID - use the Webex App to login your Supervisor User.
- This user is in the format:
wxcclabs+supvr_ID
attendeeID @@gmail.com
(3) The items listed below have been pre-configured for you:
- Agent and Supervisor user accounts are configured and ready for logins.
- You can access the Agent Desktop via the URL: https://desktop.wxcc-us1.cisco.com.
- As an agent, you’re associated with two teams—designated by your Attendee ID—as “Team1” and “Team2”.
Example:
If your attendee ID is 100:
100_Team1
100_Team2
(4) Agents will use browsers for voice calls using WebRTC (Web Real-time Communication) endpoints. Additionally, Webex Calling extensions have been assigned to users (both agents and supervisors) to facilitate alternate device experiences. Webex Contact Center agents and supervisors can opt for any mix of these devices, encompassing PSTN endpoints and mobile phones.
(5) A preset inbound Voice flow is available for test calls.
Quick Links
For this lab, you’ll only require access to two web portals:
Control Hub Administration: https://admin.webex.com
Contact Center Desktop: https://desktop.wxcc-us1.cisco.com
Lab Configuration
The following Administration entities have been configured for you via Webex Control Hub
Please note, that to proceed to the next section, you will need to use the accounts shown in the top 3 rows.
| Entity | Name |
|---|---|
| Agent 1 | wxcclabs+agent_ID |
| Supervisor 1 | wxcclabs+supvr_ID |
| Administrator | wxcclabs+admin_ID |
| Desktop Profile | |
| Entry Point | |
| Queue | |
| Team 1 | |
| Team 2 | |
| Outdial ANI | |
| Outdial ANI Entry 1 | WebexOneOutdial ANI |
| Address Book | |
| Address Book Entry 1 | WebexOne Addressbook Entry |
| Multimedia Profile |
1.1: Agent Desktop Overview
Desktop multi-language support is based on the language settings on the browser. Currently, we support 29 languages, including: Bulgarian, Catalan, Chinese (China), Chinese (Taiwan), Croatian, Czech, Danish, Dutch, English (UK), English (US), Finnish, French, German, Hungarian, Italian, Japanese, Korean, Norwegian, Polish, Portuguese (Brazil), Portuguese (Portugal), Romanian, Russian, Serbian, Slovak, Slovenian, Spanish, Swedish, and Turkish.
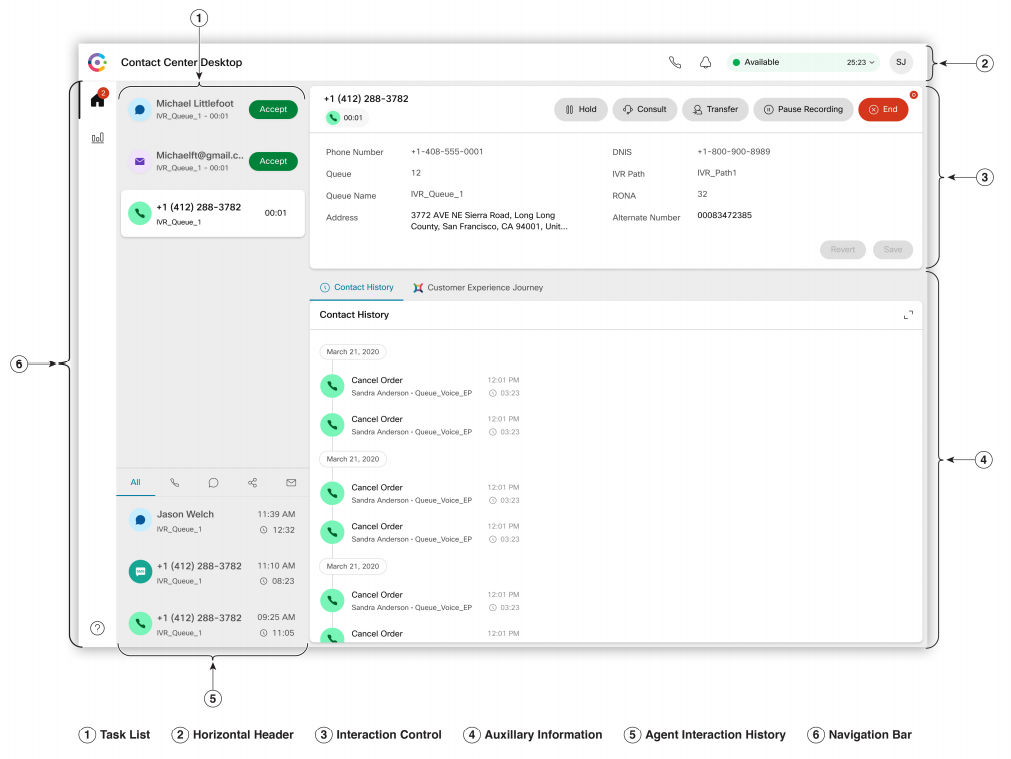
The Agent Desktop is divided into 6 sections. The image above shows the general view after receiving an interaction.
Here is an overview of the sections:
-
Task List: When a request is routed to your queue and you are Available, a new request appears in your Task List pane. You must accept the requests to start communication with the customer.
-
Horizontal Header: Basic functionalities such as: Title and logo, Agent availability state, Notification Center, Outdial and User Profile. We will explain more in detail some User Profile options in the next section of the lab.
-
Interaction Control: When you accept a voice call (inbound or outbound), by default, the Interaction Control pane is expanded. This pane includes: customer information (CAD variables), timers (for example: connected and call on hold time) and call control buttons (Record, Hold, Transfer…).
-
Auxiliary Information: The center pane displays details based on your selection of the contact card in the Task List panel. For Voice requests, it will display the customer contacts history. Whereas for any digital channels (email, chat or social messaging), you will see the whole conversation with the customer and you will be able to send new messages.
-
Agent Interaction History: You can view your previous contacts of the agent across all the channels (voice, email, chat, and social) in this pane. The pane displays details for the last 24 hours. Moreover, for Voice channel you can callback to the contact phone number.
-
Navigation pane: By default you can find the following icons here: Home, Agent Performance Statistics and Help. However, you can customize it and add some additional icons and widgets.
1.2: Desktop Login Process
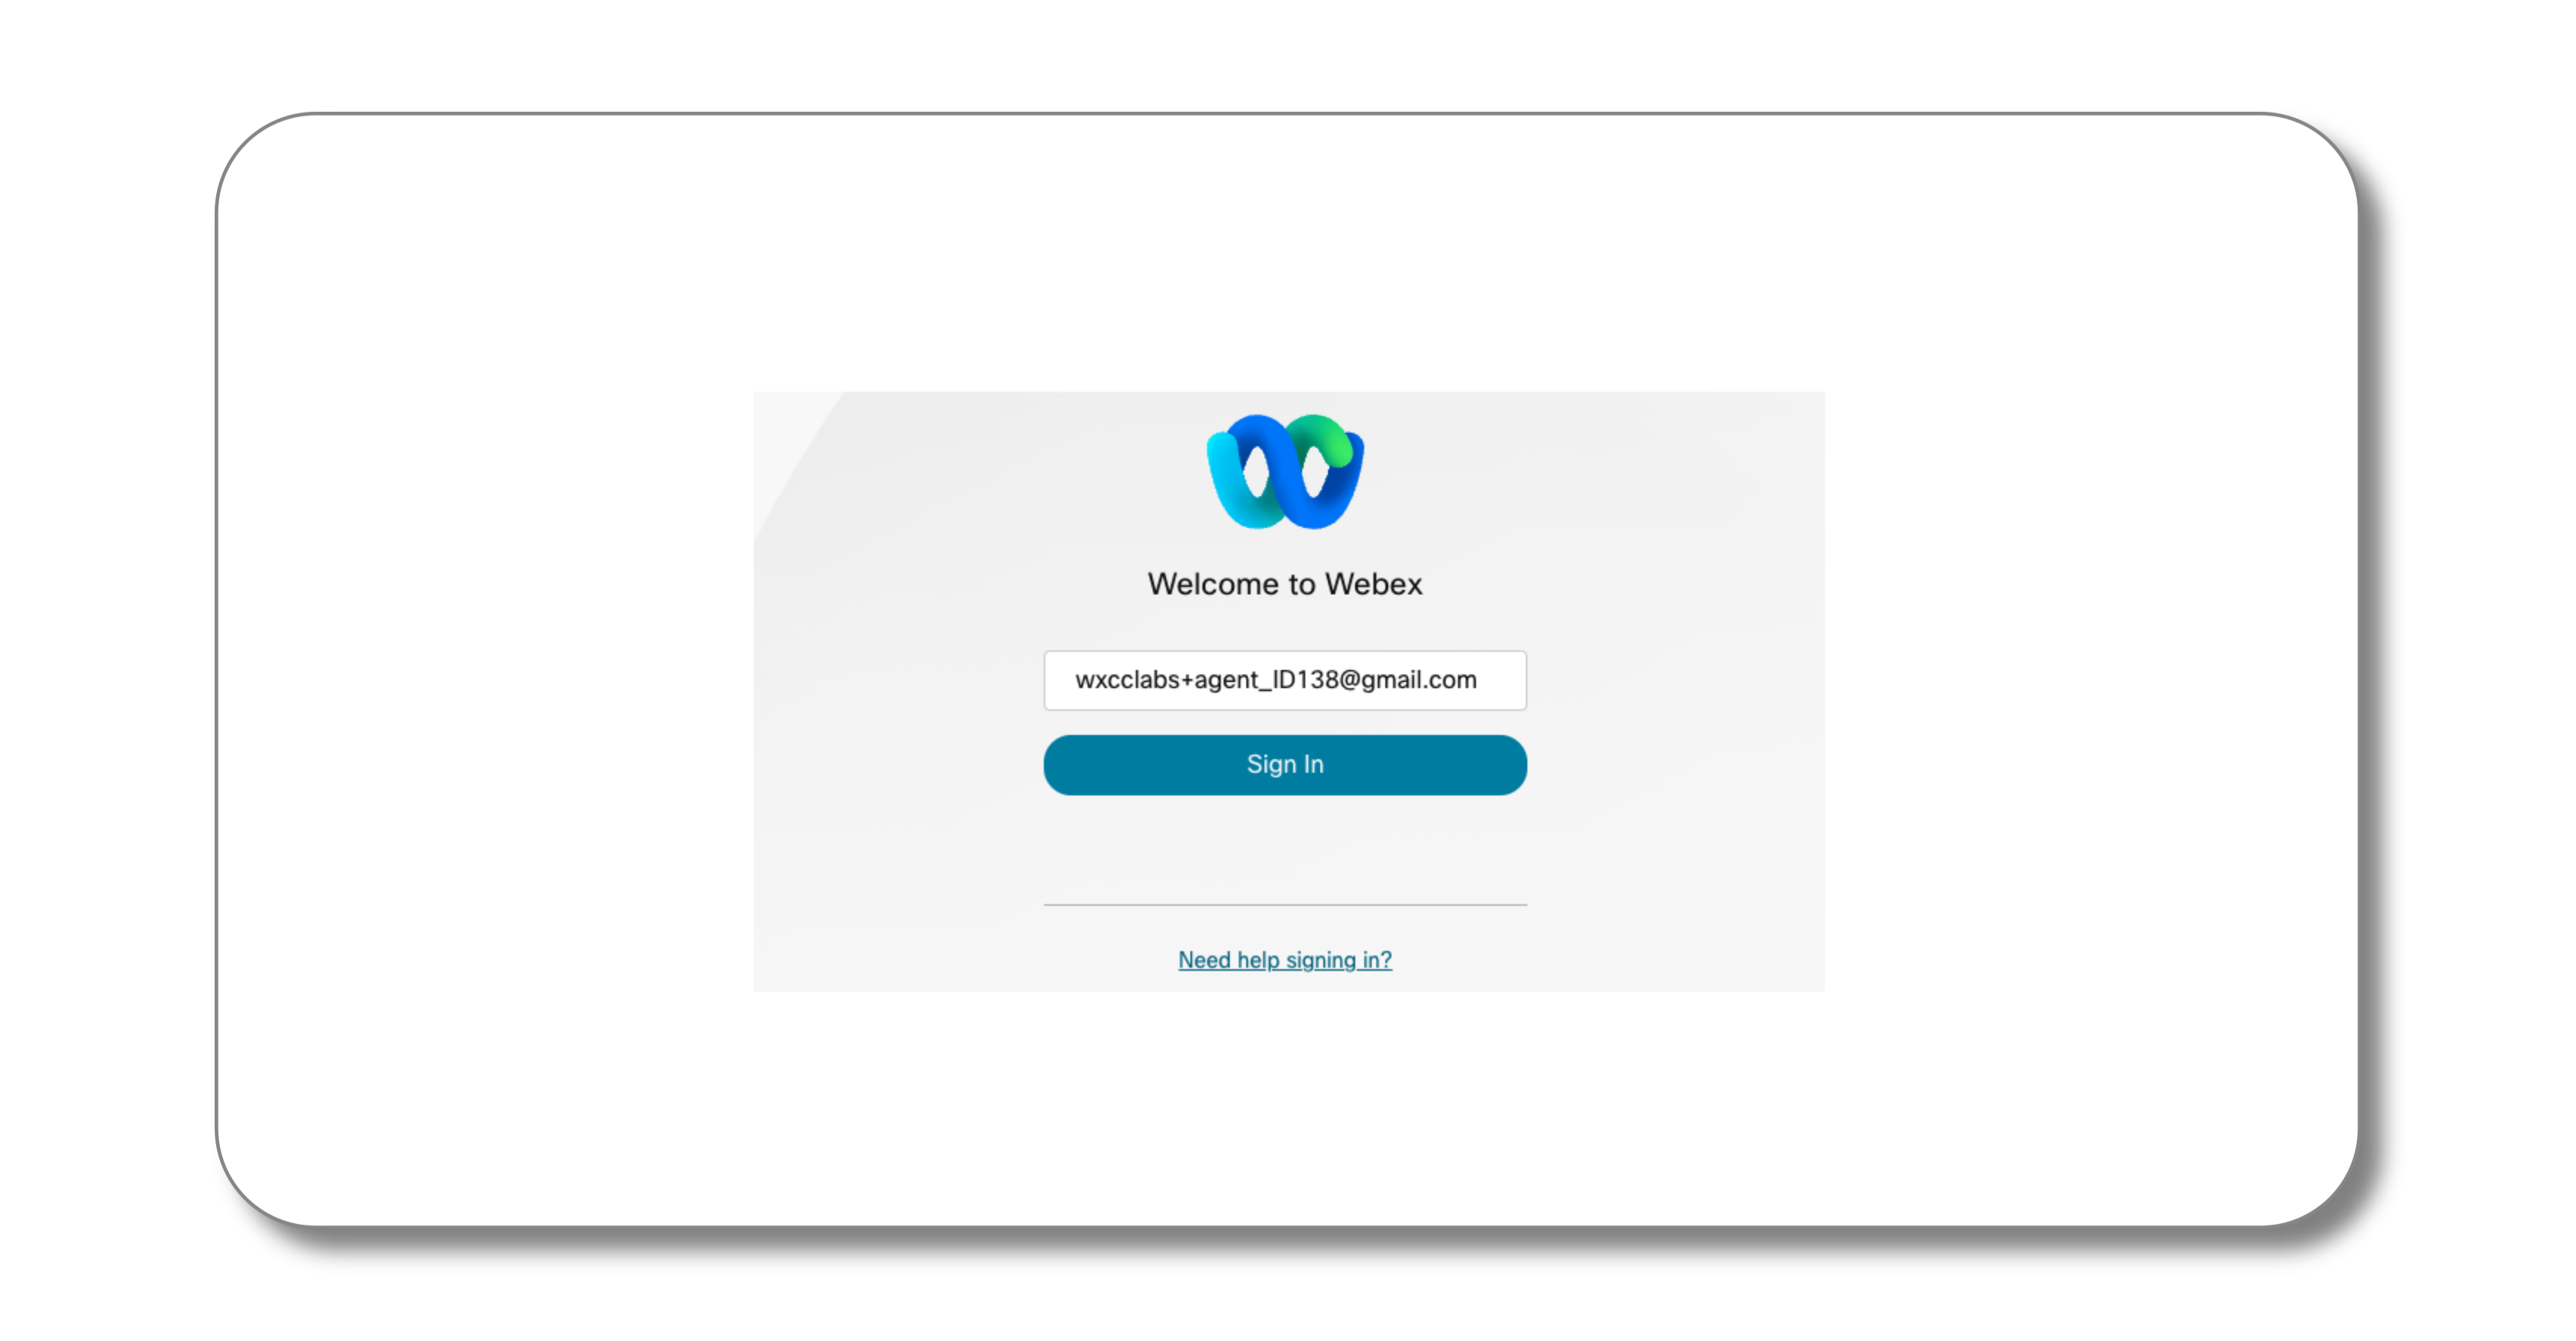
- To Login to the Agent Desktop, launch Google Chrome and navigate to the URL: https://desktop.wxcc-us1.cisco.com
Note: Please use Google Chrome as the browser to take advantage of the all new WebRTC Voice Option.
Tip: You can also find this link under Control Hub: admin.webex.com > Contact Center > Settings
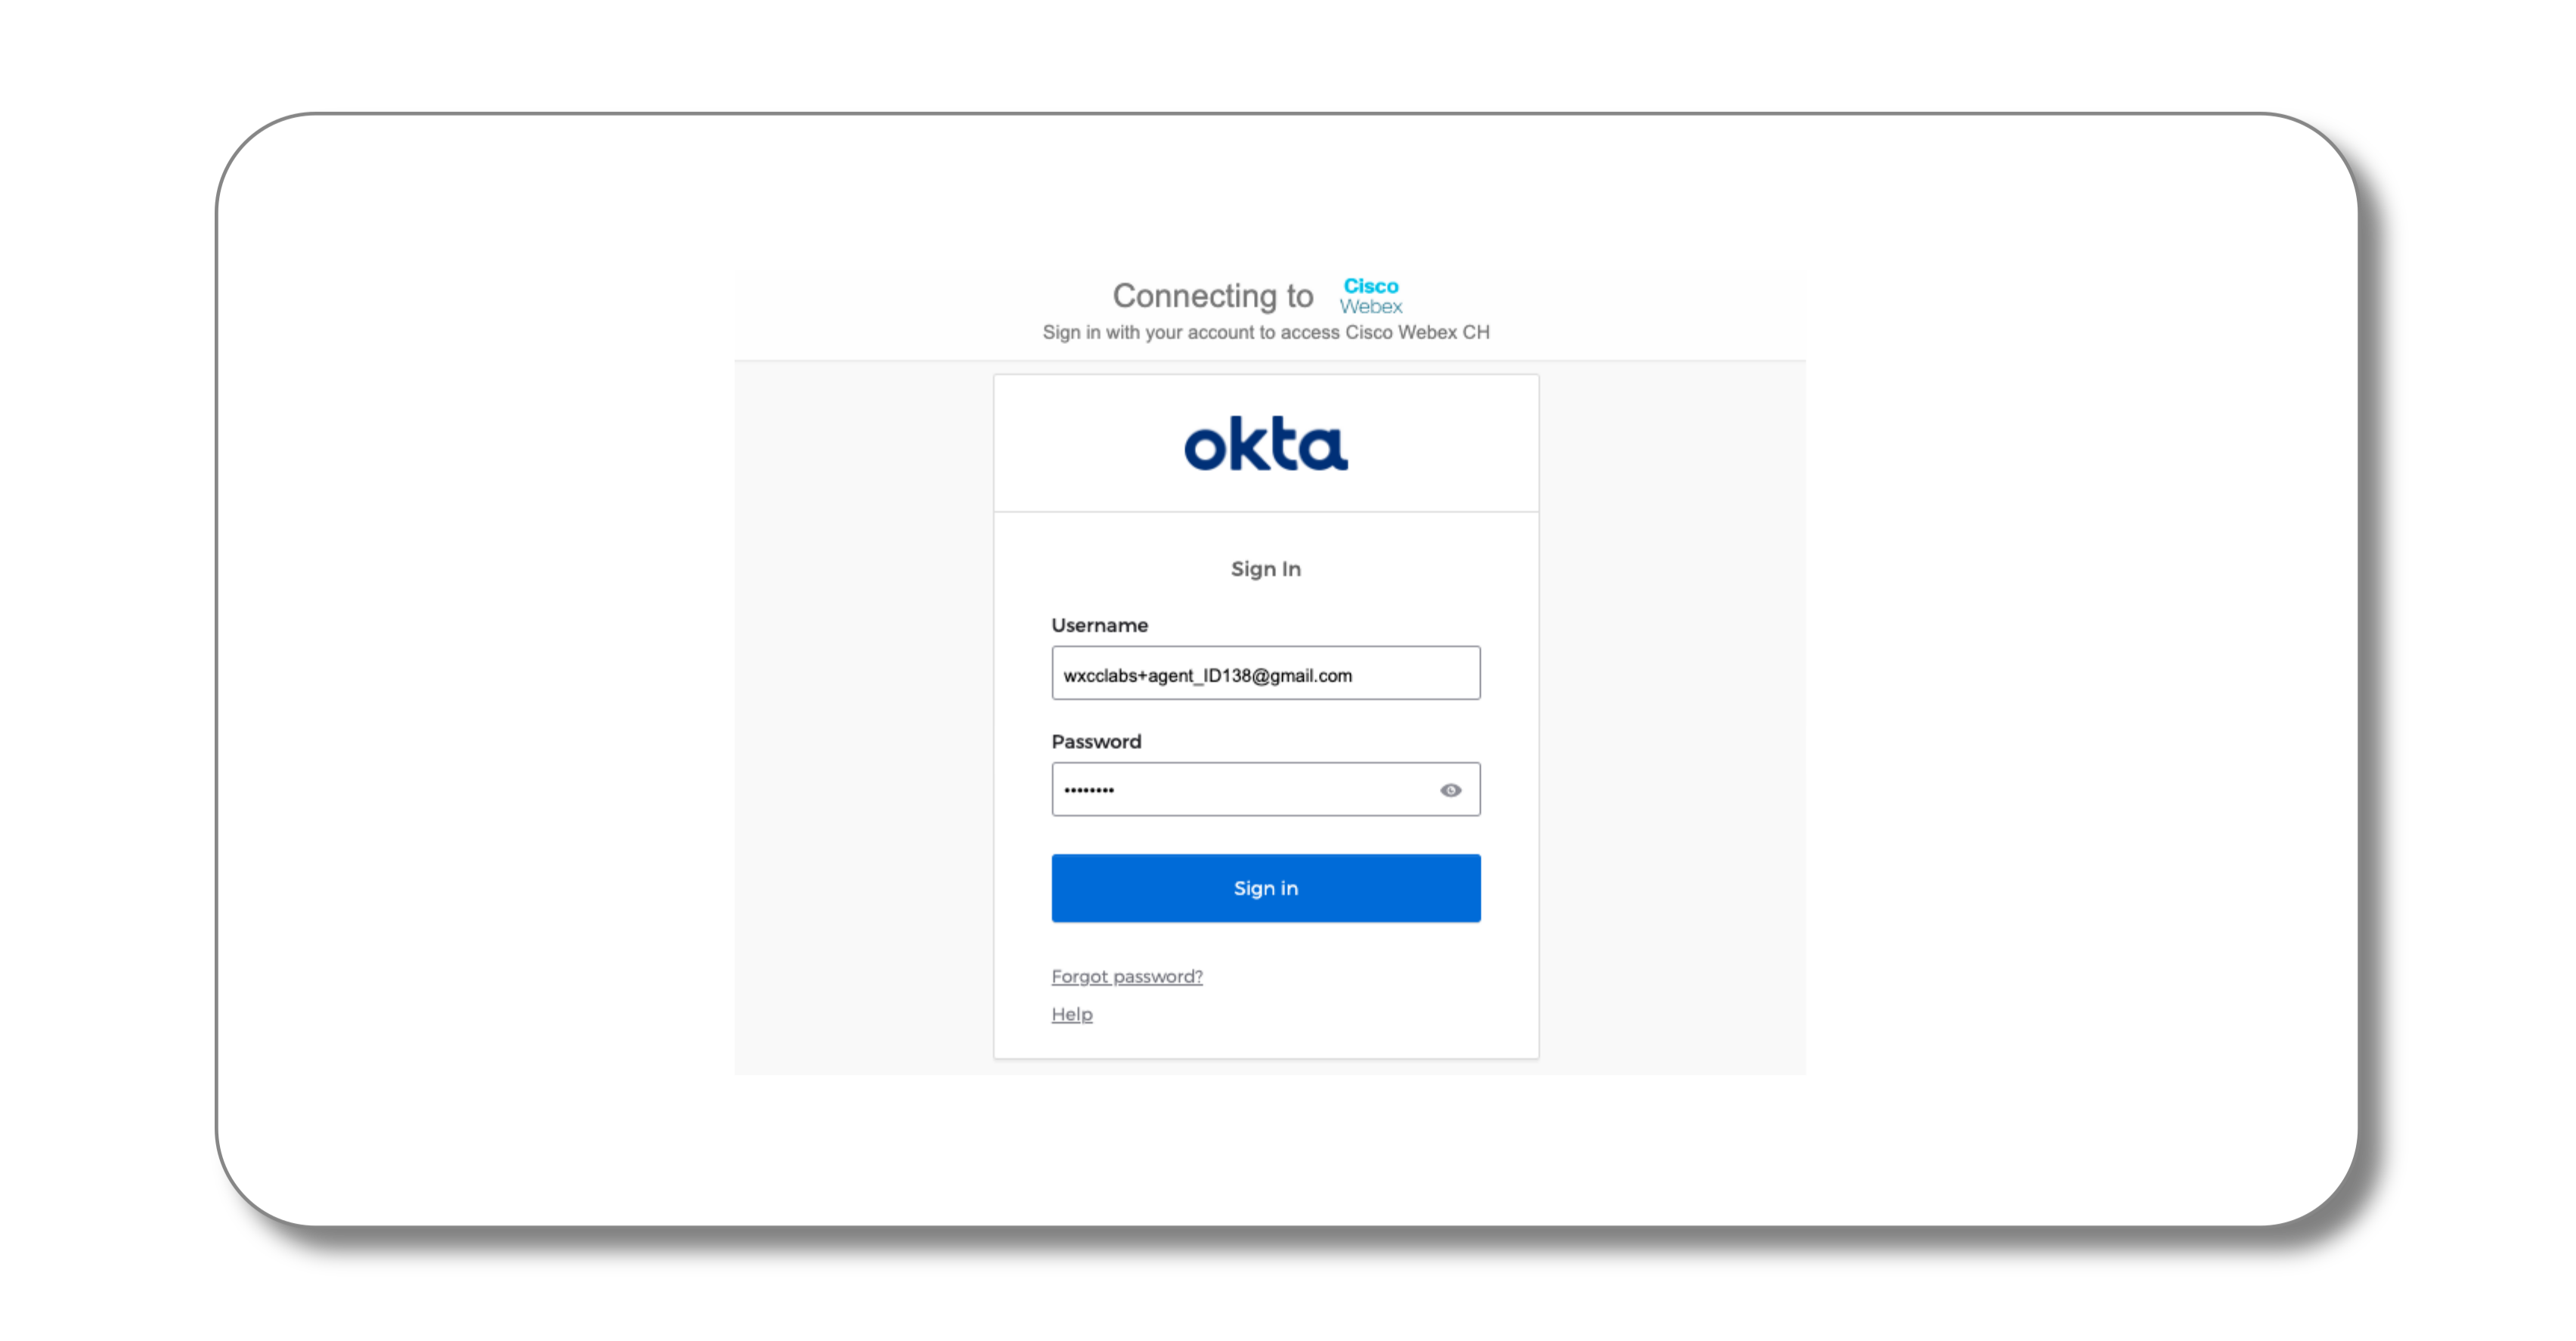
- Once you’re in the login page, enter the agent credentials (username and password)
In this example, please use the specific login for your attendee ID
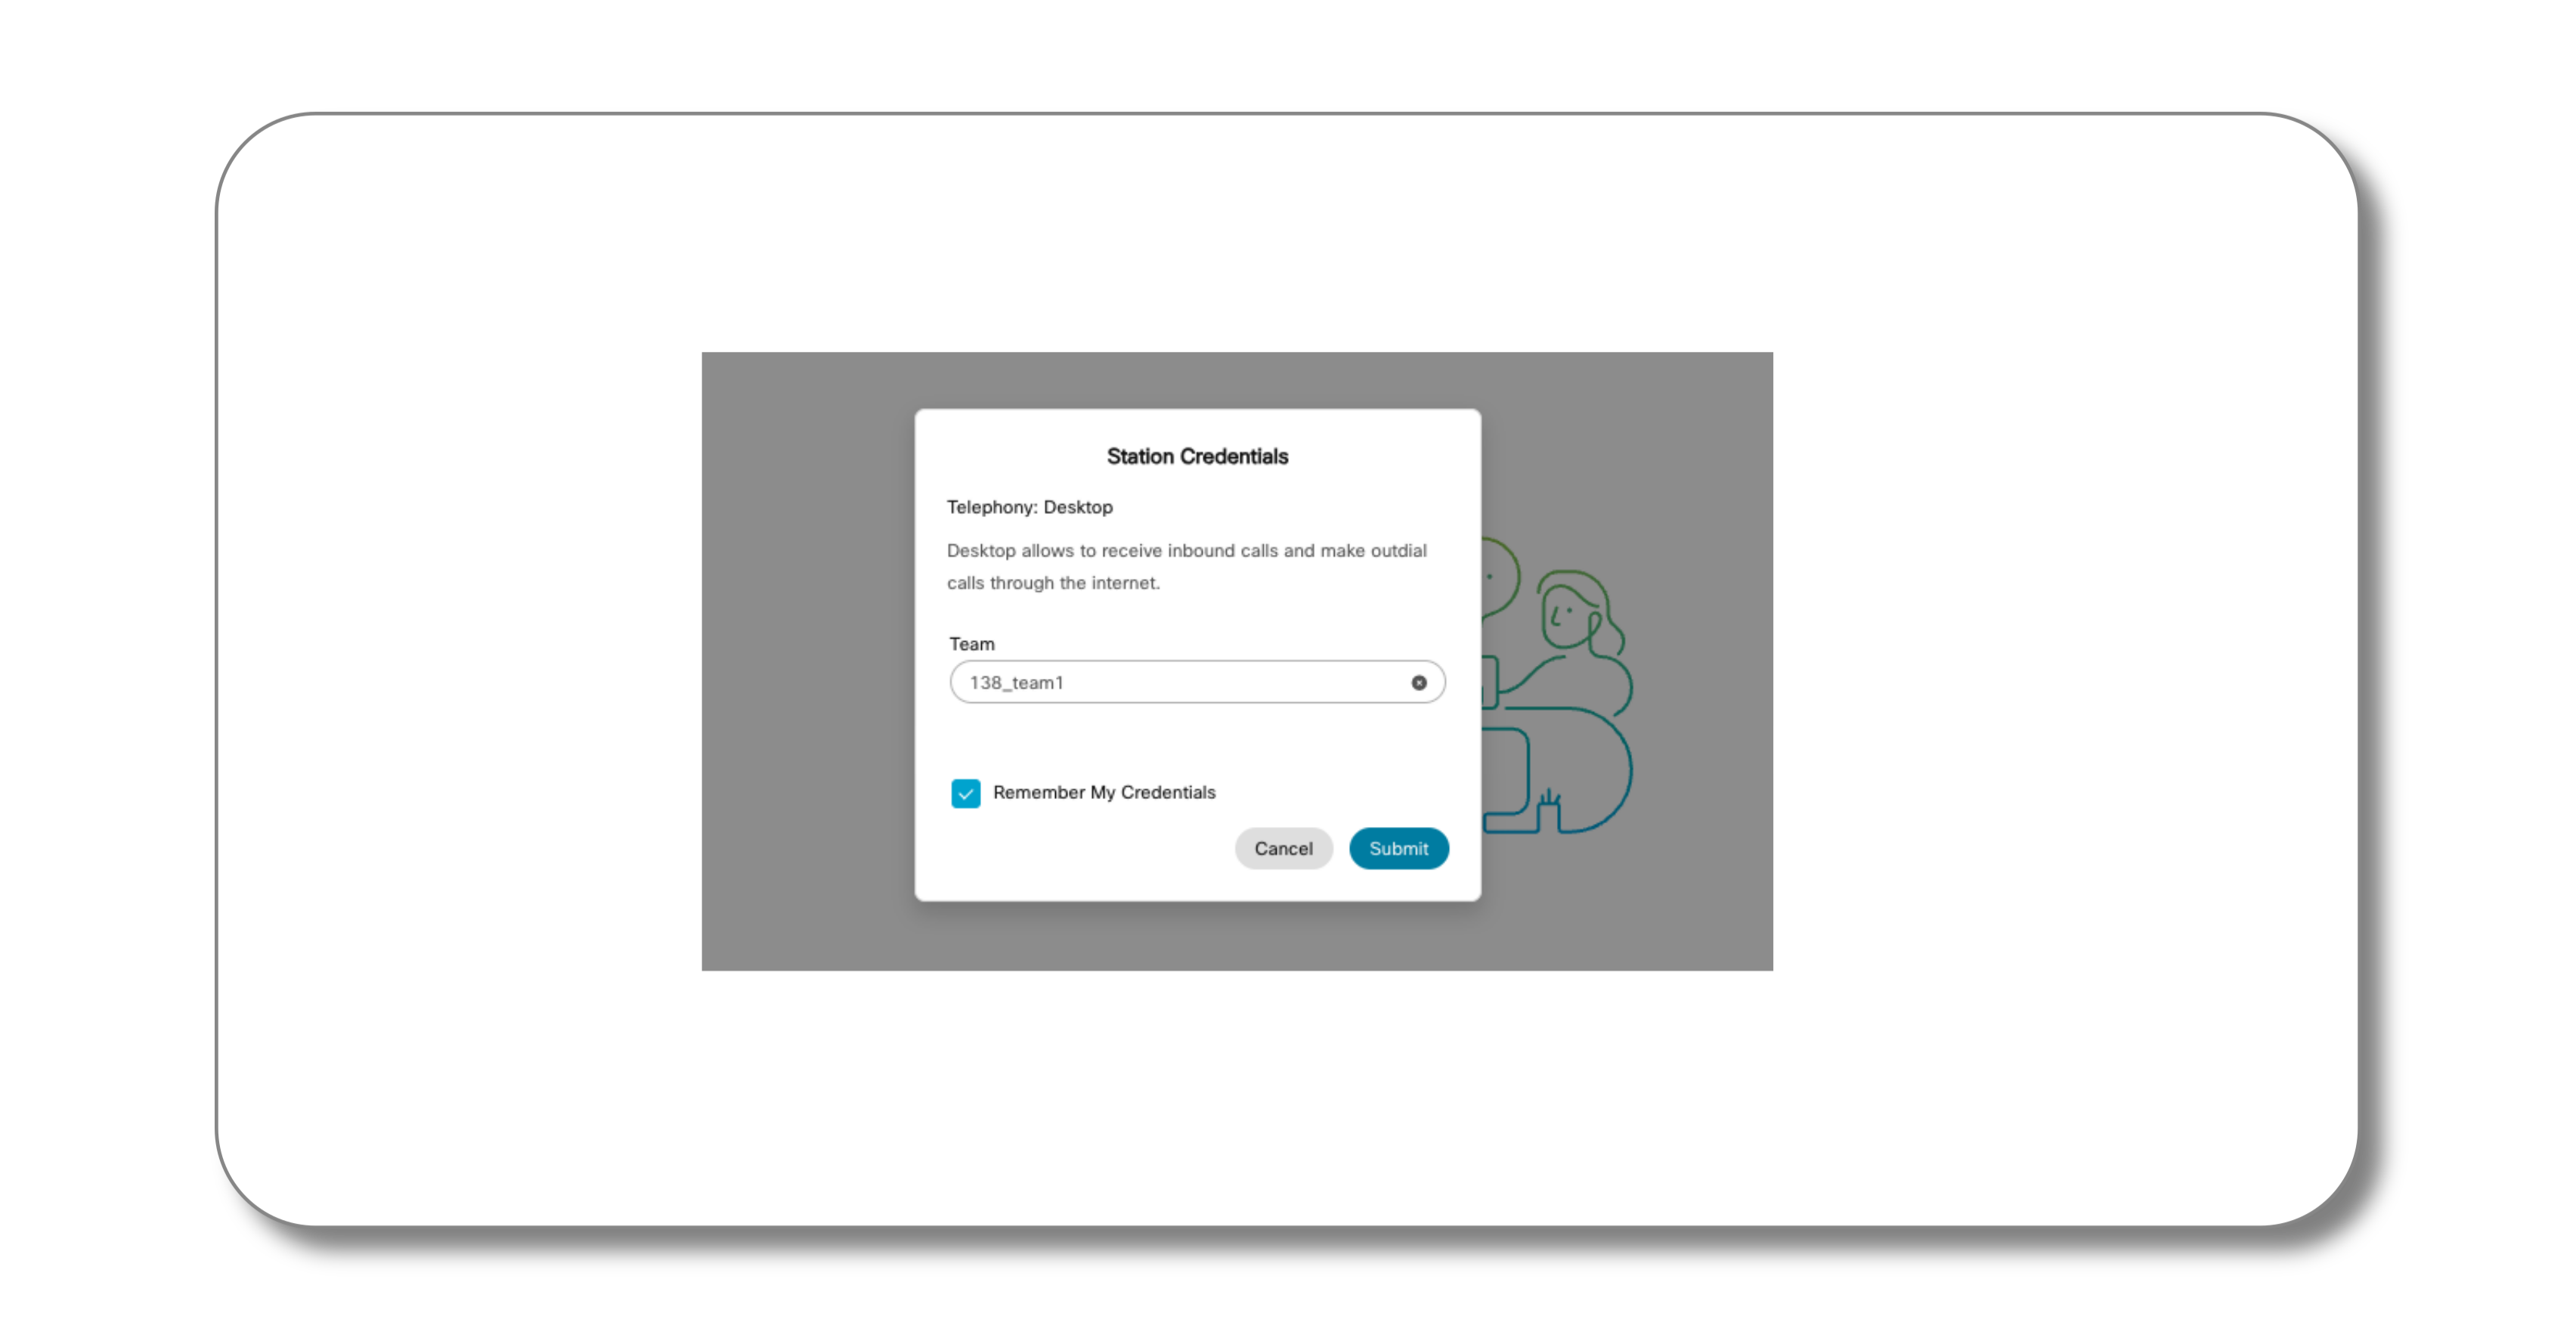
- This is the station Login Screen. Agents may input the number where they need to receive incoming and outdial calls.
We will use the new feature of Desktop telephony that uses the browser as a device to directly receive calls.
-
Notice that the voice option defaults to “Desktop”.
-
Select Team1 from the list. Agents can belong to multiple teams, but they can only receive calls of 1 specific team. Your agent is configured for 2 teams.
-
Check the Remember My Credentials box to save your credentials for future sign-ins.
-
Click Sign in to be connected to telephony and complete the login process.
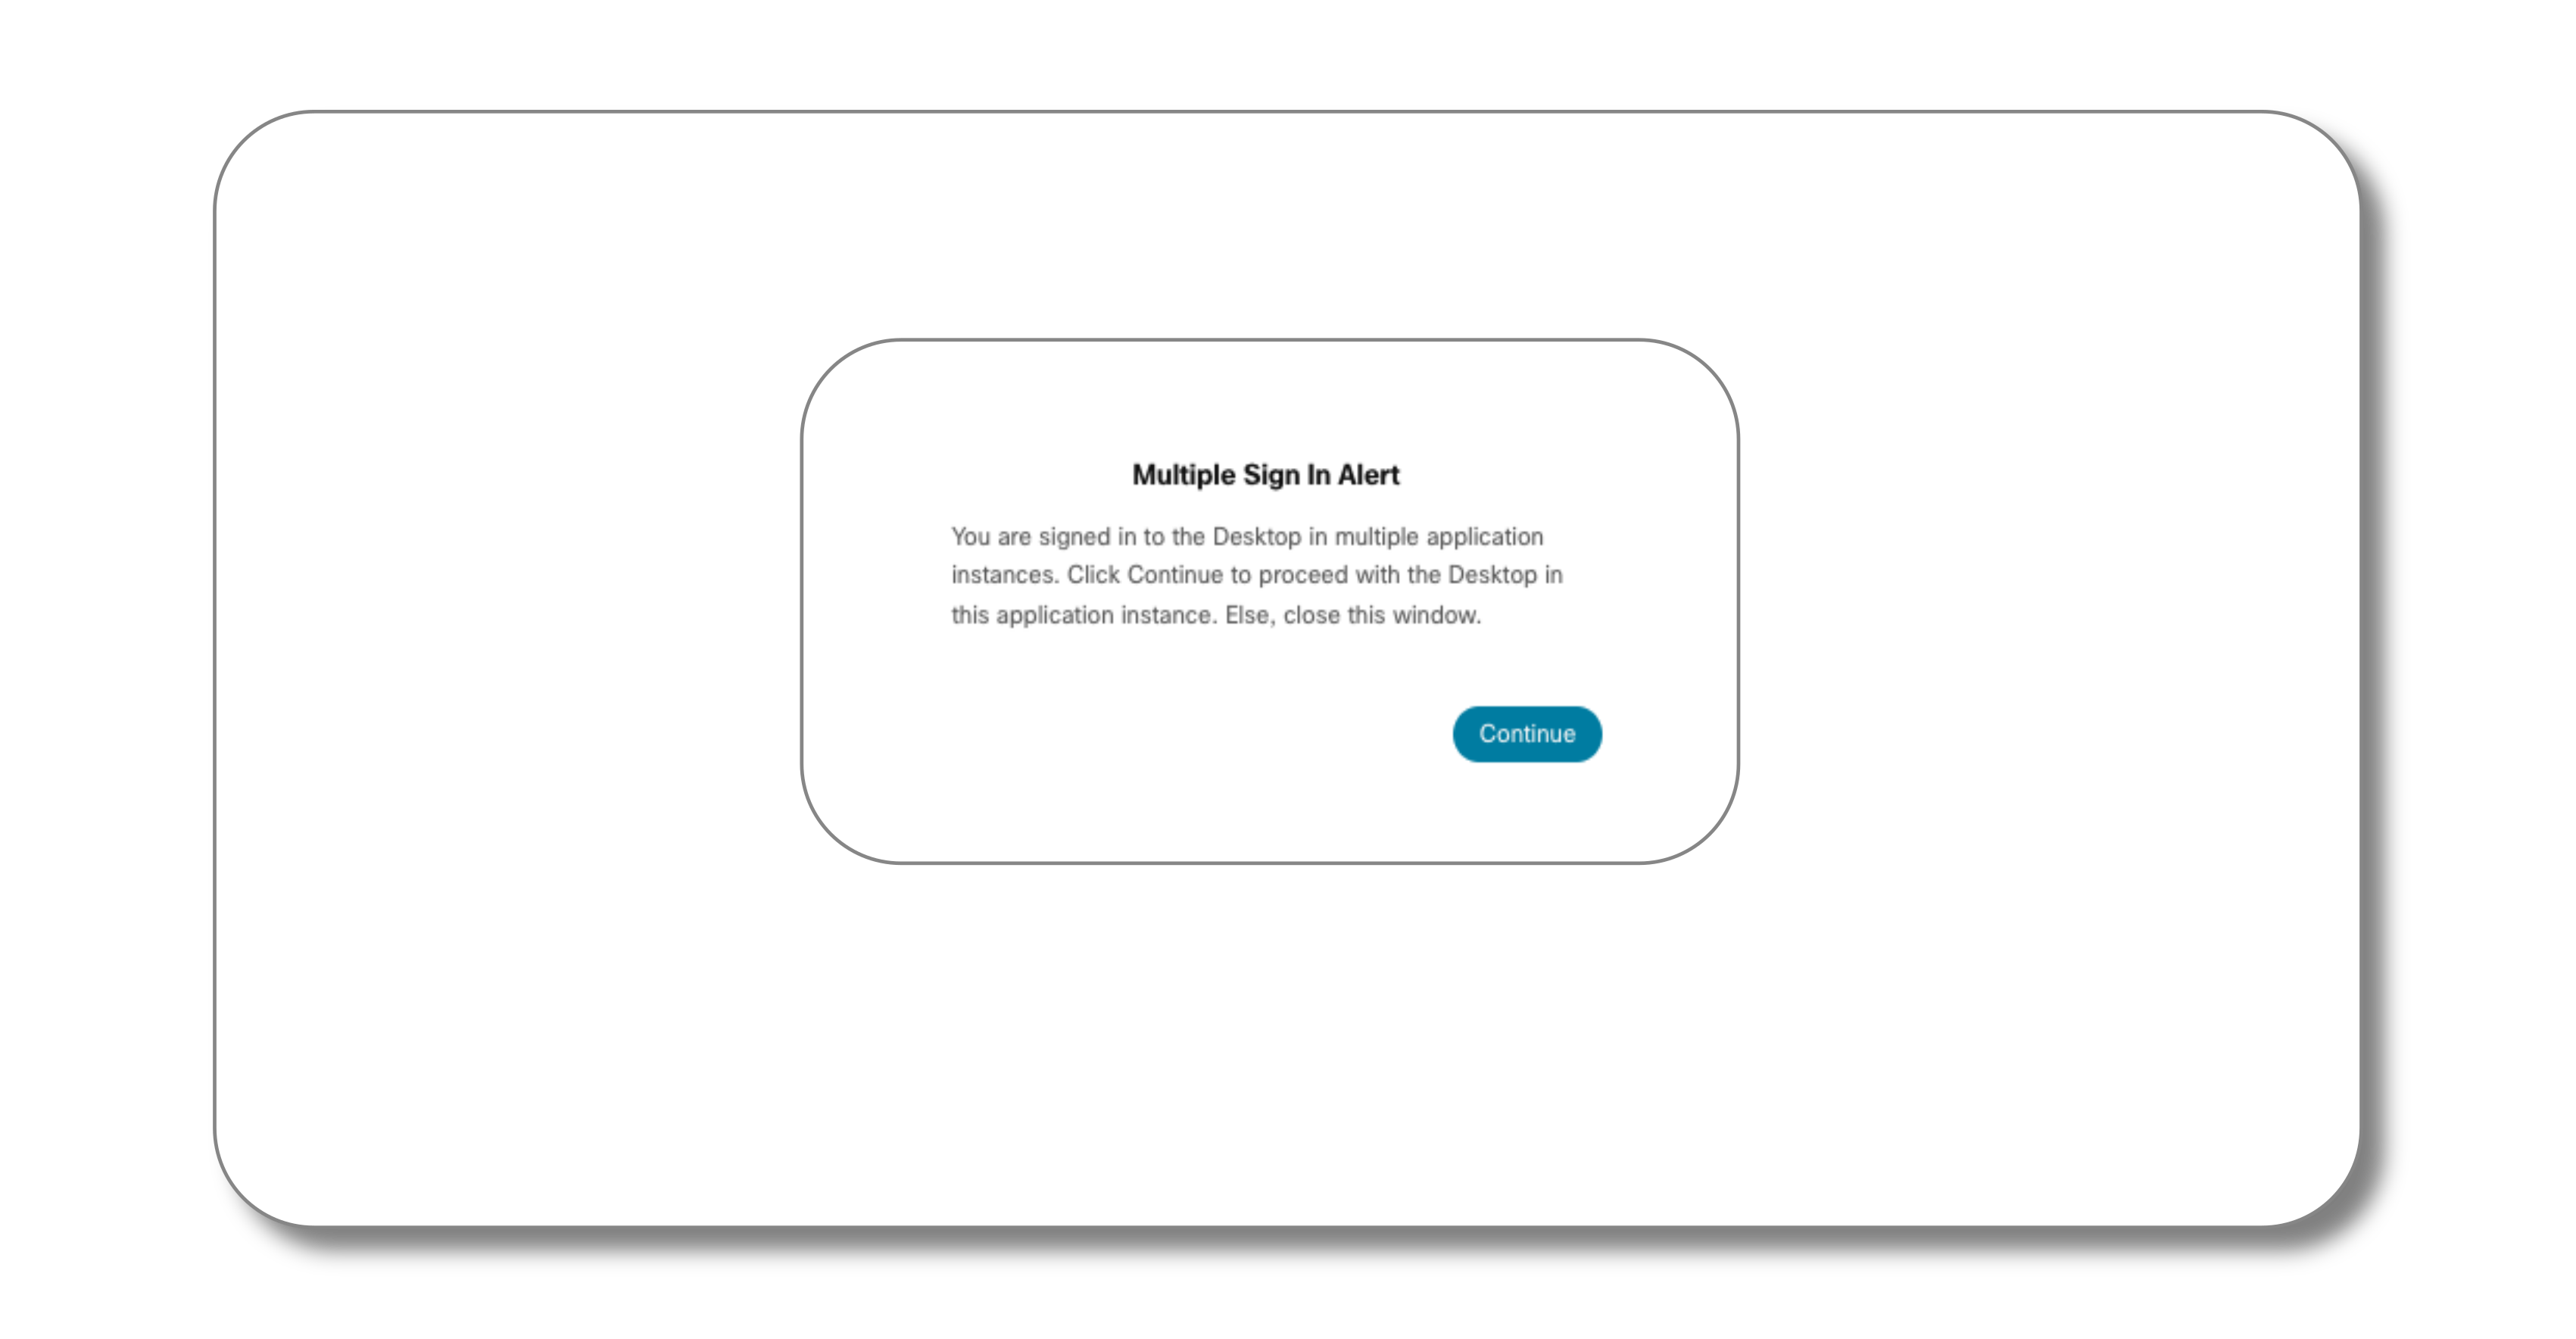
NOTE: Agents cannot access the Agent Desktop from multiple browsers or multiple tabs of the same browser window. In that case, a warning message will be displayed.
The video below shows a demo about the agent login process and the available options:
NOTE:
The login device and DN can be enforced on the Desktop Profile as follows
- If your administrator configures the default Dial Number (DN), the default DN is prepopulated in the Dial Number and Extension fields.
-
If your administrator restricts the DN to the default DN, you cannot edit the prepopulated DN when signing in to the Agent Desktop.
-
They can choose between Dial Number or Extension or Desktop
-
Extension: Just in case the agent is using Webex Calling or some other softphone as calling endpoint
- Dial Number: E.164 format phone number
- If you check the International Dialing Format box, you can choose the country code based on your geographical location from the drop-down list. You can also enter a country code or country name to filter the list. Dial numbers are validated based on the country code
- Dial Number: E.164 format phone number
-
Explore Agent Desktop Header Actions
The following section explores the Agent Desktop header actions.
Explore Agent State and Idle codes
The header section of the agent desktop contains the State change toggle where the agent can make themselves available.
This also has the section where you can view the Idle codes.

Note: The Idle codes are customizable and configured under Webex Control Hub > Contact Center Settings > Idle / Wrap up Codes These Idle codes can indeed be customized per Desktop Profile, on a per user level. Desktop Profiles can also be segmented on a Tenant or Site, or even Team level - i.e one Profile per Team
Explore the Agent Personal Statistics
The Agent can access the out of box Agent Personal Statistics Reports on the left navigation screen.
Note: These Agent Personal Statistics are canned reports out of the box. However, one can configure custom Analyzer Reports for Agents in the Layout if custom reporting views are needed. The Supervisor Desktop Layout allows you to hide/show certain Personal Statistics.
Organizational Messaging using the Webex App
Launch the Webex App from within the Desktop to message other users in the organization. This is a quick way for the Agent to message the Supervisor, or the Supervisor to be able to send messages to the Agent.
Send a message to the supervisor user - search for supervisor or admin user and send a message.
Your Supervisor is configured in the format: wxcclabs_supvr_ID<attendeeID>@gmail.com
Launch the Notification Pane
The notification pane on the desktop shows you the notifications of incoming calls or messages. The agent can also launch previously delivered screenpops from this pane.
Launch the Agent Settings Pane
To review or change the Desktop Settings, click on the persona icon on the top right.
Verify Profile Settings
The Profile settings shows the Agent which Device(s) or Teams are configured for use, allowing the agent to switch the Device OR Teams that they wish to login.
This is defined in the Desktop Profile on the User or Team level. Teams are defined on the User Settings under Contact Center Settings
Verify Channel Information for Omnichannel
The Channel capacity determines how many contacts the Agent can handle at a maximum, per channel.
This is defined in the Multimedia Profile on the User or Team level.
Verify Notification Settings
The notification settings under user settings allows you to Enable/Disable the Notifications, Enable Silent Notifications, or Enable/Disable the sound. You can also change the volume of the Chime for the incoming contact.
Note: These settings persist as long as the browser cache is retained for the user.
Switch to Dark Mode
You can switchover the theme on the Desktop using the Dark mode toggle. This helps with visibility on the eyes in low light conditions and can be a user preference for the theme.
This is another setting that is preserved with the user’s browser cache.
View Desktop Mic & Speaker Options
This is a setting that is enabled for all logged in Agents with the Desktop (WebRTC) option. This can help troubleshoot any audio related settings for the Agent’s microphone or speaker volumes.

Explore Shortcuts
Try to speed up actions with keyboard shortcuts available out of box on the Agent Desktop.
You can launch the shortcuts using Ctrl+Alt+F for Windows (or control+option+F for MAC users)
Change State Shortcuts
Change the state from Idle to Available using the shortcut
Example for Mac users:
Try Ctrl + Option + F to bring up the shortcuts Try Ctrl + Option + R to go Ready Try Ctrl + Option + N to go Not Ready by typing an Idle code + Enter
Download Error Logs
A diagnostic must have for Agents is the ability to download error reports to send to administrators for troubleshooting.
Use Ctrl + Shift + 2 as a shortcut to download and view the log file!
What you will notice when you open the file: The Desktop uses a combination of secure HTTPS as well as Websocket connectivity to stay connected to the backend. From a connectivity standpoint, this means that the Agent’s Desktop requires network access, latency and bandwidth requirements to facilitate streamlined HTTPS traffic for both pure REST as well as WebSocket payloads.
Test Your Network
This is specifically for the Desktop Voice option. Agents can also test their local network connectivity for latency and bandwidth requirements on the Agent Desktop - eespecially for diagnostics.
Explore the new Help Documentation
The help documentation has been enhanced with Webex Help Center. Agents will now be redirected to the new Webex Help Center for online help including search.
Note: This will now open a new tab for the
1.3: Make an Incoming Call
In this section, you will will interact as an agent and test an Incoming call. Review the video of the lab section above to understand the different call handling options.
-
In order to test properly an incoming call, first we need to make sure that we have all the call handling options enabled
-
Login with your administrator user in the Control Hub: https://admin.webex.com Navigate to SERVICES > Contact Center > TENANT SETTINGS > Desktop
- Make sure that
End CallandEnd Consultare enabled - You can also configure Auto Wrapup and RONA timeouts
- Make sure that
- Navigate to DESKTOP EXPERIENCE > Desktop Profiles and view your Desktop Profile:
- In the Collaboration tab:
- Make sure the Buddy Teams to
All - Make sure Enable
Consult to Queueis also set
- Make sure the Buddy Teams to
- In the Collaboration tab:
- Navigate to CUSTOMER EXPERIENCE > Queue and view the
WebexOne_InboundQueue- Make sure
Permit Monitoring, Pause/Resumeare Enabled- Make sure that these settings are also enabled at tenant level
- You can also set the Recording Pause Duration. This is the maximum duration that an agent can pause the recording
- Make sure
-
Now place it’s time to test the incoming call
- Login the Agent Desktop with your Agent 1 user
- Move to
Availablestate - Place an incoming call to the DN mapped to your EP, in other words, this is the number a customer would call into… (You should have mapped your EP in Lab 2)
- You will be asked to enter your Attendee Id: i.e. 138#
-
When the call arrives - you will be able to see an incoming popover when the Agent is offered the contact. It will have an Accept and Decline button since it is a Browser powered softphone.
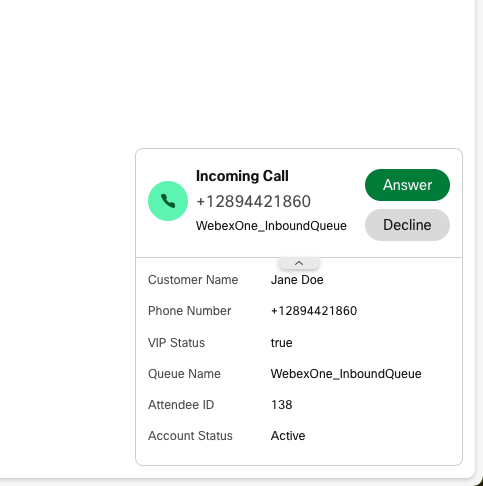
Click on the Accept Button to take the call

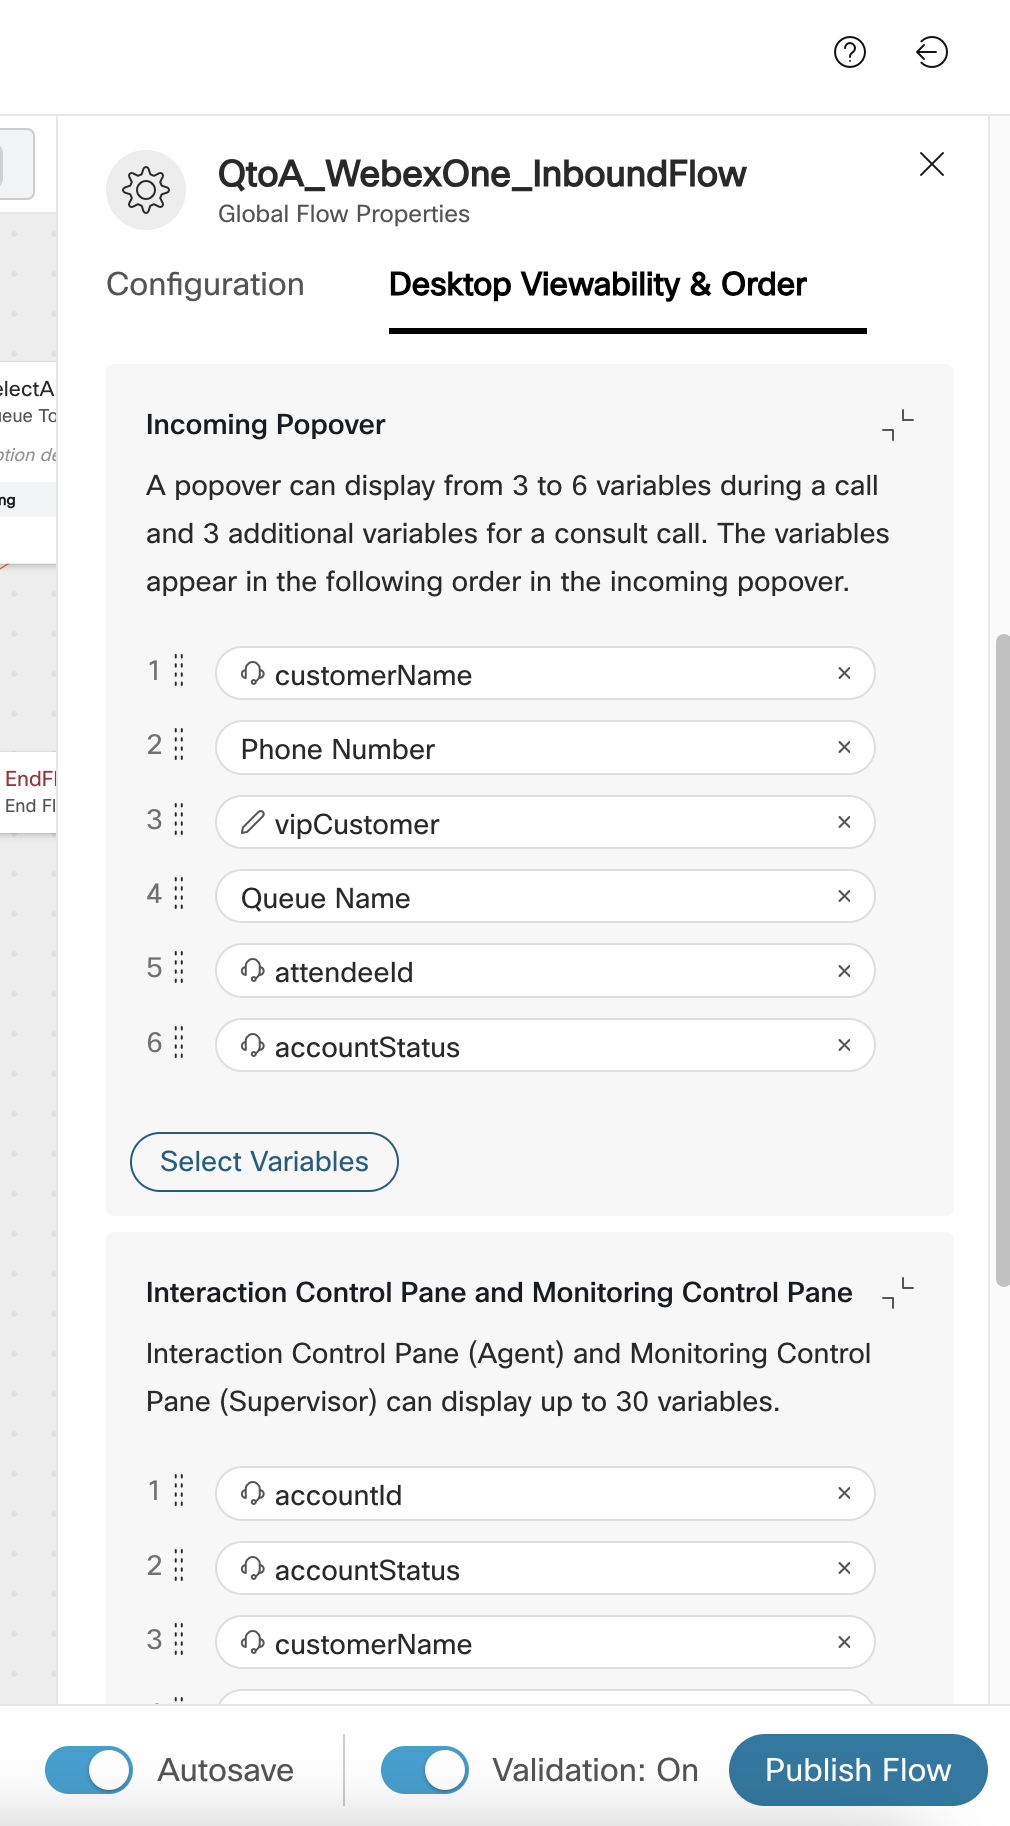
Note: The variables displayed in the incoming popover and on the Desktop can be ordered in a custom manner. This is done on the flow designer on the flow level.
- After you have Accepted the call in the Agent Desktop of your Agent 1
- Check the CAD variables and try to edit any of the Editable Variables. This is customizable via Flow Designer.
- Notice the status of the Desktop has changed to
Engaged.
Note: While you are engaged for a voice call, you are still marked available on other channels based on your channel capacity. This is the configuration on the Multimedia Profile settings on the Agent Desktop.
- Let’s play with the call interaction buttons
- Click on
Holdto pause the conversation with the end-customer and click onResumeto talk with him again - Click on
Pause Recording, say some personal infor and click again onResumeto continue the recording - Click on
Transfer, selectQueueand then in the pull down menu select theWelcome_EP- End-customer be redirected to a common EP already created
- End the call (this can be done from customer or agent perspective) and select any Wrap-up code
- Click on
For this part, you will need a third calling device for interacting as a Supervisor
-
Now, lets create a new Chrome profile so we can login the Supervisor on the same browser
- Select
Profileson Chrome - Select
Add Profile - Select
continue without an account - Give it a name .i.e
supervisor - Click
done
- Select
-
After you create a new Chrome Profile, login in the Agent Desktop with your Supervisor user and move to
Availablestatus- In a separate device (you mobile phone for example), login in Webex App with your Supervisor user
- Place the call from the third calling endpoint (your personal phone for example)
- Try
Consult, Conference and Transferfunctions between End Customer, Agent and Supervisor.
Agent States
-
Available: Indicates that you are ready to accept and respond to contact requests that are routed to you. After you sign in, you must select Available from the drop-down list to accept voice call, chat, email, and social messaging conversation requests.
-
Idle: Indicates that you are signed in but not ready to accept any routed requests. When you sign in to the desktop, your state is set to the default idle reason configured by your administrator.
-
RONA (Redirection on No Answer): Indicates that you have not accepted a voice call, chat, email, or social messaging conversation request within the specified time. Your administrator configures the time available to accept an incoming request from any channel. If you cannot accept the request within the specified time displayed in the timer, the action button on the popover flashes for a few seconds and your state automatically changes to RONA. The request is returned to the queue. When your state changes to RONA, a popover appears and you can select the state that you want to be moved: to Idle or to Available
-
Engaged: indicates that you are busy and connected with a customer. When you have accepted the contact request, the Available state changes to the Engaged - Available label. When you’re in this state, you can continue to receive active requests on other channels, depending on the channel capacity. If you don’t want to receive more requests, you can select any Idle state, so you will be moved to Engaged - Idle label.
Manage Voice Calls
-
Call Associated Data (CAD) variables: These variables allow the administrator to collect call data such as a case number or any action code of the customer. In Flow Designer, your administrator configures the variables, labels of the variables, and the order in which they must appear on the Interaction Control panel. While you are on a call, you can edit the CAD variables if your administrator configures the CAD variables as editable.
-
Hold/Resume: You can put the customer on hold so that you can consult with another agent or lookup additional information without having the customer listening to you. Click on Resume to take a call off hold.
-
Pause/Resume Recording: Your administrator can choose for each Queue either to record all the calls or not. In case the recording is enabled, the agent can Pause and Resume the recording.
-
End: After you have helped your customer with queries, it is a good practice to ask the customer to end the voice call. If necessary, you can also end the call. When the customer ends the call, agent will need to select some Wrap Up Reasons from the dialog box appears.
-
Consult: You can initiate a consult call with another agent while you are on an active call with a customer.
-
Transfer: If you cannot resolve a customer query and want to escalate the active voice call (inbound or outbound), you can transfer the call to another agent or supervisor.
-
Either for Consult and Transfer you have the following options:
-
Agent: You can either select an agent from the drop-down list, or use the search field to filter the list. The drop-down list displays the names of available agents.
-
Queue: You can select a Queue or Entry Point from the drop-down list, or use the search field to filter the list. The drop-down list displays the queues that are available to transfer the call.
-
DN: You can enter a name or number; select a name or number from the drop-down list; or use the search field to filter the list. The drop-down list shows the grouped list of contacts in your address book. Names are listed along with the numbers for the contacts in the address book.
-
-
Conference: To start a three-way conference call between you, the customer and another agent. For this option, you (primary agent) must have initiated a consult call. Click Transfer to transfer the call to the consulting agent. The consulted agent can exit the call by clicking Exit Conference, and the call continues between the primary agent and the customer. Only the primary agent can end the Conference.
1.4 Make an Outdial Call
In this section, we will test Outdial calls using different Outdial ANIs and Address Books.
- While Logged into the Agent Desktop, look for the Address book.
- You will see two contacts that are preloaded for you. You can directly make a call to any of those numbers.
Not choosing an option on the dropdown selects the Default Outdial ANI (Calling Number Mask) of the tenant. This is configured on Control Hub, under the Desktop Settings. i.e
admin.webex.com > Contact Center > Desktop Settings > Outdial ANI
Note: These are live, real numbers published on cisco.com!
- Alternatively, you can select a customized Calling Number mask by selecting the Outdial ANI dropdown. This Outdial ANI dropdown can be configured on the
Outdial ANIsettings in Control Hub.
You will notice that upon clicking the dial button, the Agent is presented with a floating pop-over that displays call varibales and is then connected to the call, and then the remote party is connected - following which the call legs are bridged._

Note: Outdial also supports pre-dial activities that can be configured on the WebexCC Flow Designer. The Flow Designer has been configured for you with the Custom Caller Associated Data Variables that are visibile upon Outdial Screenpops for Outdial can also be configured in a similar manner, via Flow Designer.
Verify the Outdial Configuration
- On Control Hub, Navigate to DESKTOP EXPERIENCE > Outdial ANI
- In the Search bar type your attendee number to find your Outdial ANI
NNN_OutdialANI - Click on it, and look at all the settings:
- In the Search bar type your attendee number to find your Outdial ANI
- In Control Hub, Navigate to DESKTOP EXPERIENCE > Address Books
- Click on
WebexOneAddressBook - Look at settings:
Please do change these settings as they are global and will affect all users on Tenant
- Click on
- In Control Hub, Navigate to DESKTOP EXPERIENCE > Desktop Profiles
- Search for your Desktop Profile
- Select
Dial Plans - Make sure that Outdial is enabled and your Outdial ANI
NNN_OutdialANIis selected - This is where you also assign the Address Book
- In Control Hub, Navigate to TENANT SETTINGS > Voice
- See the number of the Default Outdial ANI
This is a required setting at tenant level, so PLEASE DON’T EDIT IT
1.5: Exploring Profile Settings
In this section, we will explore what are the available options and settings under the Profile Settings.
- First, we will see how to change from one team to another one
-
We are applying a different Layout.json per Team, to showcase how two teams might look differently.
-
To see where that is applied
- Navigate to the USER MANAGEMENT > Teams
- Search your Team 2 and click on
Edit - At quick glance you can see that your Team1 is using the
Gloabl Layoutand Team2 is using theWebexOne_DesktopLayout - You can click each team to explore further
- You will see a new notification appears in the Notification Center
- Mark the notification as
Read.
- Mark the notification as
- You can change the Notification settings to disable the incoming notifications or the sound.
1.6 Custom Widget Landscape
The next section covers the experience you just saw with switching to the new team : Team2
Team2 has a dedicated desktop layout that shows you the power of custom widgets and extensibility of the Desktop
Header Widgets and Advanced Header order
-
You will notice that the Agent desktop now has a custom widget in the Header area that is displaying the shift timer.
-
You will also notice that the order of the widgets has been changed, with the state timer now in the center.
-
This is the “Advanced Header” feature and allows you to embed widgets in the header area along with the help of the
advancedHeader` component in the Desktop Layout.
Exploring Navigation Area Widgets
The left pane of the Agent Desktop now has a large number of custom widgets, showing you the power of extensibility in the Agent Desktop.
Analyzer Report Custom Widget
- Custom Analyzer Reports can be embedded in the Contact Center Desktop directly by pointing to the permalink inside the layout.
- This loads up an iFrame version of the widget on the desktop.
- For more information on this widget, speak to your lab proctor.
Smartsheet Custom Widget
- External Sites can be embedded into the Agent Desktop for Agent and Supervisor Workflows.
- In this example, a shareable and embeddable link from Smarsheet.com is embedded into the Desktop workflow.
State Change Custom Widget
- Webcomponent widgets like the Example Widget allows developers to pass data from the Desktop into the widget.
- Here, in this example you can see that Agent Desktop data is passed into another widget that is hosted externally.
- The widget can be configured to obtain access to the Agent’s Access Token to perform workflow automations.
- Expanding the Drawer, this custom widget also allows you to change the Agent State.
- Once the State is changed, you can see the Team and other information show up.
- This shows you the power of the extensible Webex Contact Center Desktop JS SDK (JavaScript Software Development Kit) and event driven architectures of custom widgets.
- For more information on this widget, speak to your lab proctor.
- Part of the Desktop SDK is a method that can be applied to pause recording if an agent was to enter for example, a customers Credit card information, example below.
- FYI, you must be on an
activecall.
Custom Address Book Widget
- Another sample widget in the form of a custom Address book widget shows you the power of creating Attendant Console like widgets in the Agent Desktop.
- Clicking the Call button actually makes a call externally, showcasing the power of the “Click to Call” functionality built into this custom widget.
- For more information on this widget, speak to your lab proctor.
Custom Call Control Widget
- Another example widget shows you how you can perform various actions programmatically using the Webex Contact Center Desktop JavaScript Software Development Kit (JS SDK) that has been used to extend functionality beyond what is possible out of box.
- A simple example task would be: Make a call, and then either Hold or Unhold the call, or experiment with Pause and Resume of the Recording while entering credit card information.
- For more information on this widget, speak to your lab proctor.
Send SMS Widget
- Another example widget shows you how the Agent Desktop can be configured to send outbound SMSes in call by configuring Webex Connect flows.
- FYI, To use these
call controlsyou must be on anactivecall. - This custom widget allows you to enter your cell number, and any text - to send yourself a message.
- In the background, the Widget is configured to use Webex Connect webhooks to send a custom payload and trigger a custom workflow.
- For more information on this widget, speak to your lab proctor.
Verify Desktop Administration
The following section and describes Desktop Administration that brought together all the features you experienced on the Agent Desktop.
This is more of a walkthrough, to understand how these toggles are configured
Here is a schematic showing how the Agent Desktop configuraton aligns to all the entities on Webex Control Hub.
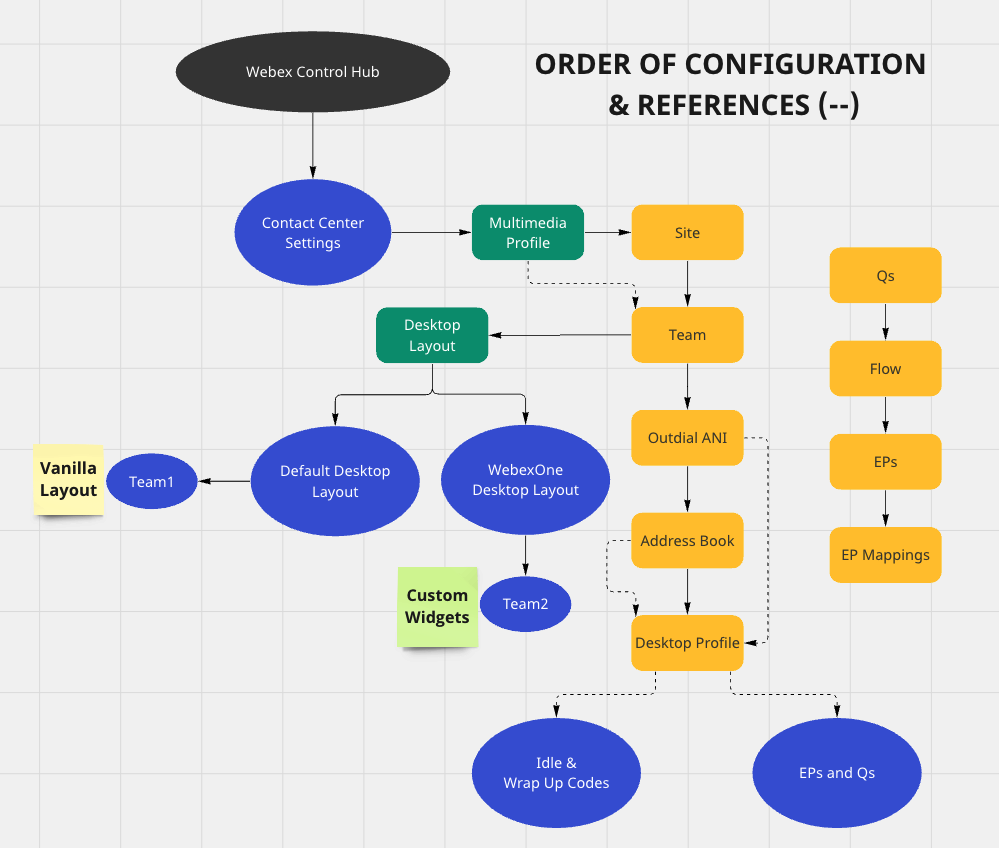
As you can see, the order of operations is as follows:
- Users need to be configured on Webex Control Hub: admin.webex.com > Users
- Licenses need to be assigned to Users to make them either an Agent or Supervisor into Webex Contact Center.
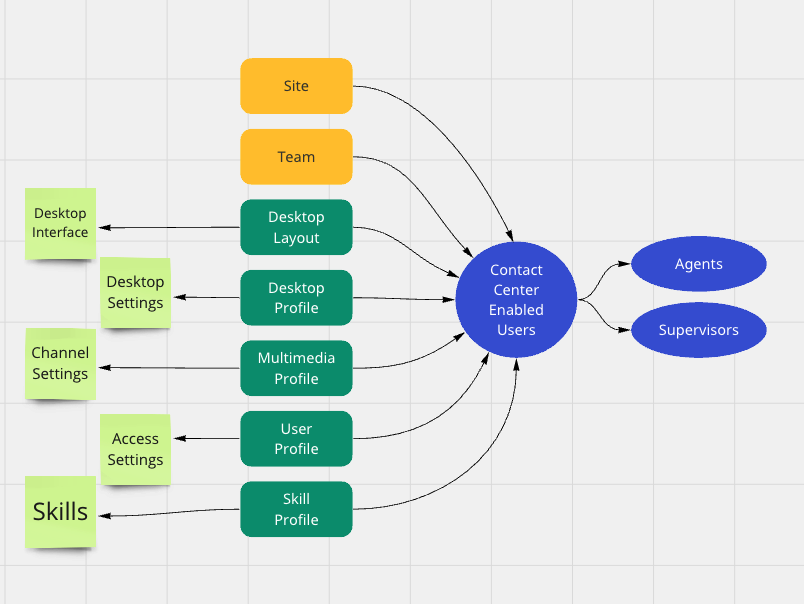
- Webex Contact Center Configuration is required after Webex Control Hub Users are synced over.
- This is the
Contact Center Enabled > User Profile > Site > Team > Multimedia Profile > Desktop Profile > Skill Profile > Default DN configuration. - Go To admin.webex.com > Contact Center Users to verify this configuration for the Agents and the Supervisors.
1.7: Administration Entities
The following Administration entities have been configured for you.
To verify, navigate to Control Hub > Contact Center > TENANT SETTINGS

| Entity | Name |
|---|---|
| Agent 1 | |
| Supervisor 1 | |
| Desktop Profile | |
| Entry Point | |
| Queue | |
| Team 1 | |
| Team 2 | |
| Outdial ANI | |
| Outdial ANI Entry 1 | |
| Address Book | |
| Address Book Entry 1 | |
| Multimedia Profile |
Administration Walkthrough
NOTE: All of the above the tenant entities follow the naming convention mentioned specified in the table above. Your attendeeID is provided in the email in the “Attendee ID” line. All of this configuration has been done for you.
Teams
- You were able to change from one team to another using the Profile Settings.
- You can verify this by going to
admin.webex.com > Contact Center > TeamsandContact Center > Contact Center Users > Check the Team Assignmenton the user. - This allows you to verify the the
User > Teamassociation
Multimedia Profiles
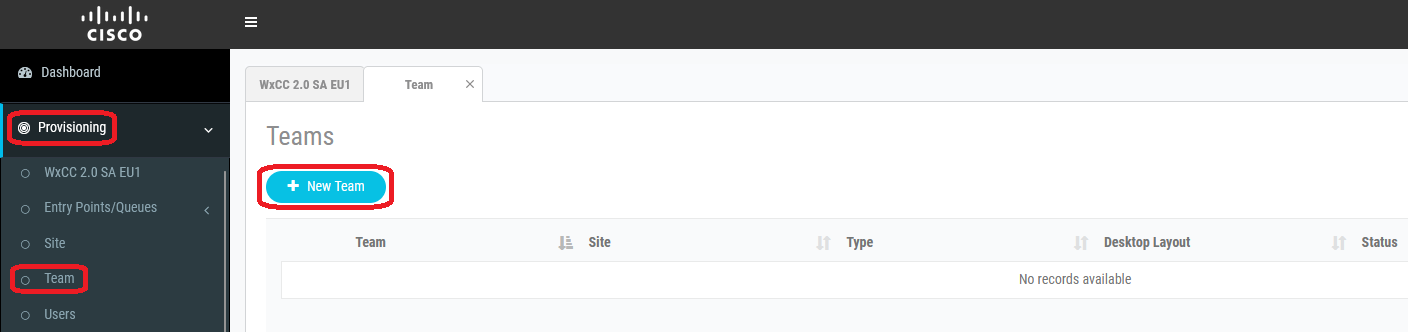
- Navigate to Control Hub > Provisioning > Teams - Click on the Teams: Team1 and _Team2
Edit- Check _your User settings and make sure that the Multimedia Profile is assigned. - Note: User settings have preference over Team setting, so the Multimedia Profile at User level will be applied.
Desktop Profiles
- Desktop Profiles is what brings together all the different components of the Desktop Behavior.
Part 2: Supervisor Experience
Objective
This lab is designed to introduce the audience to the Extensible Supervisor Desktop (ESD), its configuration and capabilities.
At the end of the lab, you should have a good understanding of the Supervisor role on Webex Contact Center, the Supervisor Desktop and common Supervisor workflows available.
You are provided two users on Control Hub to simulate the lab activities
| User Role | User email | User Extension |
|---|---|---|
| Agent | wxcclabs+agent_ID |
WebRTC (Browser) |
| Supervisor | wxcclabs+supvr_ID |
Quick Links
Control Hub: https://admin.webex.com
Supervisor Desktop: https://desktop.wxcc-us1.cisco.com Webex App (Download): ****
2.1: Supervisor Desktop Modes
The following section explains the types of login modes into the Supervisor Desktop
The Supervisor Role is assigned as a part of the Control Hub License. When you assign a Control Hub Supervisor License, you are automatically assigned the Default Supervisor User Profile.
We will review this on Control Hub Settings.
Control Hub > Contact Center Users > Supervisor User > User Profile: Supervisor Profile
- Look up your Supervisor User bu going to admin.webex.com > Contact Center > User Management (Category) > Contact Center Users
- Ensure that the Supervisor user wxcclabs+supvr_ID
Your_Attendee_ID @gmail.com has theSupervisor Profilein theUser Profilefield

Supervisor Only Mode:
- You can choose not to be an Agent but still login to the Supervisor Desktop. This is called the Supervisor Only Role.
- This is enabled by setting up a User with the Supervisor License and a Primary Team.
- Contact Center need not be enabled for the User.
- In this role, you will still need a Primary Team assigment which will be used to display the statistics.
- The Supervisor Only Role is used for Team Statistics and Reporting.
Supervisor and Agent Mode
- You can to take calls from the Queue as a supervisor. This is called the Supervisor and Agent Role
- This is enabled by setting up a User with the Supervisor License, a Primary Team AND marking the user Contact Center enabled.
Pre-requisites:
- A supervisor user configured as described below.
- A agent logged in and in conversation with a customer so you can monitor the call.
- Webex App Installed - Please install and download the Webex App from: https://www.webex.com/downloads.html
We will use the Webex App as the Supervisor endpoint Device.
2.2: Supervisor Login
-
Sign in to the Supervisor Desktop: https://desktop.wxcc-us1.cisco.com with your supervisor credentials.
-
In the next window, set your role as Supervisor and your own extension. Please note that you can set your role either as supervisor or agent and supervisor. We will select this second option at the end of this lab.
This mode will help you perform midcall monitoring and reporting
- When you sign in to the Supervisor Desktop, the appearance depends on how the Webex Contact Center administrator has configured the desktop layout. The Supervisor Desktop display size must be greater than 500 x 500 pixels (width x height). You must set your web browser zoom to 100% for the best experience with the Supervisor Desktop. With this lab layout you get :
- Home Page: Displays a user friendly interface that provides a consolidated view of key contact center metrics and filters. This is the default landing page in the Supervisor Desktop. The administrator can customize the Home Page in the layout JSON file.
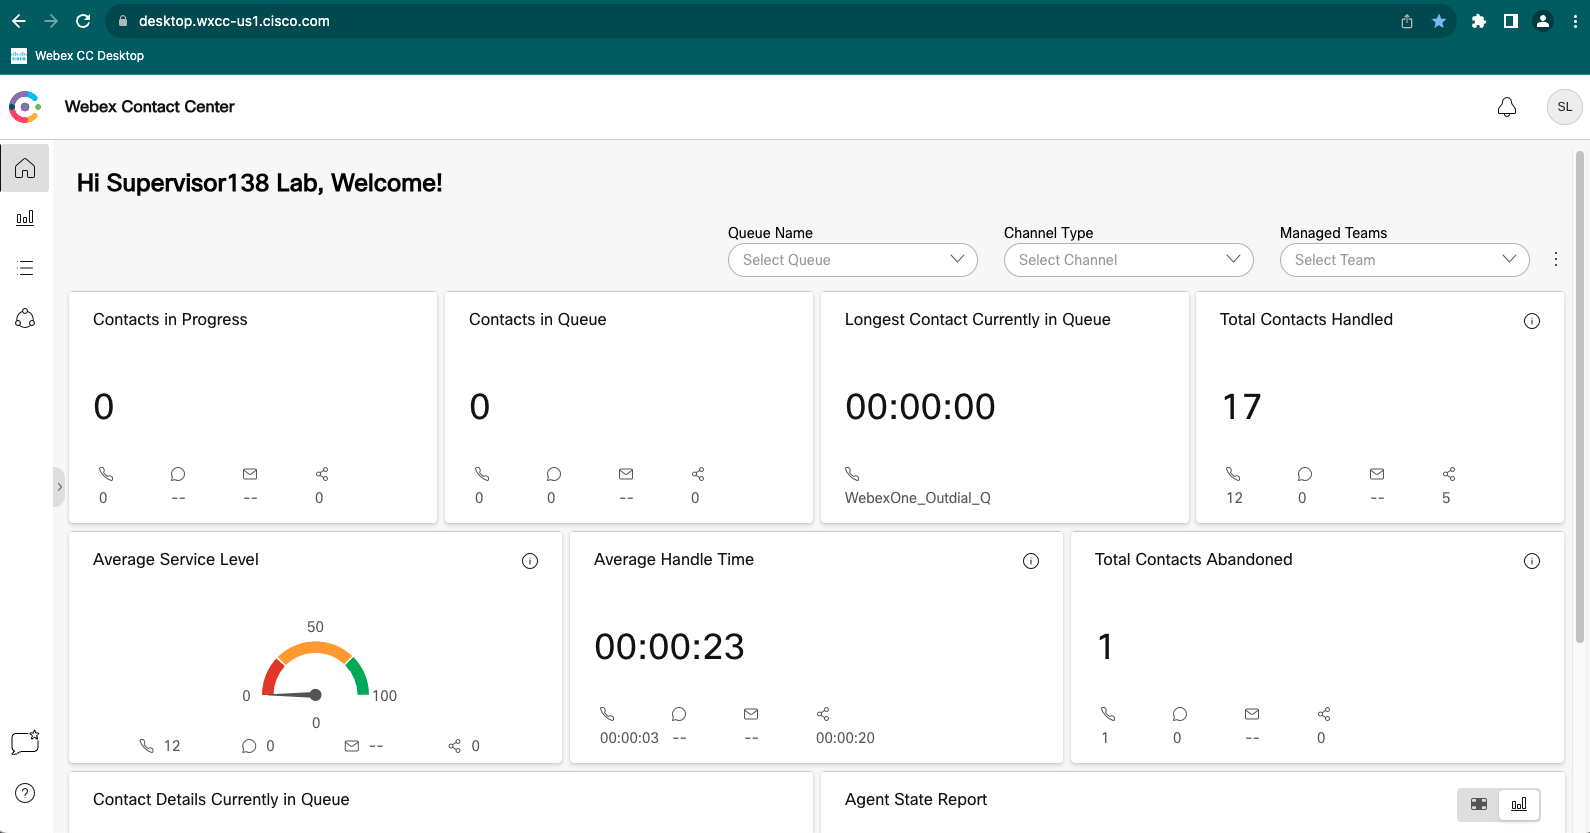
- Task: Displays all the tasks when you sign in to the Desktop in dual role (supervisor and agent) or as a supervisor, interactions such as voice, chat, email, and social messaging conversations, along with monitoring. The icon displays a badge indicating the number of requests that you have not accepted across various channels.
- Team Performance: Displays real-time information about an agent and a consolidated view of an agent’s performance as part of the team. You can also monitor and send 1:1 messages to an agent.
Note: Supervisor Desktop supports localization in 30 languages. The following are the supported languages: Bulgarian, Catalan, Chinese (China), Chinese (Taiwan), Croatian, Czech, Danish, Dutch, English (UK), English (US),Finnish,French, German, Hungarian, Italian,Japanese, Korean, Norwegian,Polish,Portuguese (Brazil), Portuguese (Portugal), Romanian, Russian, Serbian, Slovak, Slovenian, Spanish, Swedish, Turkish, and Ukrainian.
The Supervisor Desktop language is based on the language preference settings on your browser.
For example, let us consider that you have selected the preferred language as French on the Google Chrome browser.
When you launch the Supervisor Desktop in the Google Chrome browser, the Supervisor Desktop UI appears in Français (French).
-
Click on the third menu option, you now see the Team Performance Details page where your agents activities are displayed : status, call duration, team, … In the last column, you are presented two options : chat or monitor. The monitoring option is obvisously only enabled when an agent is in conversation with a customer otherwise the icon will be greyed.
-
The columns displayed are the following
| Column | Description |
|---|---|
| Agent Name | Displays name and avatar (Webex image) of the agent. |
| Agent State | The work status while using the Supervisor Desktop. The agent availability state includes Available, Idle codes, or RONA. |
| Agent State Duration | The time that the agent has been in the current state. The state timer format is hh:mm:ss (for example, 01:10:25). |
| Phone Number | Dial number or extension of the agent signed in. |
| Site | Name of the site with which the agent is associated. |
| Team | Name of the team with which the agent is associated. |
| Channels | The mode of communication through which an agent can communicate.For example, voice call. |
| Contact Queue | Name of the queue from where the agent receives the incoming call. |
| Contact Status | The status of the agent in an active call. Example: Connected, Consulting, Conference, or Wrap up |
| Time in Contact Status | The time spent by an agent in an active call. For example, the time an agent is in conference call. |
| Total Contact Duration | Total duration of the contact from when it was first connected (including any other state like consult or conference in the same contact). The time elapsed since the agent accepted the request. The connected timer format is hh:mm:ss (for example, 01:10:25). |
| Sign In Time | The time an agent has signed in to the Supervisor Desktop. The date and time format is dynamic and displays according to location. |
| Action | You can perform the following actions:• Review and Monitor - Based on the privilege provided by Administrator as part of user profile, you can review and monitor an ongoing agent call silently. • Send1:1 message to Agent – Based on the privilege provided by Administrator as part of user profile, you can send 1:1 message to an agent. |
- you can customize this view to show / hide columns or group information at your convenience.
2.3: Chat with your agents
Collaboration between agents and supervisors can help your Contact Center to be more effective and efficient for your customers and this is why we have enabled Webex messaging features in both Agent and Supervisor desktops.
- Click on the Send Message button
- Fill the chat window with a message to send to your agent
- On the agent side, observe the message notification received
- If, as an agent, you want to answer to the supervisor, your will need to click on the Webex logo to open the Webex app embedded in the Agent Desktop. You can then reply to the supervisor directly.
- On the supervisor side, observe the message notification received
2.4: Monitor calls
- As a supervisor, the Team Performance Details page allows you to see all connected agents and decide to monitor calls by clicking on the Review and Monitor icon.
- The following popup will be displayed. Click on Start Monitoring. Please note a supervisor can monitor other call types such as callbacks, outdial calls, outbound preview campaign calls.
- In your Supervisor Desktop, an incoming popover window will be displayed and your softphone will ring as Webex Contact Center is now trying to reach you. You recognize the agent you want to monitor and other call variables are displayed. The Flow configuration defines variables to display on this popover (max 6). Accept the call on your supervisor softphone.
- As a supervisor, the call you are now monitoring is displayed in your desktop with agent and customer details of which the call variables so you are aware of the context of the call. You can view previous communications with a customer across all channels (voice, email, chat, and social) in the Contact History pane. The pane displays details for the last 24 hours.
- You can pause the monitoring and start is again if you will
2.5: Supervisor and Agent role
- When you sign in to the Supervisor Desktop, you can - depending or your team assignement - choose either the supervisor role or supervisor AND agent role.
- In the case, the supervisor experience is a bit different as your agent status appears in the header section of the Desktop.
- If, as a supervisor, you chose to monitor a call, your status is set to Engaged and you cannot take other calls as an agent.
Verify Supervisor Desktop Administration
The following section outlines where you can find the main configuration settings for Supervisors, and their Teams, Queues and other segmentation settings
2.6: Desktop Layout Regions for Supervisor
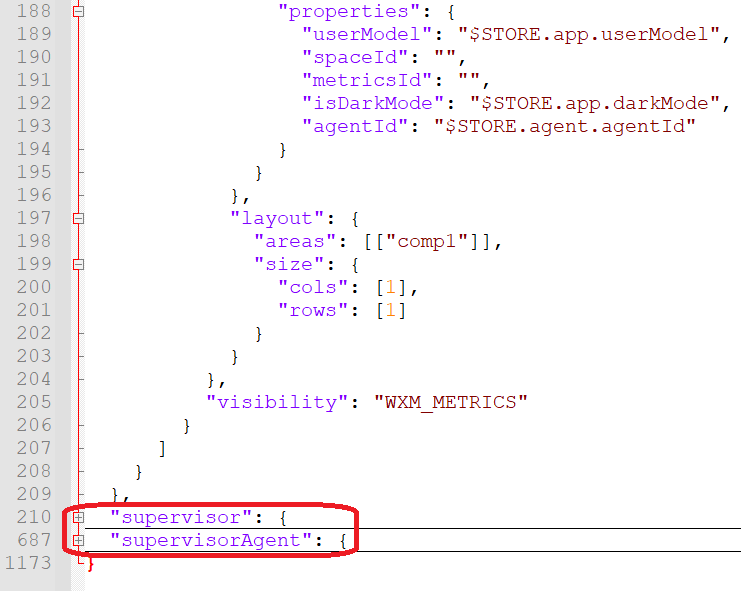
- The Supervisor Layout is enabled for a user via the Desktop Layout JSON file for supervisor from GitHub.
- Open the file in any JSON editor, check and make sure it contains supervisor and supervisorAgent sections.
- supervisor section is used when the user signs in to supervisor desktop with Supervisor role.
- supervisorAdmin section is used when the user signs in to supervisor desktop with Supervisor and Agent role.
- Lets see where this is uploaded.
- On Webex Control Hub (admin.webex.com) - Go to DESKTOP EXPERIENCE -> Desktop Layout
- To verify layout Assignments, go to Control Hub Contact Center > USER MANAGEMENT > Teams and search for your Team (Team1 or Team2). You will find the WebexOne_desktopLayout in there.
- To verify layout Assignments, go to Control Hub > Teams and search for your Team (Team1 or Team2). You will find the WebexOne_desktopLayout in there.
2.7: User Profile Settings for Supervisor
- Under USER MANAGEMENT -> User Profiles, find default Supervisor Profile, and let us take a look at it.
- We are able to view Supervisor settings including Access Rights.
Supervisor Licensing
In This section, we will review the Supervisor Licensing that creates the supervisor.
- Login to Control Hub using your administrator account.
- Go to Users,
- Search for your Supervisor
- Click on supervisor’s account, scroll dow to Licenses section and press Edit Licenses button.
- Click again Edit Licenses button, located bottom right
- Click Contact Center
- View license options (Do not change, please)
- Check and make sure supervisor license is displayed in Licenses section of user seetings on Control Hub.
- To Synchronize Users - Go to Contact Center -> TENANT SETTINGS > General and press Synchronize Users button in order to synchronize Webex users with Contact Center licenses in order to successfully assign Contact Center user privileges.
Send Product Feedback
Thank you for completing the Agent and Supervisor labs, we would love to hear direct product feedback from you!
Explore the product feedback option from right within the Contact Center Desktop.
Click the icon to launch the Experience Management Survey.
Please fill in the survey and help us improve the product!
Congratulations, you have officially completed the Agent and Supervisor Experience labs!

Custom Desktop
Bonus: Advanced Desktop Customizations
The next section covers advanced customizations elements on the Agent Desktop and showcases the HOW in terms of customizing the desktop. Refer to the sections to understand how the desktop layout was configured.
To get a copy of the Desktop Layout used in Webex One, go to:
You can open this file in any file editor.
Basic JSON elements
The following are the top-level and most important properties to know for JSON layout:
-
appTitle: To specify a title on the horizontal header of the Desktop. The default title isWebex Contact Center. -
logo: To specify a URL for the company logo. If you do not provide a URL, then the Webex Contact Center logo appears by default. taskPageIllustration: To specify a custom illustration for the task page based on organization preferences and brand alignment. When an agent signs in, the task page displays the configured illustration as a background. By default, the task page appears without illustration.-
stopNavigateOnAcceptTask: To determine whether to shift the focus to a newly accepted task, when the agent accepts the new task while working on a previous task. The default value isfalse. -
dragDropEnabled: To enable the drag-and-drop and resizing of the widgets on the custom pages, set the value totrue. The default value isfalse. -
notificationTimer: To set the duration (in seconds) after which the desktop notifications on the Desktop are automatically dismissed. The notification appears at the top-right corner of the Desktop. The default timeout value is 8 seconds. The valid range for timeout values is 1-10 seconds. For the timeout changes to take effect, the browser must be refreshed after the changes are made. -
maximumNotificationCount: To set the number of desktop notifications to be displayed at a time on the Desktop. The default value is 3. The range for desktop notifications is 1-10. The desktop notifications are stacked. If there are many notifications, they appear with a slight delay depending on thenotificationTimersettings. -
browserNotificationTimer: To set the duration (in seconds) after which the browser toaster notifications on the Desktop are automatically dismissed. Toaster is a native browser notification that appears only if the Desktop is not the active browser window or tab. The Desktop browser window or tab is inactive when wxmConfigured: (Optional) To configure Webex Experience Management, set the value totrue. The default value isfalse.-
desktopChatApp: To configure multiple Cisco-offered chat applications such as Webex App. -
webexConfigured: Webex App along with its messaging, calling, and meeting functionalities, can be configured within the Desktop. This configuration allows agents to collaborate with other agents, supervisors, and subject matter experts (SMEs) in their organization without navigating away from the Desktop. -
headerActions: To change the order of the icons on the horizontal header of the Desktop. The default order is as follows:["webex", "outdial", "notification"]. area: Theareaproperty is the core section of the Desktop Layout. You can define the layout as per the area.
Personalize the title and logo
In this video, you will learn the desktop layout customization process. After watching this, you will be able to customize the Agent Desktop with a custom logo, custom title. You will also learn how to enable/disbale standard widgets:
-
Login to https://portal.wxcc-us1.cisco.com with admin credentials.
-
Navigate to Provisioning –> Desktop Layout.
-
Click on New Layout button.
-
Click on Download button to download the Default Desktop Layout.json file.
-
Open the Default Desktop Layout.json file with any text editor (e.g. Notepad, Sublime text).
-
Modify the appTitle key value with your company name in order to change Agent Desktop title.
-
Modify the logo key value with your company logo URL or use this https://raw.githubusercontent.com/wxcctechsummit/holcct2100/main/labslive/CiscoLiveLogo.jpg.
-
Modify the wxmConfigured and webexConfigured key values to true to enable the standard (out of box) widgets.
-
Save As JSON file with a distinguishable name.
-
Login as admin to Desktop Layout module in the Webex Contact Center Management Portal.
-
Click on New Layout.
-
Provide the following name:
attendeeID _desktopLayout -
Select
attendeeID _team2 as Team. -
Click Upload button to upload the modified JSON file.
-
Click Save button to apply the layout.
-
Login to the Agent Desktop.
-
Open the User Profile and click on the arrow
>under Team. -
Change the team of the agent to
attendeeID _team2 -
Click on Save Team Selection.
-
Confirm the changes by clicking on Change Team.
-
Wait for few seconds to see the results.
-
Now you should be able to see the new logo, new title and will be able to access the out of box widgets i.e Webex & Custom Experience Analytics.
Reorder components of Horizontal Header
In this section, you will learn how to reorder components of Horizontal Header.
-
Take the same desktop layout file that you used in the last section.
-
Open the desktop layout file with any text editor (e.g. Notepad, Sublime text).
-
Make sure the layout version is 0.0.7 or higher.
-
Under advancedHeader, change the order of components.
-
Save As JSON file and upload it on Webex Contact Center Management Portal against your team.
-
Now login to the Agent Desktop or refresh the browser if you are already logged in.
-
You should be able to see the order of components in the Horizontal header as per your configuration.
Create iFrame Widget & change default landing page
The iFrame widget is a special widget that can be used to embed a different application. The iFrame widget creates an HTML iFrame and renders your application.
In this section, you will learn how to create a iFrame widget and how to change the default landing page in the Agent Desktop. For this example, we are using Webex Contact Center Analyzer Report as a iFrame widget.
-
Take the default desktop layout file.
-
Open the desktop layout file with any text editor (e.g. Notepad, Sublime text).
-
Create another section under navigation similar to that of existing Customer Experience Analytics.
Check out this sample Analyzer_iFrame_Widget.json
-
In the new section, add the label key value with your choice.
-
Add the icon key value with your choice.
-
Add a new key isDefaultLandingPage and its value should be set as true.
-
src key value should be same as URL of your analyzer report.
-
Save As JSON file and upload it on Webex Contact Center Management Portal against your team.
-
Now login to the Agent Desktop or refresh the browser if you are already logged in.
-
You should be able to see the new widget you added when you login to the agent desktop as it is set as the default landing page.
Populate Custom Widget with desktop parameters
A Custom Widget is a component with some specific encapsulated functionality, exported as a custom HTML element that is placed within the desktop.
Watch the demo below to understand the ability to pass default Desktop parameters into your Custom widget. This will help developers understand how data is handled in the Desktop STORE and injected into widgets inside of Webex Contact Center desktop.
Below, you will find a breakdown of all possible data and type definitions that is available through the STORE key:
- STORE.agent: Desktop profile info and settings.
- STORE.agentContact: Agent tasks and interactions
- STORE.app: Company logo, title and dark mode
- STORE.auth: Authentication token used for Single Sign On
- STORE.generalNotifications: Application notifications
- STORE.dynamic: Connector (smaller) or Desktop (larger) view area
Check the Developer guide for more details about Custom Widgets.
If you want to explore and play around with the possible types of custom widgets you can create, check the below Git repository with some samples: https://github.com/CiscoDevNet/webex-contact-center-widget-starter/tree/master/Examples
JavaScript SDK and Modules
Desktop JavaScript SDK is an npm package that allows you to request up-to-date information from the Desktop. Using the SDK, you can request information such as agent details, assigned tasks, details of specific tasks, current browser locale, and the authentication token for Single Sign-On (SSO) integration.
-
To start using the JavaScript SDK, run the following command in your project folder:
npm install @wxcc-desktop/sdk --saveoryarn add @wxcc-desktop/sdk. -
Once you have installed the package in your project, include it in the appropriate component file following the ES6 import pattern:
import {Desktop} from "@wxcc-desktop/sdk";. -
Desktopis the root module of the JavaScript SDK. The root module provides a reference to the following sub-modules:- Configuration Module
- Localization Module
- Actions Module
- Logger Module
- Agent State Information Module
- Agent Contact Module
- Dialer Module
- Screen Pop Module
- Shortcut Key Module
- Call Monitoring Module
-
Check the Developer Guide for more details about each module.
Congratulations, you have completed the Advanced Desktop Customizations Section!
